How To: The Beginner's Guide to Using Signal Private Messenger
Signal is one of the best end-to-end encrypted messengers on the market. It offers robust security, keeps minimal information about its users, and is free to use. Switching to it as your main messenger can be a bit daunting, so to help, we created a guide to walk you through the process.As Signal continues to grow, many of its new features get lost on new users. Not only has Signal added new ways to keep your conversations private, but they've also added iMessage-like features to make it easier for people to make the switch and to enhance communications. However, as with all messaging services, to take full advantage of its features, you need the recipient to also use Signal.Our hope with this guide is that it helps you figure out how to set up Signal and get the most out of it. Additionally, we hope you share this article with friends and family, so when you ask them to switch, the process isn't as jarring. With any luck, all your conversations will be able to enjoy the security and privacy of Signal's end-to-end encryption.
Step 1: Download the Latest Version of SignalThe first thing you'll want to do is to make sure you are using the latest version of Signal Private Messenger. Signal is continuously updated, and new features continue to come to the platform. The easiest way to accomplish this is to head to your app store and either install Signal if you don't already have it, or update the app if the "Open" button is replaced by "Update" on the app listing.Install Signal Private Messenger: Android (free) | iOS (free)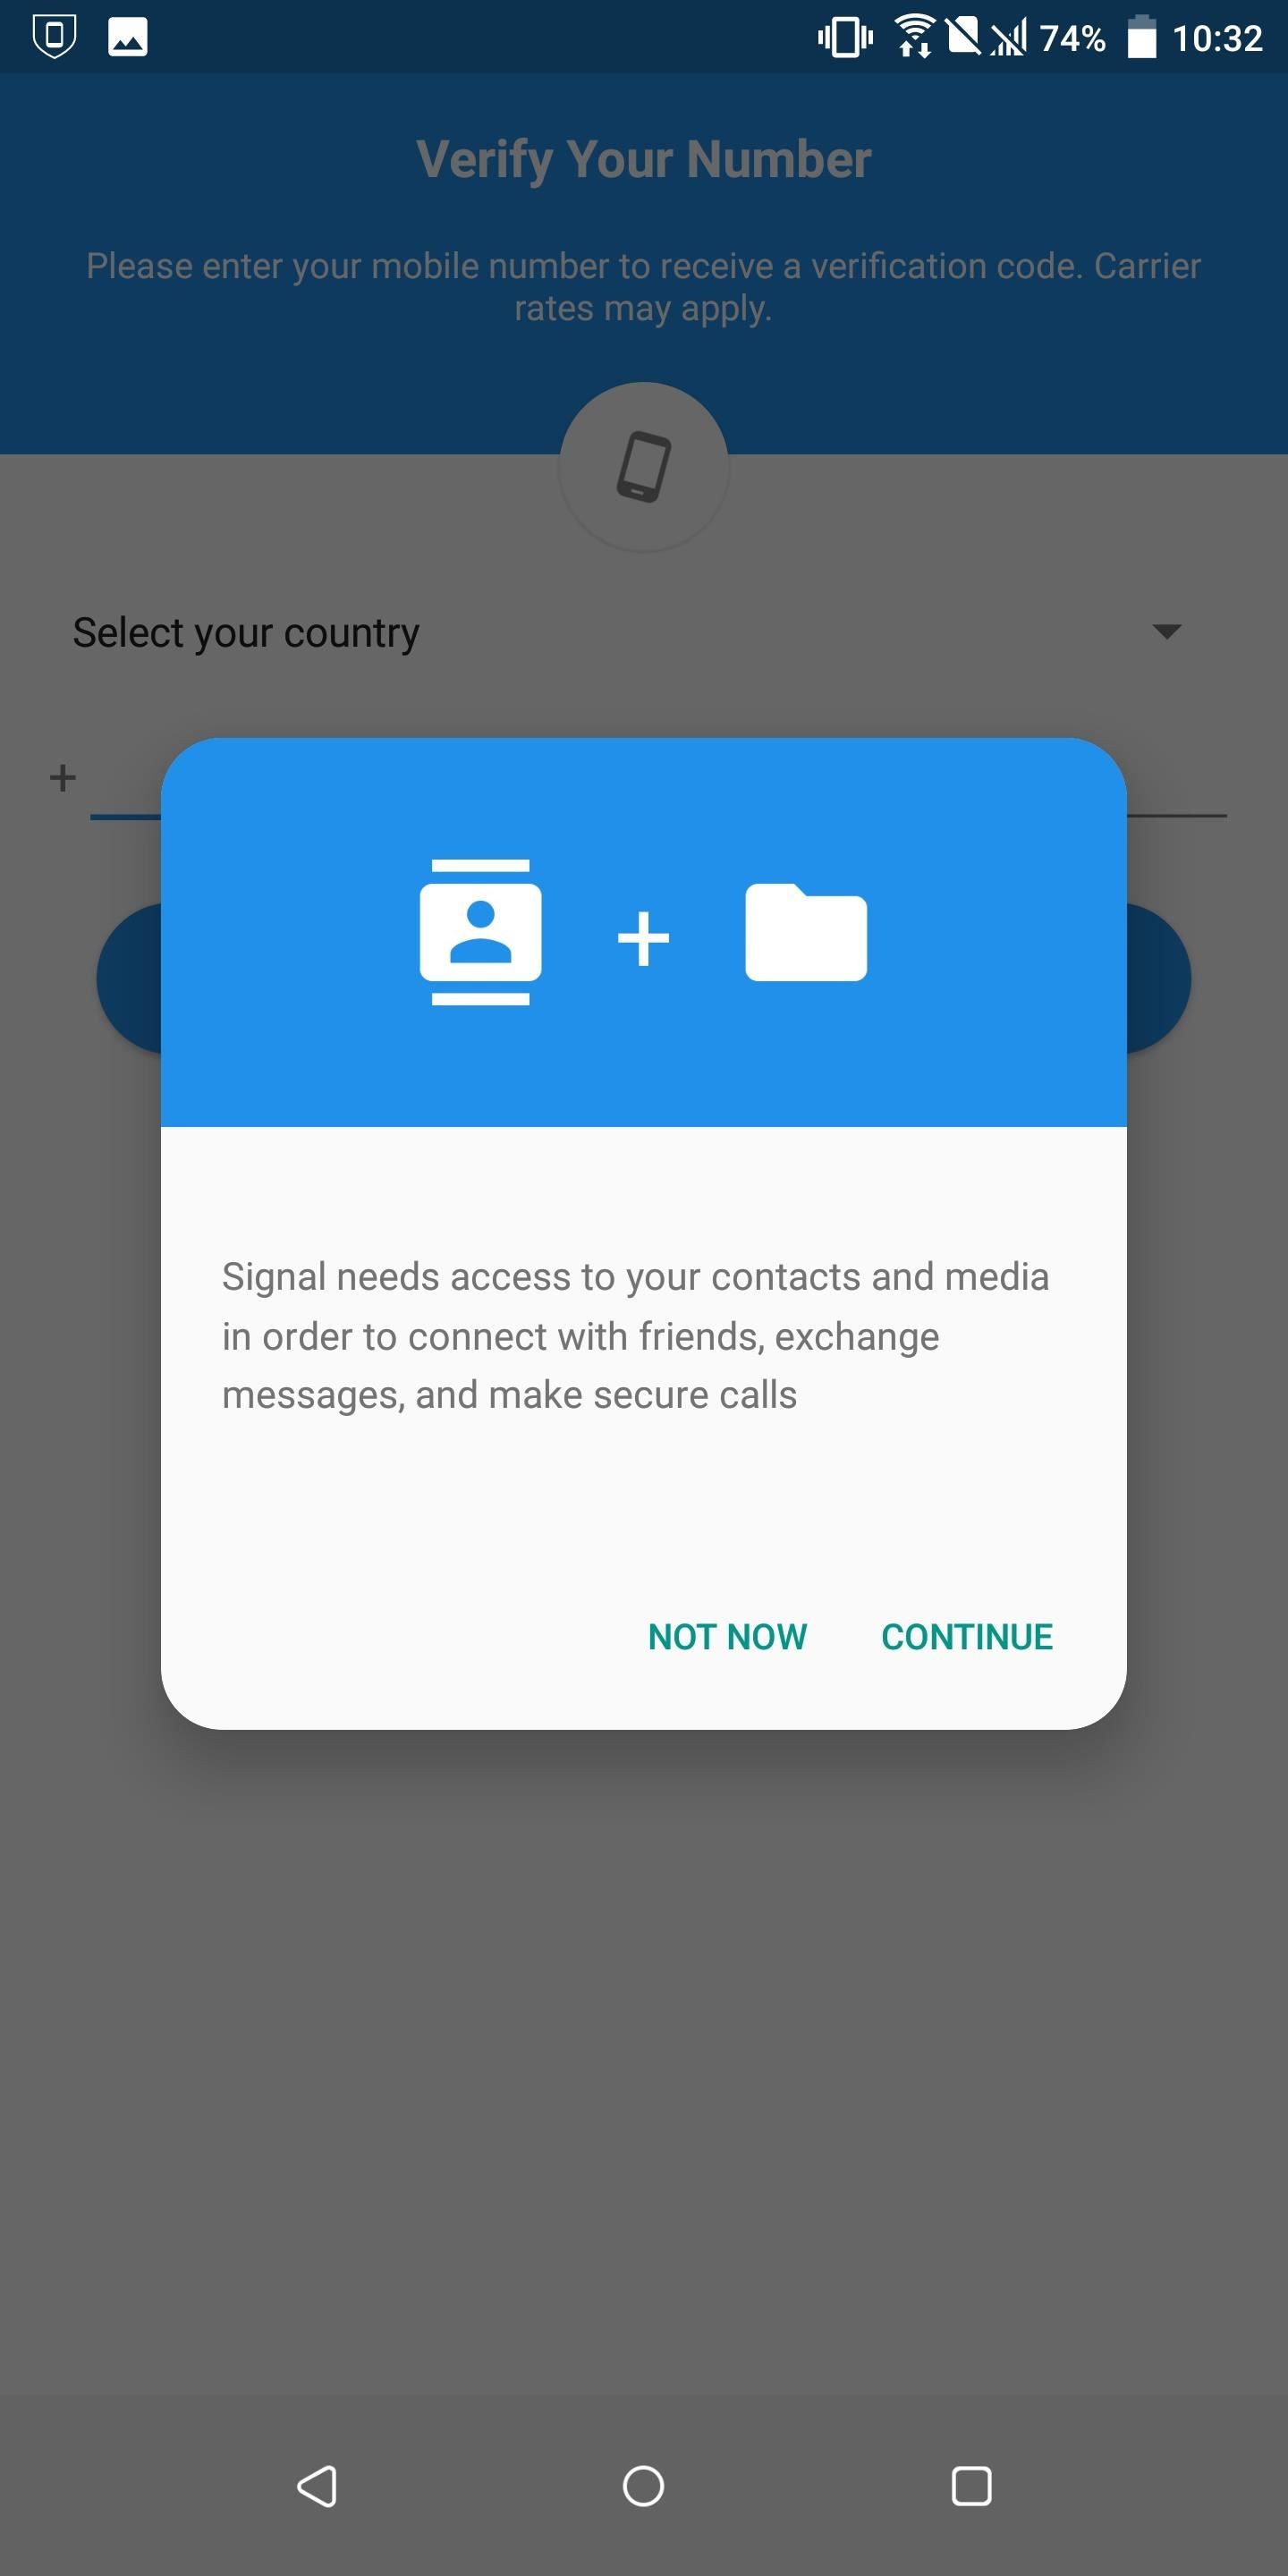
Step 2: Sign Up Using Your Phone NumberHow the app appears when you first open it is different depending on the operating system you are using. For Android, a popup will appear informing you that you need to provide Signal access to your contacts, storage, and phone calls for it to work. After selecting "Continue," a series of permission propmts will appear which you'll need to accept, and after doing so, you'll be taken to the signup screen.On iPhones, the signup screen is accessible right away, without the need to give the app-specific permissions first.On the screen, Signal will ask you for your telephone number. While you can use a burner number, we recommend using your actual phone number, as this is how your contacts will find you on Signal. Either way, input a valid telephone number and select "Register."Don't Miss: How to Use Google Voice as a Burner Number for Signal A verification code will be sent to this phone number as a text, and you'll need to input this code on the next page. For Android, once you input the correct code, it will automatically take you to a new page. However, for iOS, you will need to hit "Submit" after inputting the correct code.On Android, the next page will ask you to input a name and add a picture which will appear when you conduct a conversation with other Signal users. Fill out this information, then choose "Save" to finish the setup process. On iOS, a popup will appear asking if you wish for Signal to send you notifications. Choose "Allow," which will bring you the "Profile" page, where you can input a name and a picture. Choose "Save" to finish the setup process.
Step 3: Set Signal as Your Default SMS App (Android)When you arrive on the main page on Android, a banner will appear asking if you'd like to "Use as default SMS app." Select the banner and a popup will appear asking you to make Signal the default app for SMS messages (regular texts to your phone number). With this change, you can manage both Signal messages as well regular text messages all within one app. Choose "Yes" on the popup to approve this change.
Step 4: Invite Your Friends & Remove the Invite BannerOn iOS, Signal can't be used to manage SMS. Instead, the only communication possible is between other Signal users. Therefore, to make the most of the app, you will need to invite your friends.On Android, in the upper right corner, choose the three vertical dots, and then in the sub-menu, select "Invite friends." On the next page, select "Choose Contacts" and select from saved contacts who you want to switch to Signal. Once selected, choose "Send SMS to X Friends" (X representing the number of contacts you selected). Another way to invite friends is to start a conversation with them over traditional SMS (Android only). Appearing below their name is a blue banner asking you to "Invite to Signal" for conversations between contacts who aren't Signal users. Selecting this banner will create a text message to send, which will include a link to install the app on their phone. This banner can get pretty annoying after a while, especially for saved contacts you know won't make the switch. Fortunately, you can remove it. Select the three vertical dots in the upper-right corner of the main page and choose "Settings." Choose "Chats and media" and disable the toggle next to "Show invitation prompts." This toggle will remove the blue banner from non-Signal users. This feature is exclusive to Android, as the iOS version is unable to communicate with non-Signal users.
Step 5: Set Up Automatic Backups (Android)Signal doesn't use either iOS's iCloud or Android's Google Drive service because of privacy concerns. Therefore, when you switch phones, your existing chats won't automatically transfer over.On Android, there is a solution. By creating a locally stored encrypted backup, your messages remain safe and can be restored when you switch phones. This feature will also turn on automatic backup. While you can't control how often they occur or even where they are located, it does it frequently enough that if you forget to create a backup, using the automatic backup files should give you a recent enough copy of your messages. For a tutorial on how to accomplish this, check out the link below.Don't Miss: How to Back Up & Restore Your Signal Messages
Step 6: Improve Your SecurityWhile Signal on its own is a highly secure end-to-end encrypted messaging service, you can improve the security by taking advantage of some of its options. On Android, select the three vertical dots in the upper-right corner and choose "Settings." On iOS, select your picture or first letter of your user name. On the next page, choose "Privacy."Under the Privacy menu, you'll find a few options to improve your security. The first is "Screen lock," which requires you to authenticate yourself to access the app either using the fingerprint/face scanner or your lock screen code. Choose the toggle next to "Screen lock" to activate this feature.You can adjust the time before the app gets locked and requires authentication using "Screen lock inactivity timeout." For those looking to maximize security, the lowest time on Android is one minute. When set, after you leave the Signal app for one minute, it will be locked and require authentication to see your messages. iOS users can set this to instant so that it locks as soon as you leave the app.Another security feature is "Screen security." This feature blocks previewing the app in your recent apps list (multitasking screen). On Android, it also prevents you from taking any screenshots in Signal. It doesn't prevent those you communicate with from taking a screenshot, but it could protect you against a malware app which somehow finds a way to hack your device and take screenshots without you knowing.Because Android users can take advantage of third-party keyboards, Signal includes another privacy feature, "Incognito keyboard." This feature protects Gboard (or other keyboard apps that use the proper APIs) from learning how you text. Since keyboard apps must capture each word you input by nature, this protects your conversation from being read by a malicious app. Do note that this will disable voice typing. Signal not only lets you send messages, but lets you make voice and video calls as well, providing the same level of protection as text-based messages. However, voice calls can reveal your IP address to the caller on the other end. While we assume you trust people in your contacts, even a friend can take advantage of this information to perform an attack. However, when you enable the "Always relay calls" toggle in Signal's Privacy menu, all calls first go through Signal's servers, protecting your real IP address in the case of a leak.Finally, enable "Registration Lock" (known as Registration Lock PIN on Android). This feature adds an additional layer of protection for new devices registered to your phone number by requiring the use of a PIN code. When a device registers with your phone number, they can receive all Signal messages. This feature prevents this.
Step 7: Hide NotificationsFor those wanting true privacy, you'll need to hide your Signal notifications. Any incoming alert will appear on the lock screen, fully visible to anyone even without unlocking your phone. While this is convenient, it does open up us to a privacy concern. The safer method is to hide these messages so that they don't appear on the lock screen. There are two methods to accomplish this. We'll start with the easier one.
Hiding Notifications in Signal's SettingsSelect either the three verticals dots in upper-right corner (Android) and choose "Settings," or tap your picture or the first letter of your user name in the upper-left corner (iOS). Choose "Notifications" and select "Show."There are three options you can choose from: "Name and message," "Name only," and "No name or message." To protect the content of the message, select "Name only." Once selected, new messages will show the name of the person and inform you that you have a new message, but content will not be readable from anywhere outside the app.
Hiding Notifications in Your OS SettingsAlternatively, you can hide Signal's notifications through your phone's main settings. On iOS, select Settings from your home screen, choose "Notifications," then select "Signal." Here, you will find multiple options to configure notifications such as where it appears, if it makes a sound, and if it creates an app badge.At a minimum, we recommend opening "Show Previews" and either keeping "When Unlocked (Default)" or switching to "Never." The former will only reveal the contents of the message when you unlock the phone, while the latter will keep the content locked until you open the Signal app. The biggest advantage of "Never" is that you better protect yourself from shoulder surfing (individuals reading your screen behind you). On Android, the process is different depending on the OEM skin and the version of the Android you are running. However, we will explain for stock Android running Android 9.0 Pie, as this is the latest version and the base of all skins.Open Settings from your app drawer and choose "Apps & notifications." Choose "See all X apps" and select Signal from the list. Choose "Notifications" and select "Default" under the Messages grouping. Select "Advanced" and choose "On lock screen."A popup will appear with three options. Choose either "Hide sensitive content" or "Don't show notifications at all." The former hides the content of the message on the lock screen and will only reveal them after unlocking the Signal app. The latter will not show the notification at all, so the only way you'll know that you have a new message will be by opening Signal (or receiving an app badge if this is enabled in your launcher's settings).
Step 8: Improve Your MessagesSignal has recently added many features to bridge the gap between itself and iMessage or RCS messaging. These features include read receipts, typing indicators, and "Send Link Previews," which shows a preview of any website you link to in a chat. You will find each one of these options under the "Privacy" menu in Signal's settings."Read Receipts" lets you get a visual confirmation that the recipient read your message. If both you and the recipient have this feature enabled, whenever you send a message, a circle will appear with a check mark next to when it was sent. When delivered, two circles will appear. Once read, the circles will turn gray. "Typing Indicator" lets you see when the recipient is typing a message. A series of dots will appear to indicate they are currently typing a message, letting you know they are active. Finally, there is "Send Link Previews." When enabled, links from Imgur, Instagram, Reddit, and YouTube can be previewed within the Signal message giving you an idea of what the content of the link is.
Step 9: Learn How to Send Disappearing MessagesA staple of secure messaging apps is the ability to send disappearing messages. These are messages sent with an expiration date that you assign before sending. Once set, the message will be deleted upon reaching the determined time length.Don't Miss: How to Send Disappearing Messages in Signal When a disappearing message is sent, it converts all future messages in that conversation to disappearing messages. However, after receiving a disappearing message, a prompt will appear letting you change the time length. This doesn't change the initial messages — rather, future messages. You can also end these expiring messages altogether.
Step 10: Verify Your ContactsWith it being common for users to switch phones, it's possible for a hacker to exploit this. By learning either your phone number or the numbers of people you communicate with, they can register their device and continue the conversation. With safety numbers, Signal protects against this by allowing you to verify that the person you are talking with is, in fact, the person you believe it to be.By either scanning their QR code or comparing their safety number, you can verify a contact. Once verified, any changes made must manually be approved by the other party before a new message is sent. This way, your conversation stops, preventing a hacker from operating as you.Don't Miss: How to Verify Contacts on Signal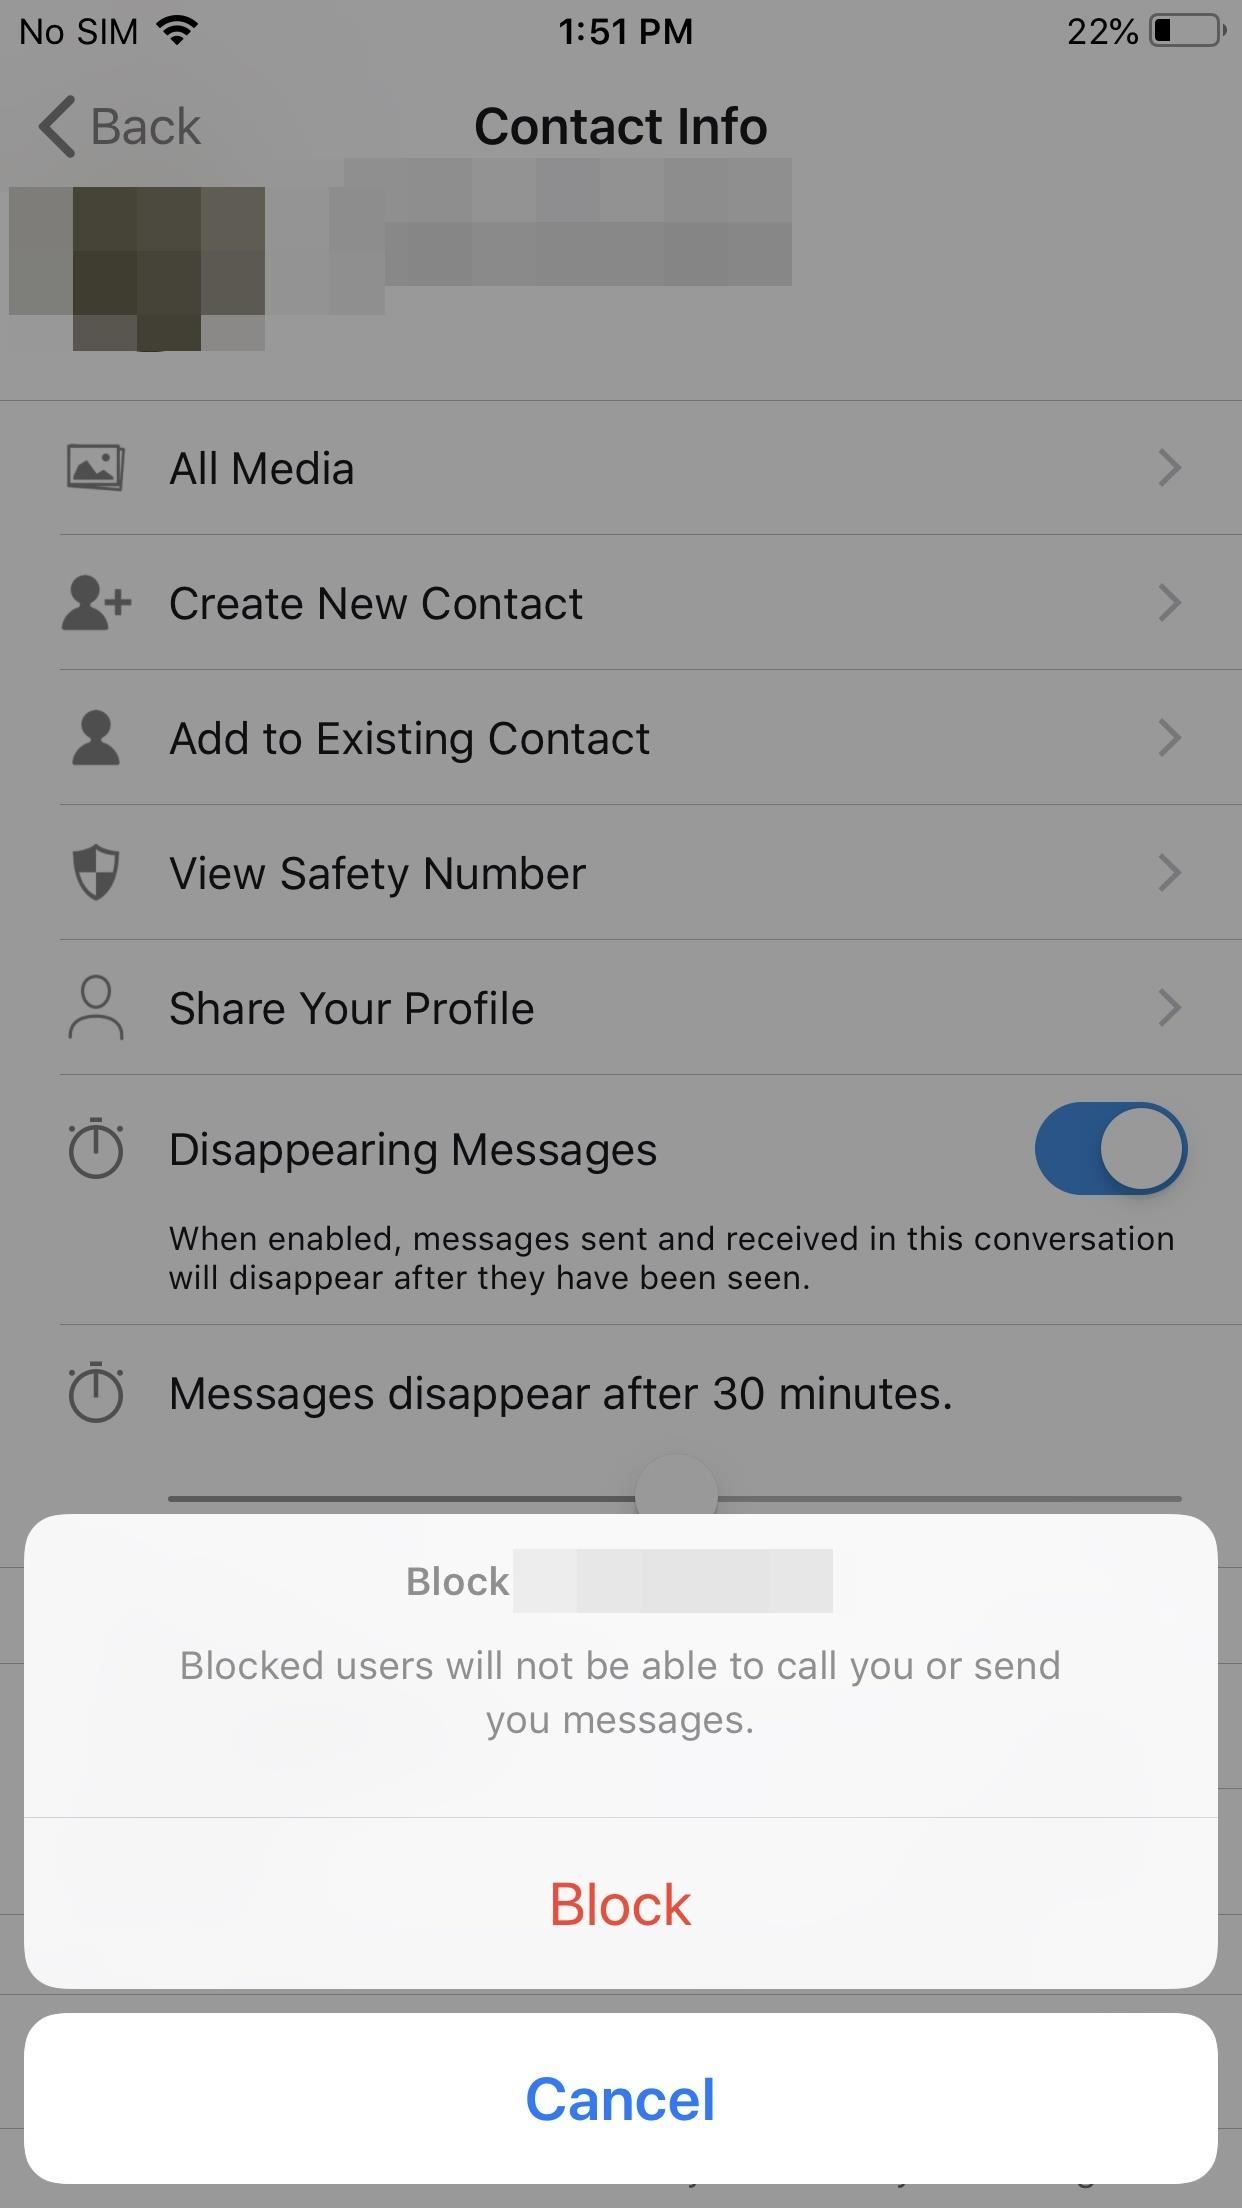
Step 11: Block Users as NeededUnfortunately, relationships sometimes end poorly and we decide it's best we no longer speak to that person. That doesn't mean the other person agrees, requiring us to take steps to prevent further communication. Blocking a user will prevent you from receiving any new messages from them (and you from sending any new messages to them).Don't Miss: How to Block Users on Signal Unblocking them doesn't let you receive the messages sent when they were blocked. Instead, it lets new messages come in and allows you to send messages to them again. And with that, you can enjoy Signal. There are a few other options to play with, but you have the basics down pat. Share this guide with your saved contacts to remove any reservations they might have in making a switch to this wonderful service. Remember, end-to-end encryption only occurs when talking to other Signal users, so in order to take full advantage of this app, you need your friends to use it as well.This article was produced during Gadget Hacks' special coverage on smartphone privacy and security. Check out the whole Privacy and Security series.Don't Miss: The Best Apps for Private, Encrypted Communications on Android & iPhoneFollow Gadget Hacks on Pinterest, Reddit, Twitter, YouTube, and Flipboard Sign up for Gadget Hacks' daily newsletter or weekly Android and iOS updates Follow WonderHowTo on Facebook, Twitter, Pinterest, and Flipboard
Cover image and screenshots by Jon Knight/Gadget Hacks
NetBus.Hack can tamper with your Internet settings or redirect your default home page to unwanted web sites. NetBus.Hack may even add new shortcuts to your PC desktop. Annoying popups keep appearing on your PC. NetBus.Hack may swamp your computer with pestering popup ads, even when you're not connected to the Internet, while secretly tracking
Netbus Hacking - Free Download Netbus Hacking Software
The main difference is that VolumeMixer 2 lets you change the volume levels of individual volume modes throughout iOS, such as Bluetooth headsets, headphones, ringer volume, media volume, and more, while this tweak lets you change the individual volume levels of your apps. Depending on your uses, you may pick VolumeMixer 2 over VolumePanel.
How to Make Your Volume Buttons Control Media Volume by
Install Android Apps on Amazon Kindle Fire HD. Amazon Fire is an excellent tablet with dual camera and powerful hardware. However, you may not find your favorite Apps on Amazon App Store. Here you have to depend on the Google Play Store to install your favorite apps on Amazon Fire Tablet.
30+ Best Apps For Samsung Galaxy Watch - Tizen Help
Getting a file from your Android smartphone or tablet to your PC might not seem easy when you first try, but there are a number of quick methods to do it. Whether you opt for the software or
Android file transfer: How to move data between your phone
Apple Pay Cash 101: How to View Your Transactions History
Group messages make for some hilarious conversations with your friends, and are also a great way to update multiple people without sending individual text messages. But as awesome as they can be, they can also be as equally annoying. We've all been there; you either get preoccupied with something or
How to Leave a Group Chat in Messages for iOS on iPhone and iPad
osxdaily.com/2014/09/23/leave-group-message-chat-ios/
How to Leave a Group Chat in Messages for iOS on iPhone and iPad Sep 23, 2014 - 42 Comments If you've ever been included in a group text messaging thread that you had no intention on being a part of, you know how annoying it can be to have your iPhone (or iPad) chime repeatedly as new messages come in to the conversation you aren't following.
How to Leave Group Chat on an iPhone | Your Business
Apple's iOS 11 is finally here, and while they showed off several of the new features it brings to your iPhone, iPad, and iPod touch back at WWDC 2017, they've only just touched the surface of what iOS 11 has to offer. There are a lot of cool new (and sometimes secret) features to explore, so we've collected them all here for you.
The 55 Coolest New iOS 9 Features You Didn't Know About
Here are the best ways to ensure your browsing stays off the books. Continue reading to learn how to browse the internet anonymously on an iPhone (or iPad). Next Up 4 Or use arrows to navigate
How to browse the Web anonymously - USA TODAY
The raise to wake and tap to wake features are enabled by default, but still make sure that those are on. A good habit to make to increase the speed of Face ID is to always have your thumb or finger hovering over the bottom of the screen before waking the iPhone X, so that way it's always ready to swipe.
The iPhone X's Face ID is only slower if you use it the wrong
Phones iOS 13: Every new feature iPhone you need to know about now. Learn about the new software Apple will deliver to your iPhone this fall.
Mindfulness App Aura for Sale on Android « Gadget Hacks
Several days ago, my DROID Incredible 2 just started automatically going into Speakerphone mode for every incoming and outgoing call and I can't get it to stop I have had this issue a few times in the past but a soft reset always fixed it, but for some reason that solution isn't working this time. I have tried these things:
How to Set Speakerphone Mode to Automatically - YouTube
There's the obvious gift of a great pair of headphones, but also a number of accessories which improve the quality of the audio so that your friend or family member gets the best possible sound when they jam out. Here are a few must-have gifts for anyone who loves to listen to music.
2019 Gift Guides « Smartphones :: Gadget Hacks
0 comments:
Post a Comment