How To: Update Your Nexus Without Losing Root (No Computer Needed)
For many people, the two main advantages of buying a Nexus device are prompt updates and the ability to root without much hassle. But in a cruel twist of fate, these two features are almost mutually exclusive, since OTA updates will refuse to run on rooted devices.In the past, this has always meant that updating your rooted Nexus required hooking the device up to a computer and running complicated fastboot commands. But now, thanks to a recent update to a popular root app, we can finally apply firmware updates entirely from within Android.
Note About Major Android Version UpdatesThis method should not be used to update across major Android version bumps—for instance, from 6.0 Marshmallow to 7.0 Nougat. It's perfectly fine for minor updates like monthly security patches and "x.0.1" releases, but when Android gets a new codename, you'll still have to take the time to flash the factory images in order to make sure you don't experience any bugs.If you're trying to update your Nexus to a new milestone release like Nougat, the best method is still either Nexus Root Toolkit or ADB. I've previously covered both of these methods in detail, so use the following guide for help on that front.Don't Miss: Update Your Rooted Nexus with Nexus Root Toolkit or ADB
RequirementsRooted Nexus device "Unknown sources" enabled
Step 1: Install the Latest FlashFire BetaThe app that allows you to update your rooted Nexus from within Android is called FlashFire, and it was created by legendary developer Chainfire. So to start, simply install FlashFire from the Google Play Store.Install FlashFire for free from the Google Play Store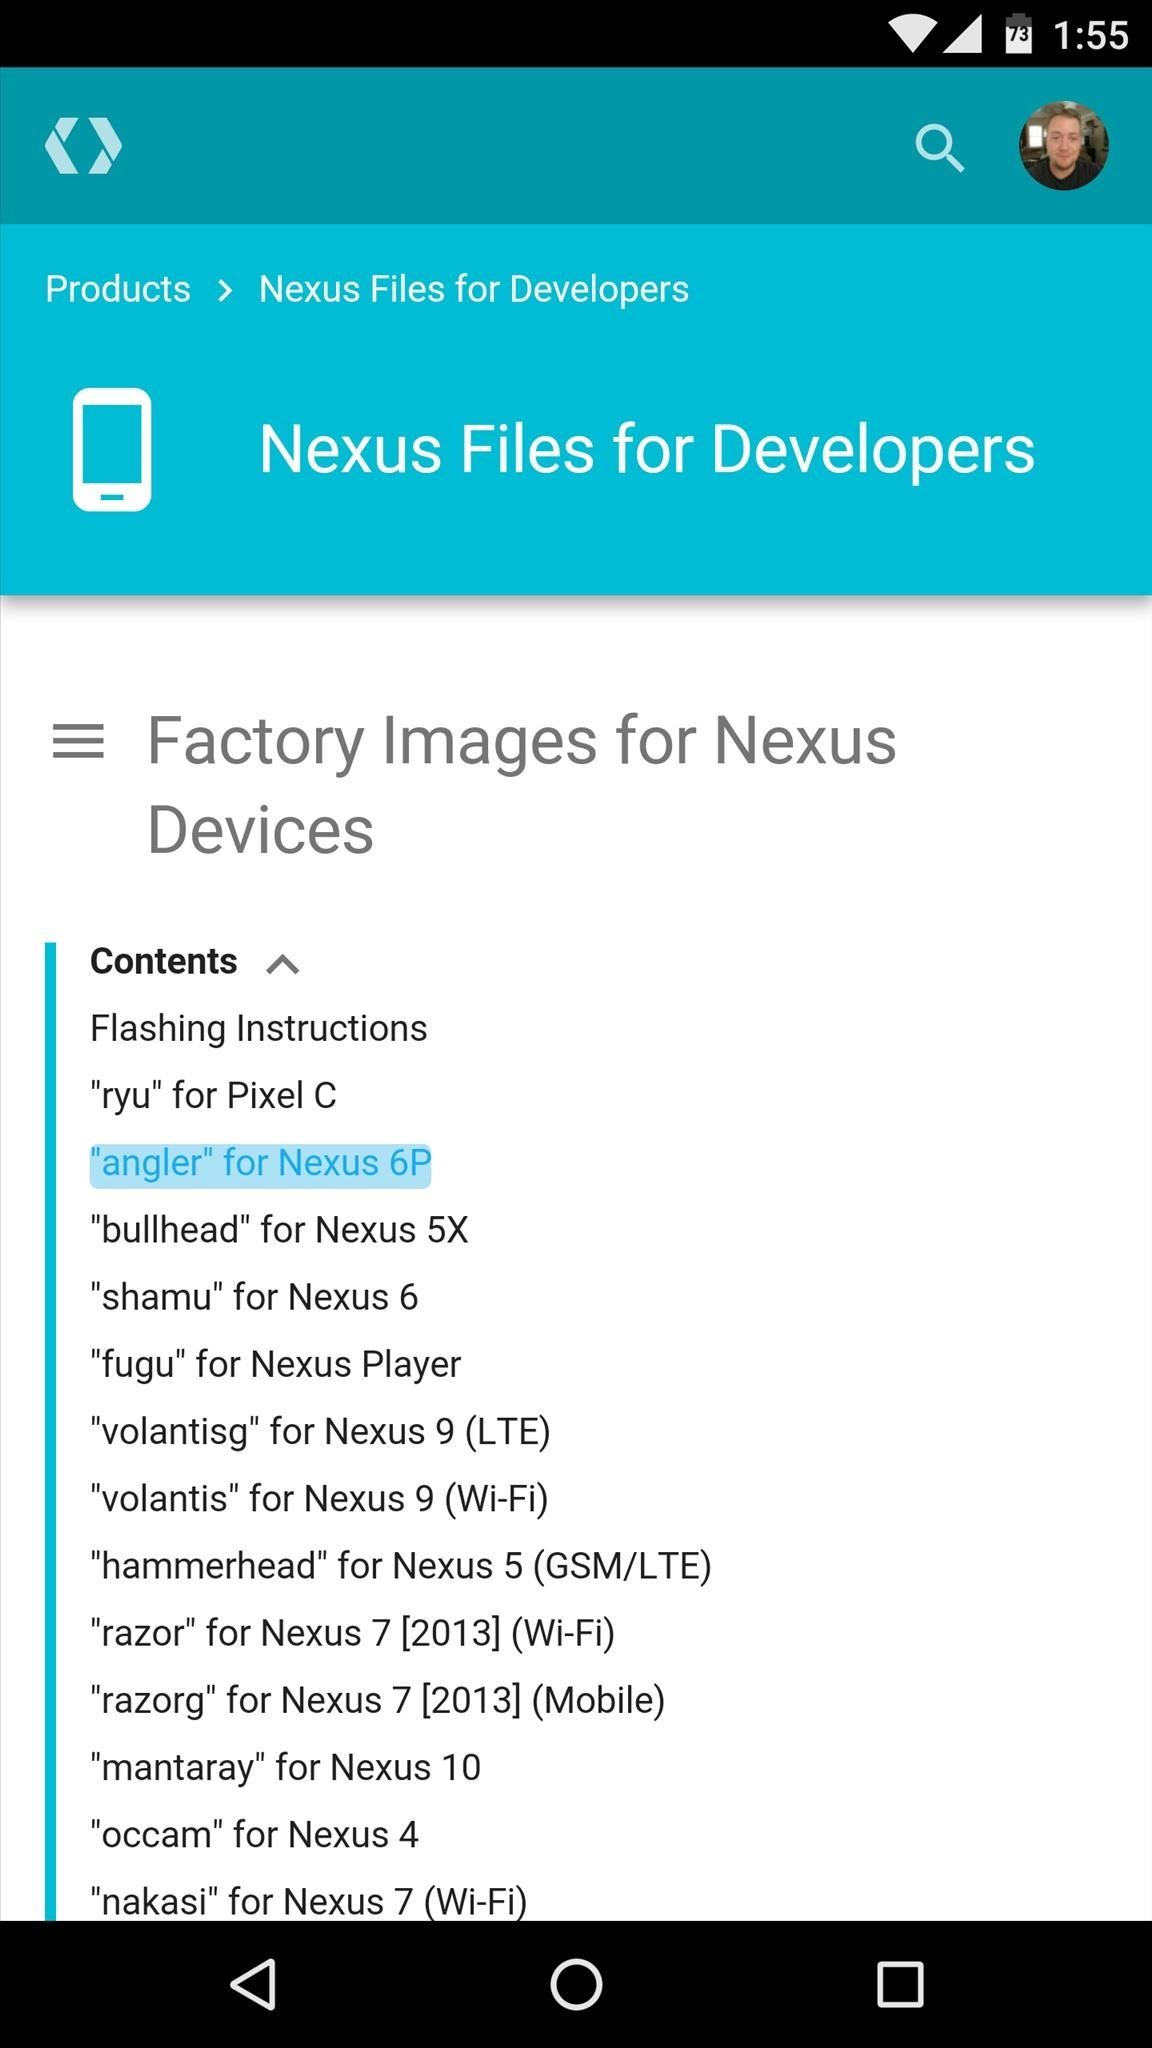
Step 2: Download the Factory Images Package from GoogleNext up, you'll need to download the latest factory images package for your device, as this is the Android update itself. So to start, head to the following link from your Nexus.Download the latest factory images package From here, tap the "Contents" link at the top of the page, then select your device from the list. Next, scroll down to the bottom of the following table, then click the download link next to the most recent Android version available for your device. The factory images package is a rather large file, so you'll need at least 1 gigabyte of free space to save it to your device, and the download itself may take as long as 20 minutes.
Step 3: Run FlashFireOnce the factory images package is done downloading, go ahead and open the FlashFire app. From here, you'll be prompted to give the app Superuser access, so tap "Grant" on the popup. Next, you'll see a disclaimer message, so tap "Agree" here.
Step 4: Import the Factory Images PackageOnce you've made it to FlashFire's main menu, tap the floating action button in the bottom-right corner. Next, choose the "Flash firmware package" option. From here, use the file browser menu to navigate to your device's Download folder, then select the factory images package that you just downloaded. If you're not sure which file is the factory images package, look for the one with the .tgz extension at the end of the file name. At this point, FlashFire will analyze the factory images package, which can take as long as 2 minutes.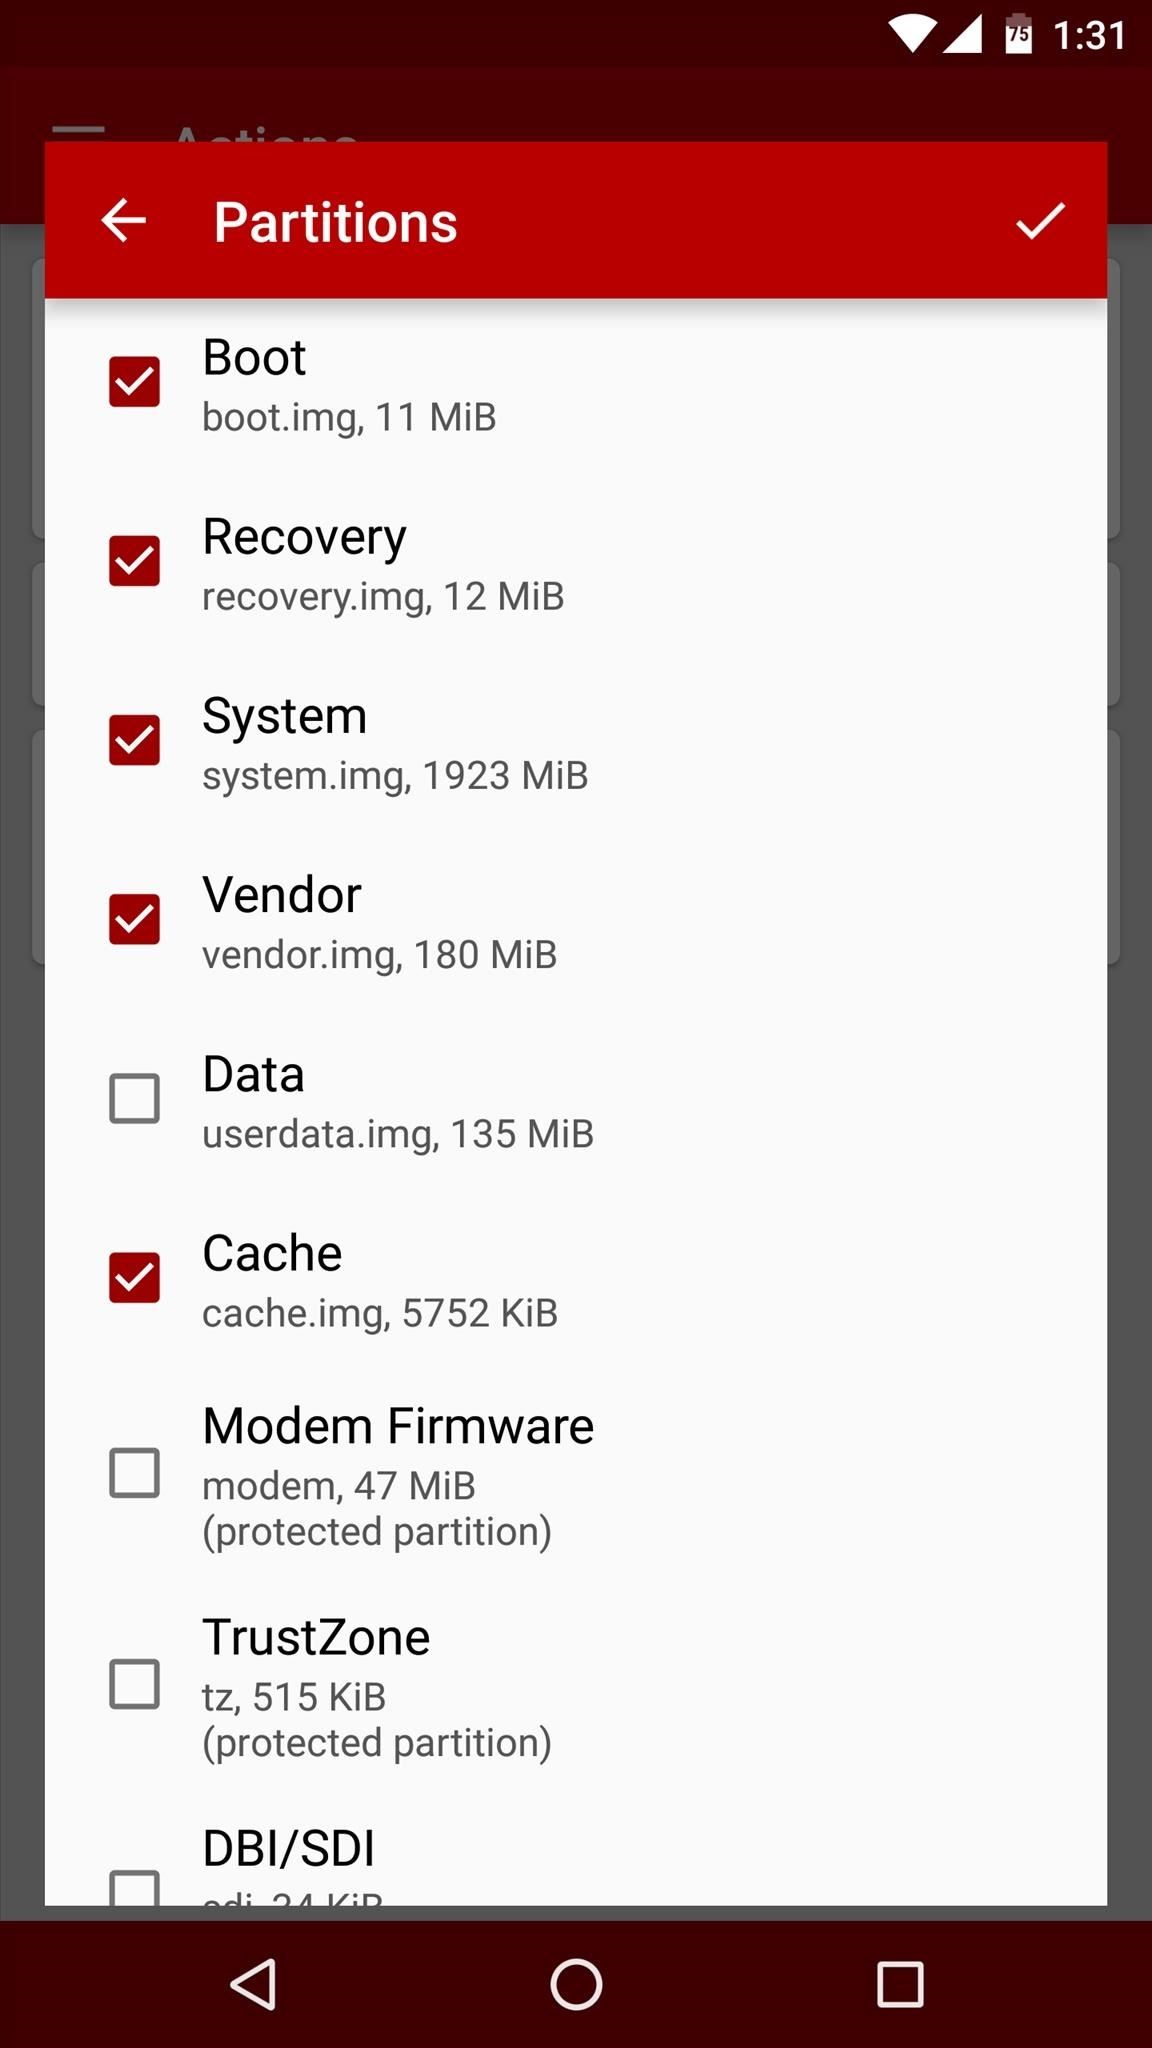
Step 5: Choose the Images You Wish to FlashOnce FlashFire is done scanning the factory images package, you'll see a pop-up menu with several different selectable options—these are the individual images that make up the Android update.If you'd like, you can deselect the Recovery image to preserve an existing installation of TWRP recovery, but I'd recommend leaving all of the options selected exactly as they are. At the very least, make sure that Boot, System, and Vendor are selected, as these are the core elements of the Android update. But either way, when you're done with this menu, tap the check mark at the top of the screen. Important: If you want to simply update your Nexus and preserve your data, make sure that Data is left unchecked. This is how OTA updates work—they simply bring in new stuff while leaving everything else as-is.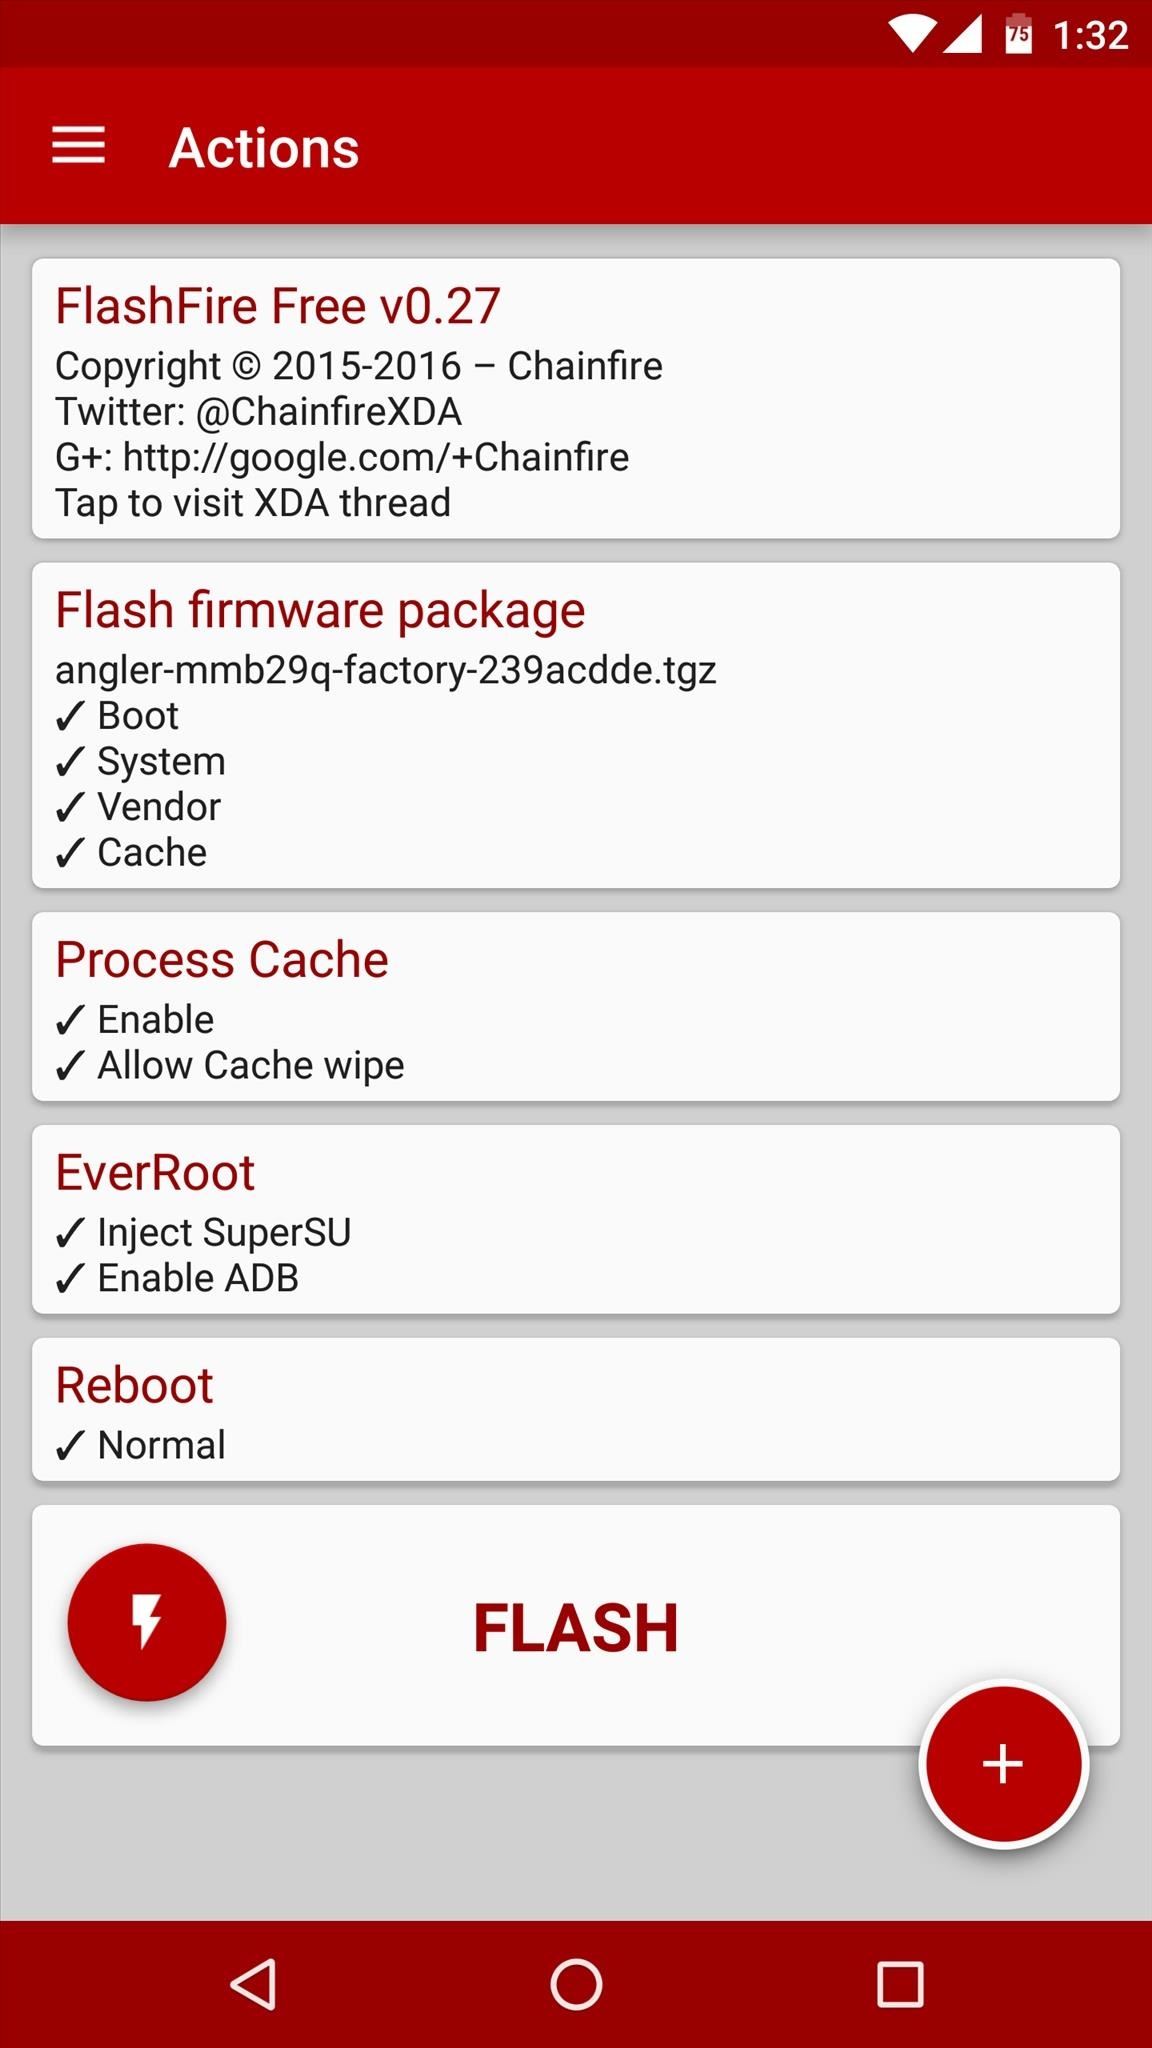
Step 6: Add Additional ZIPs Like the Xposed Installer (Optional)At this point, you're ready to install the Android update—but since FlashFire is capable of adding multiple jobs to its flashing queue, you may want to take this time to have it reinstall the Xposed Framework once it's done installing the Android update.If that's the case, simply tap the floating action button in the bottom-right corner again, then choose "Flash ZIP or OTA." From here, use the file browser menu to select the Xposed Installer ZIP, then press the check mark to add it to your flashing queue.
Step 7: Install the Android UpdateFrom here, regardless of if you opted to install Xposed or not, the only thing left to do now is to install the Android update. So scroll down to the very bottom of FlashFire's main menu, then tap the "Flash" button, and press "OK" to confirm your choice. At this point, your screen will go black for as long as a minute, then you'll see a wall of text scrolling by. Once that's done, you'll see a red progress bar across the bottom of your screen as FlashFire installs the new Android update. When this progress bar reaches 100%, your device will automatically reboot.The first time your device reboots after applying an update will take longer than usual—perhaps even as long as 15 minutes. But when you get back up, your Nexus will be running the latest version of Android, and even better, FlashFire will have automatically re-rooted your device using Chainfire's new Systemless Root method. But if you opted to install Xposed or a custom kernel, you will have effectively shifted from a systemless root to a system root.Considering how easy that was, is this how you'll be updating your rooted Nexus from now on? Let us know in the comment section below, or drop us a line on one of the following:Follow Gadget Hacks on Facebook, Twitter, Google+, and YouTube Follow Apple Hacks on Facebook and Twitter Follow Android Hacks on Facebook and Twitter Follow WonderHowTo on Facebook, Twitter, and Google+
Cover photo and screenshots by Dallas Thomas/Gadget Hacks
Now, you will need Google's physical Google Wallet Card in order to access ATMs and withdraw your money—but it's free and you can order your card via the app or right here. Once you've loaded up your Wallet Balance with your gift cards, you can proceed to any ATM and withdraw your money to purchase "cash friendly" items with the card.
30 Awesome DIY Projects that You've Never Heard of
The new technology presented by Facebook 360 will allow you to share with friends and acquaintances a new type of 3D images. The images, made from a shot taken in portrait mode, maintain a clear
How to Post 3D Pictures on Facebook | Fortune
fortune.com/2018/10/12/how-to-post-3d-pictures-on-facebook/
Facebook started rolling out a new 3D Photo feature this week. How to Post 3D Pictures on Facebook. specifically an iPhone with Portrait mode. When you snap a shot through Facebook, the
The iPod Touch offers you all the same features of an iPhone but doesn't actually make cellular phone calls. The Touch can download the same apps and do many of the same things as an iPhone but requires Wi-Fi or Bluetooth for any wireless connectivity. IPod Touch devices can also connect to the same types of
Connecting via bluetooth ipod touch to pc - Microsoft Community
We supply Samsung unlock codes for 3,354 Samsung cell phone models. Since launching this phone unlocking service, over 620,311 customers have already received Samsung unlock codes. It doesn't matter if it's an old Samsung, or one of the latest releases, with UnlockBase you will find a solution to successfully unlock your Samsung, fast.
Samsung Unlocking Instructions - UnlockRiver
To control myFloppyDriveQuartet (select the music track, start/stop the floppy drives, transpose music notes etc), I created two user interface options. PC/Laptop Interface: a simple LabVIEW VI which communicates data from a front panel to a library of network-published shared variables hosted on the myRIO
Floppy Drive Music Mix using LabVIEW myRIO - YouTube
One module will remove the SD card access restrictions for apps and games, paving the way for a second module that will make games look to your SD card for their OBB files. With these restrictions eliminated, you're free to move any large game files away from your cramped internal storage and onto your SD card.
Move Large Game Files to Your SD Card to Free Up Space [How
How to download Fortnite on iPhone and iPad - here's a guide to getting the Fortnite Battle Royale mobile game install on your Apple and iOS device. FIFA 20 changes revealed as EA finally
In fact, turning off your Location History only stops Google from creating a timeline of your location that you can view. Some apps will still track you and store time-stamped location data from
How to view your location history in Google Maps | Android
It feels strange to be walking through an open field in a small village in the English countryside. There's no one else around — just the four of us: me, my husband, my 12-year-old son, and my adult niece.
Turn a Vacation into a Treasure Hunt with Just Your Phone
Hi JuanMiguel Gealogo, My friend unfortunately I have bad news for you, while your display still works it is permanently damaged. There is no fixing this issue, there is only replacing the screen with a new one. What has happened is the display has been damaged below the first layer of glass, you ca - Samsung Galaxy S III
How to Block Unwanted Websites from Google Search Result - How to boost up the ability of an individual as better web searcher? The Answer is quite simple as Identifying useless websites and removing it from the selection list may increase the searching ability of anyone.
How to Block Any Site from Showing Up in Google Search Results
0 comments:
Post a Comment