How To: Convert Your HTC One into a Developer Edition for Super Fast Sense Updates
HTC has made it their mission to get updates out to its devices as quickly as possible, with new builds slated for release 90-days after Google finalizes a build—this is dubbed HTC Advantage.After Google I/O, the company announced they would have the Android L version of Sense ready to ship within three months of the official release, which is pretty much unheard of for skinned Android ROMs (we're looking at you, TouchWiz).Keeping with that same time frame, HTC released the Android 4.4.3 version of their Sense 6 ROM, but if you do not have a Developer or Unlocked Edition of the M8, you are SOL, thanks mainly to carriers delaying release until they can inject their own crap into the software.However, every M8 is pretty much the same. Yes, they have support for different cellular frequencies—depending on what carrier they are attached to—but other than that they are identical. Because of this, we can simply flash over all the system files of a Developer Edition model, and turn any GSM M8 into a Dev Edition. Please enable JavaScript to watch this video.
Sprint, Verizon, and other CDMA-based customers will still need to wait on your carrier to issue a release, or for a developer to port over a ROM.
Before We Get StartedThis process is pretty straightforward, but it does come with some prerequisites.Your M8 must be a GSM model, like AT&T, T-Mobile, and most international variants. S-Off and an unlocked bootloader are a must. ADB and fastboot are going to need to be installed on your computer; both Mac and Windows PCs will work. USB debugging must be enabled from your Developer settings. This process will WIPE YOUR DATA, so a complete backup of all your files. That also includes your internal storage, because that will be wiped as well. Once these prereqs are out of the way, you'll be ready to start the process, although I'd recommend reading through the guide once and downloading the necessary files prior to beginning this process.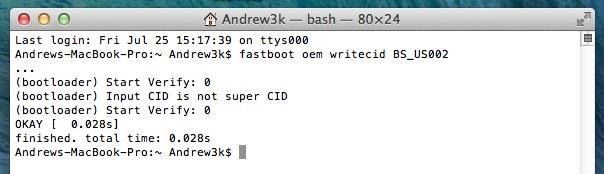
Step 1: Change CID to SuperCIDThe CID, or Carrier ID, of your device determines what carrier it is attached to, and what ROMs can be flashed to it. This is what prevents an AT&T or T-Mobile ROM from being flashed to a different carrier's device. Since we will be flashing the Dev edition, we will be using that specific CID: BS_US002.Plug your device into your computer, open up cmd/terminal, and enter the following commands followed by the Enter key each time.adb reboot bootloader fastboot oem writecid BS_US002 fastboot reboot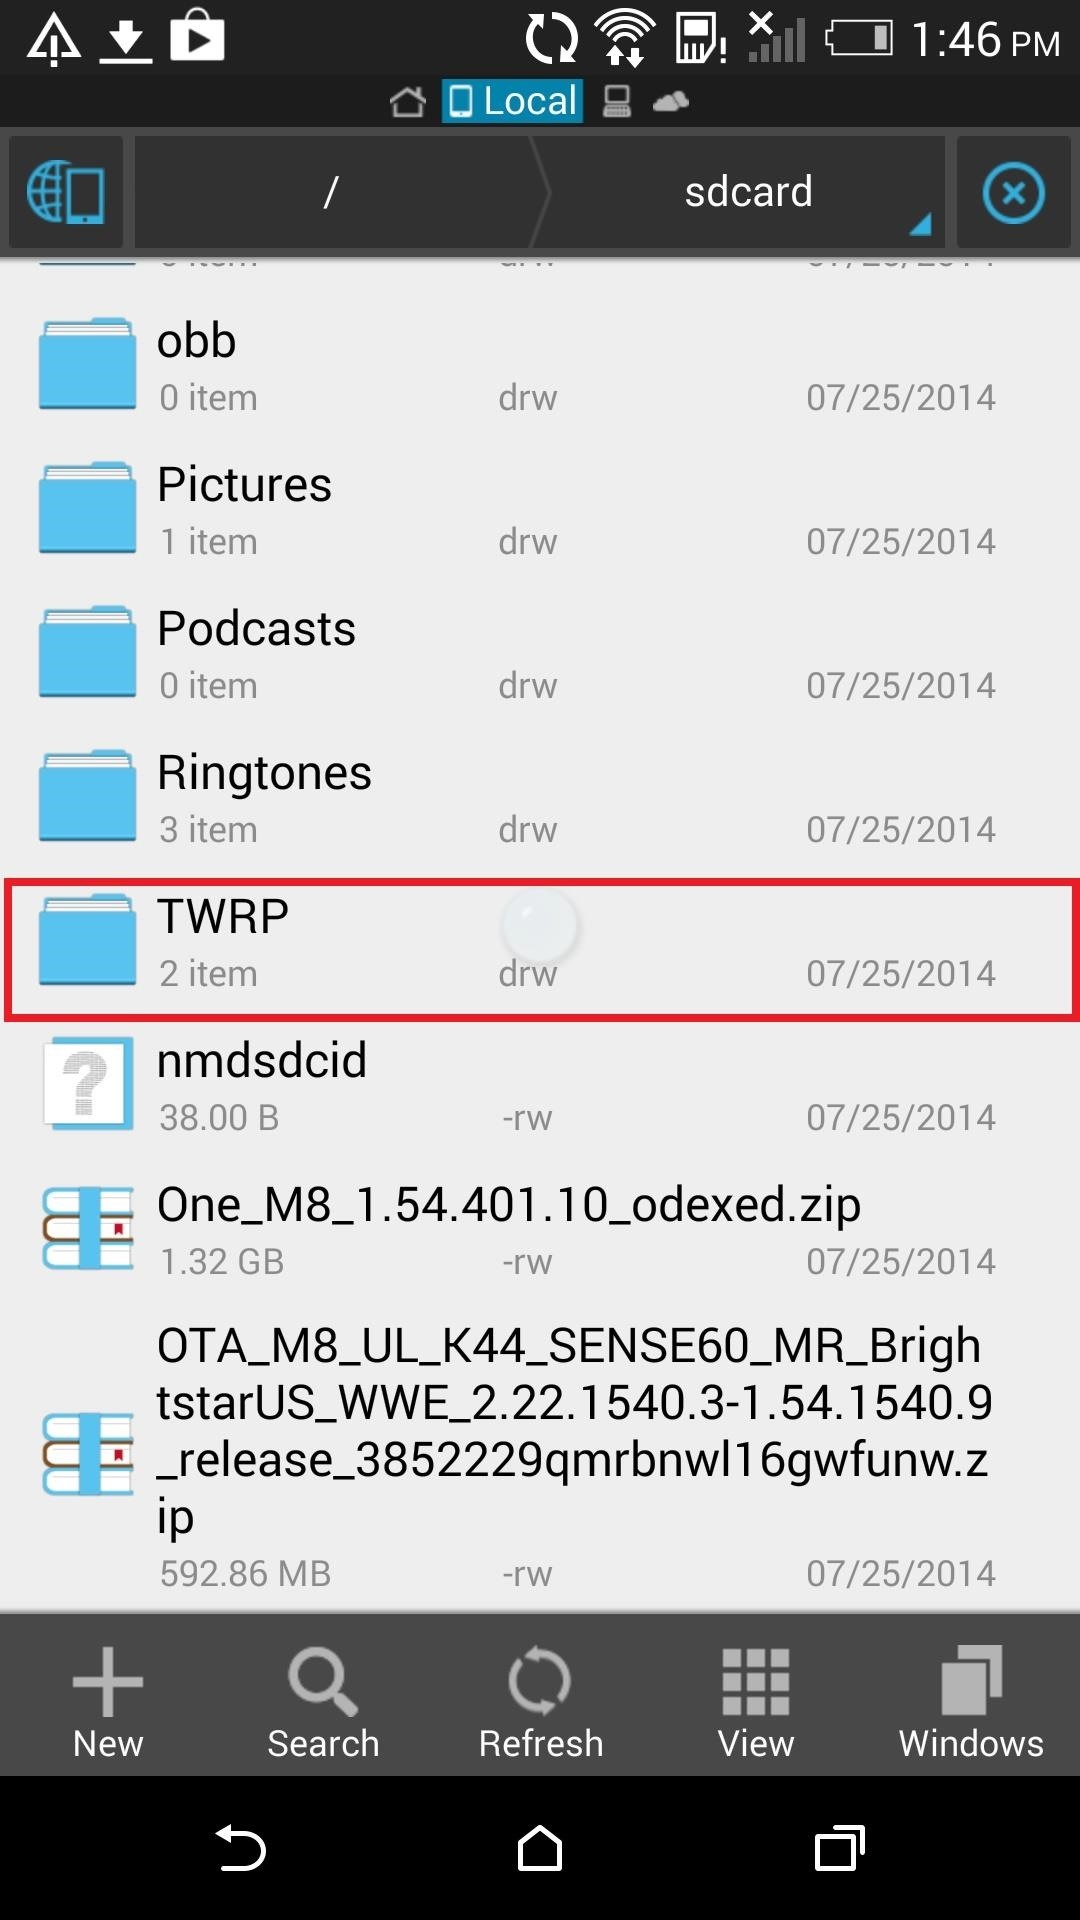
Step 2: Find Serial Number & Download FilesDownload and extract the TWRP backup file. You will then have to place the files in the TWRP folder in your internal storage. If you don't have a backups folder, go ahead a create one. The folder structure should look like this: TWRP/BACKUPS/[SERIAL NUMBER]/BackupName. The [SERIAL NUMBER] portion will need to be changed to your device's serial number, which can be found in Settings -> About -> Phone Identity.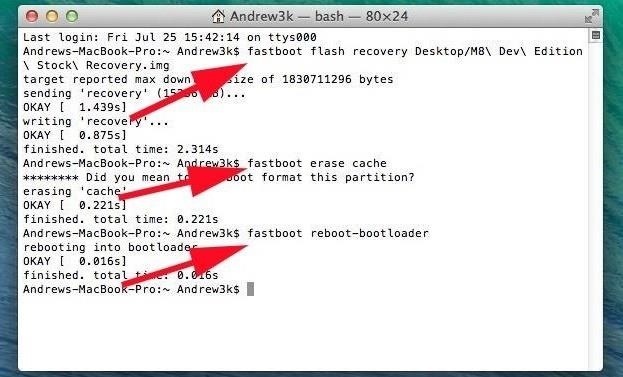
Step 3: Flash Stock RecoveryWith your backup in place, it's time to start the conversion. You will not need to flash TWRP, but you will need to download the stock recovery.Now enter the following commands:adb reboot bootloader fastboot flash recovery {location-of-Stock-Recovery.img} fastboot erase cache fastboot reboot-bootloader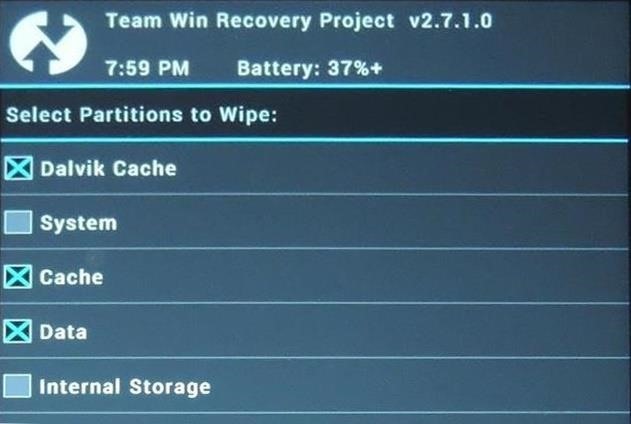
Step 4: Boot into TWRP & Wipe DataBecause the stock recovery is needed to apply OTA updates, we will only boot into TWRP instead of completely installing it. To do that, download the latest version of TWRP, then boot into it from fastboot:fastboot boot {location-of-TWRP.img} Now that you are in TWRP, tap Wipe -> Advanced Wipe and select Dalvik Cache, Cache, and Data.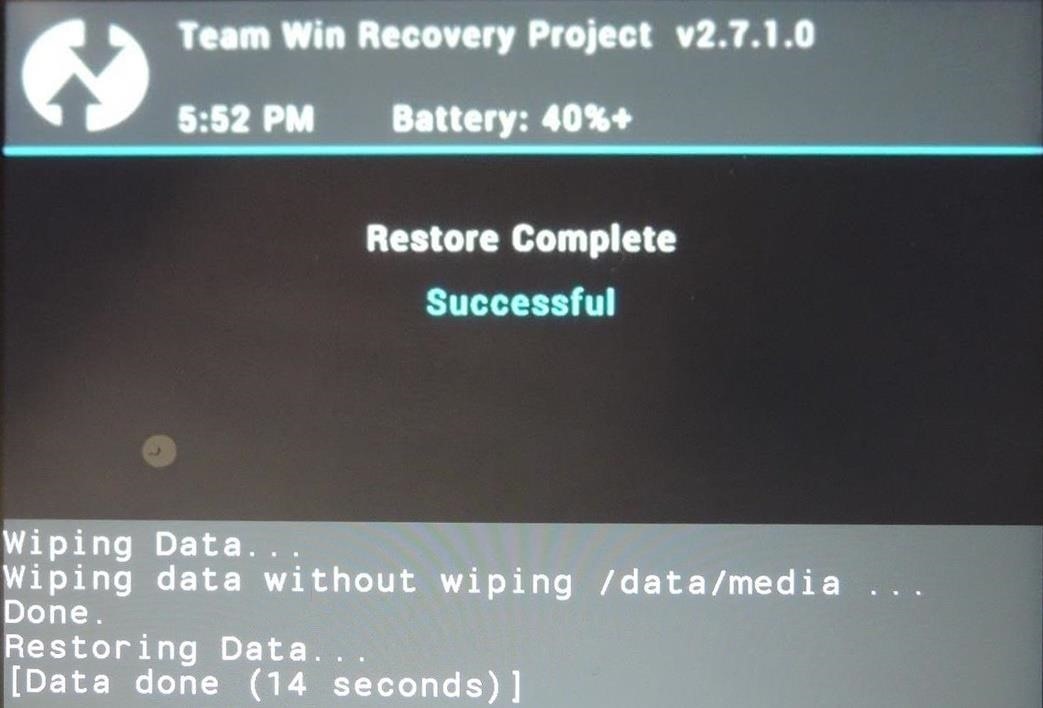
Step 5: Restore from TWRPYour device is now clean of your old ROM, so all that is left to do is to select Restore from the main TWRP screen, then pick the backup file from Step 2 and apply it.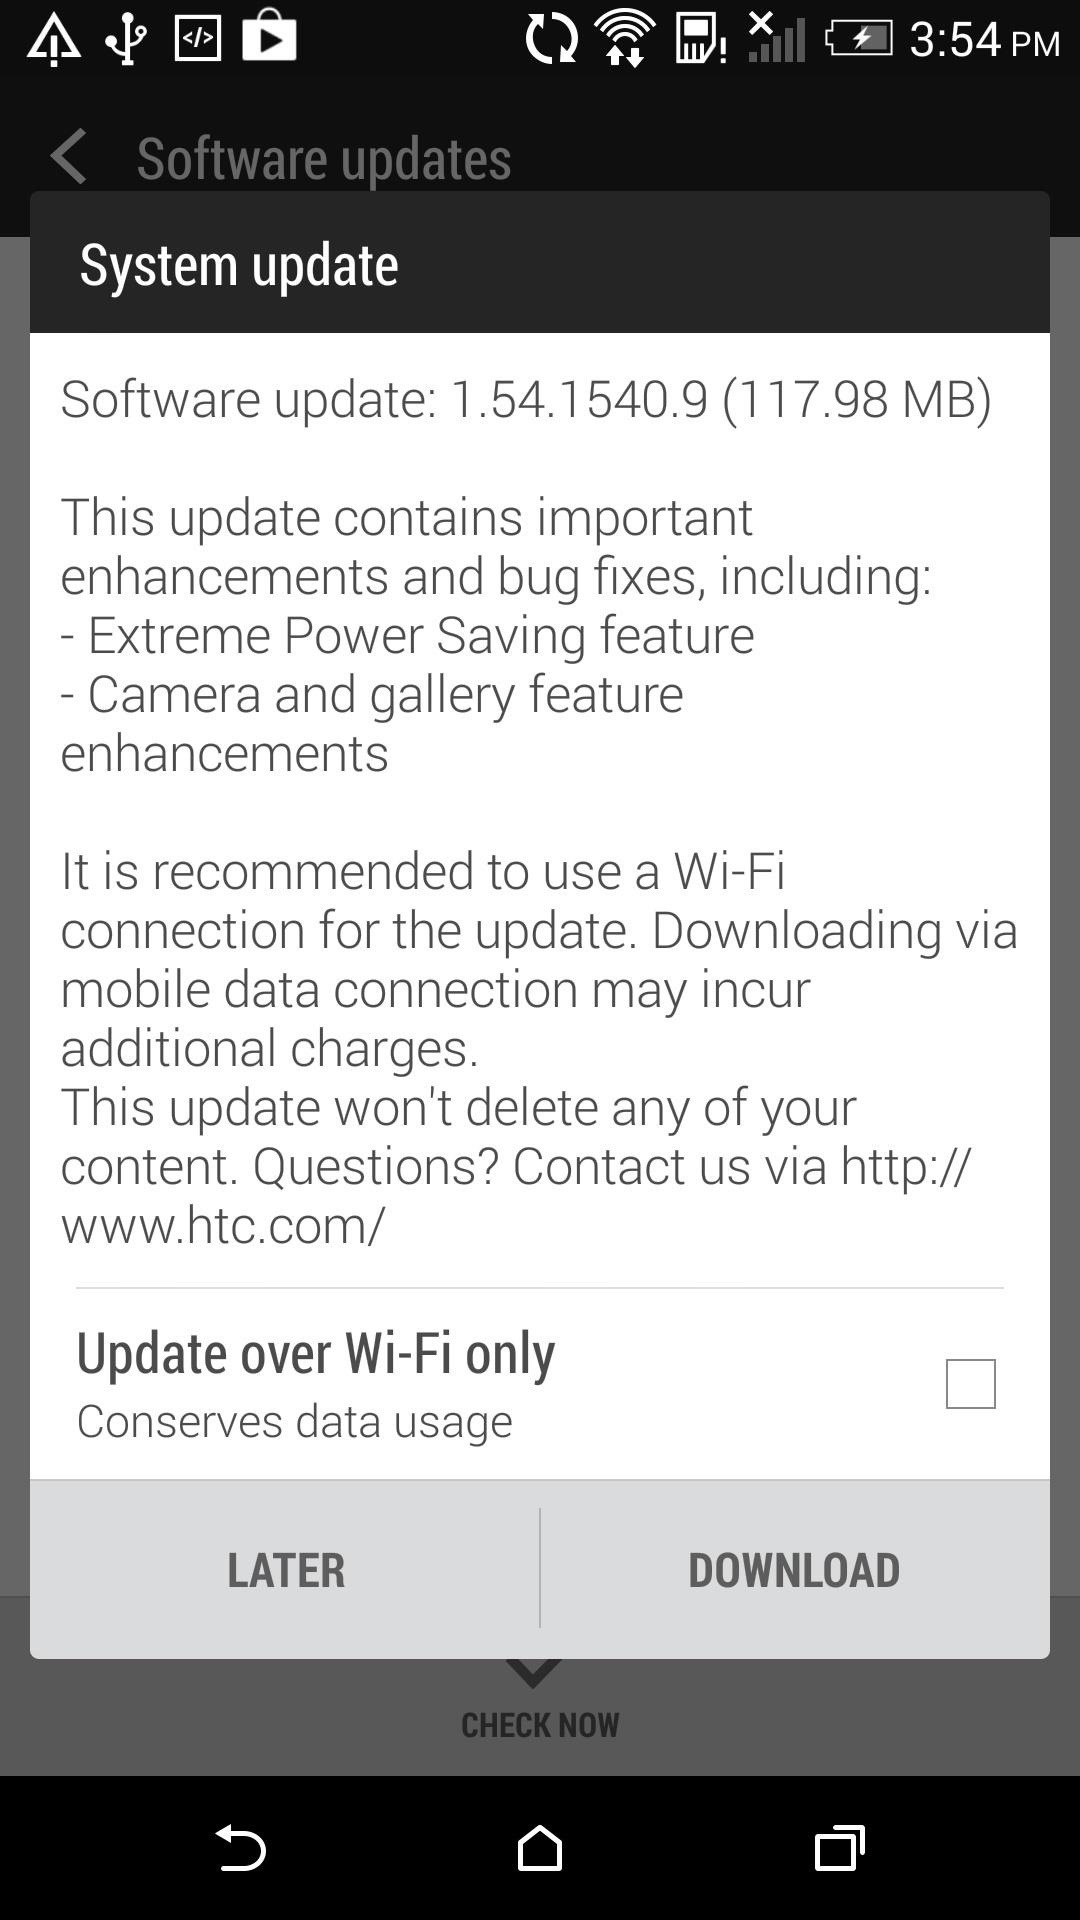
Step 6: Reboot & Check for OTATo ensure that everything worked out fine, check to make sure you can receive OTAs from Settings -> About -> Software updates. It will take a few updates before you are all caught up to Android 4.4.3, so keep checking for updates.
Step 7: Manually Flash OTA (Optional)Sometimes it takes some time for you to get an OTA pushed to your device, so if you are not the patient type, go ahead and download the OTA.zip, which will update you to Android 4.4.3.After it finishes downloading, reboot into recovery by pressing and holding the Volume Down and Power button for about 15 seconds, then select RECOVERY from the HBOOT menu.Now that you are in the stock recovery, hold Volume Up and then press the Power button. All that is left to do is install the update, apply from phone storage -> 0/ -> OTA.zip. And that's all she wrote. This process may seem a little daunting, but trust me when I say it is totally worth it to have quick OTAs and a life free of carrier bloatware.Feel free to root this ROM, but keep in mind that if you install a custom recovery, you will not be able to apply official OTAs. If you run into any issues or need any clarification, drop me a comment below.
Step 5: Enjoy Your New Musical Keyboard. From now on, your keyboard will simply make music as you type. The sound level is tied into your system media volume, so you'll probably want to set that somewhere in the middle to ensure that you can hear the sounds without them being too over the top.
How to Make SmartWatch || DIY Project « How to Videos
WonderHowTo has put together an "always up-to-date" list of retailers that accept Apple Pay. The list also includes stores that will accept it soon The retailers on their list—Petco, Macy's, Panera Bread—are official Apple Pay partners. Advertisement The site explains that while these are the
Which Stores Accept Apple Pay? The Always Up-to-Date List
StepLock locks you out of your favorite apps until you have completed your exercise goal. This means that instead of stalking someone's Instagram while eating a pint of ice cream in an alarmingly short period of time, you'll be greeted by a screen telling you how many more steps you have to take before you can even open the Instagram app.
How to Completely Back Up Your Apps & App Data on - HTC One
The Amazon US Prime Day sale is only two months away. It's an annual event exclusive to paid Amazon Prime subscribers and there are some amazing offers from Amazon US. If you're a Prime member
Amazon Prime Day 2019: Dates, deals and tips for getting the
Amazon.com: solar wrist watch. Fanmis Men's Solar Powered Casual Quartz Wrist Watch Analog Digital Multifunctional Black Sports Watch. 4.1 out of 5 stars 144.
Rock Out With Your Own Wrist-Strapped DIY Mini Synth | WIRED
Portrait mode is a shooting mode in the iPhone's built-in Camera app. It uses clever software to blur the background in your photos. It uses clever software to blur the background in your photos. Portrait mode allows you to take jaw-dropping, professional-looking portrait photos.
Whether you're new to the Note line up or an old fan check out some of these tips and tricks to help you get the most of your Samsung Galaxy Note 9.
How to Bypass Android's Pattern Lock Screen & Access Its
Taser Camera Hack. News : Taser dear friends with hacked camera. We almost forgot about the disposable camera. With every cell phone outfitted with a camera, who
Hacking Cell Phone Camera Module - mankind.com.au
Google Names BlackBerry PRIV as One of the Most Secure
Manage Wi-Fi networks is a setting that lets you edit your saved Wi-Fi networks that are always blocked or always allowed. These lists prevent your device from connecting to networks that you know are unprotected to safeguard your personal data.
Installation and Configuration of AMP Module Through
"Create your own Google logo" is part of the "Create your own Google logo" activity from CS First, one of the many Google initiatives focused on computer science education.
How To Change Google Logo Into Your Name | ITS AMAZING 2016
0 comments:
Post a Comment