How To: Use & Customize the New Start Menu in Windows 10
The desktop Start menu is finally back! After receiving a lot of negative user feedback, Microsoft ditched the touchscreen-first approach of Windows 8 and went with a more traditional setup for mouse-and-keyboard users in Windows 10.Don't Miss: How Anyone (Even Pirates) Can Get Windows 10 for Free But things aren't exactly as they were before. This new Start menu—while seemingly familiar at first glance—packs in a lot of new features and functionality. To help you learn your way around Windows 10's most central menu, I'll go over some of the key features and changes below.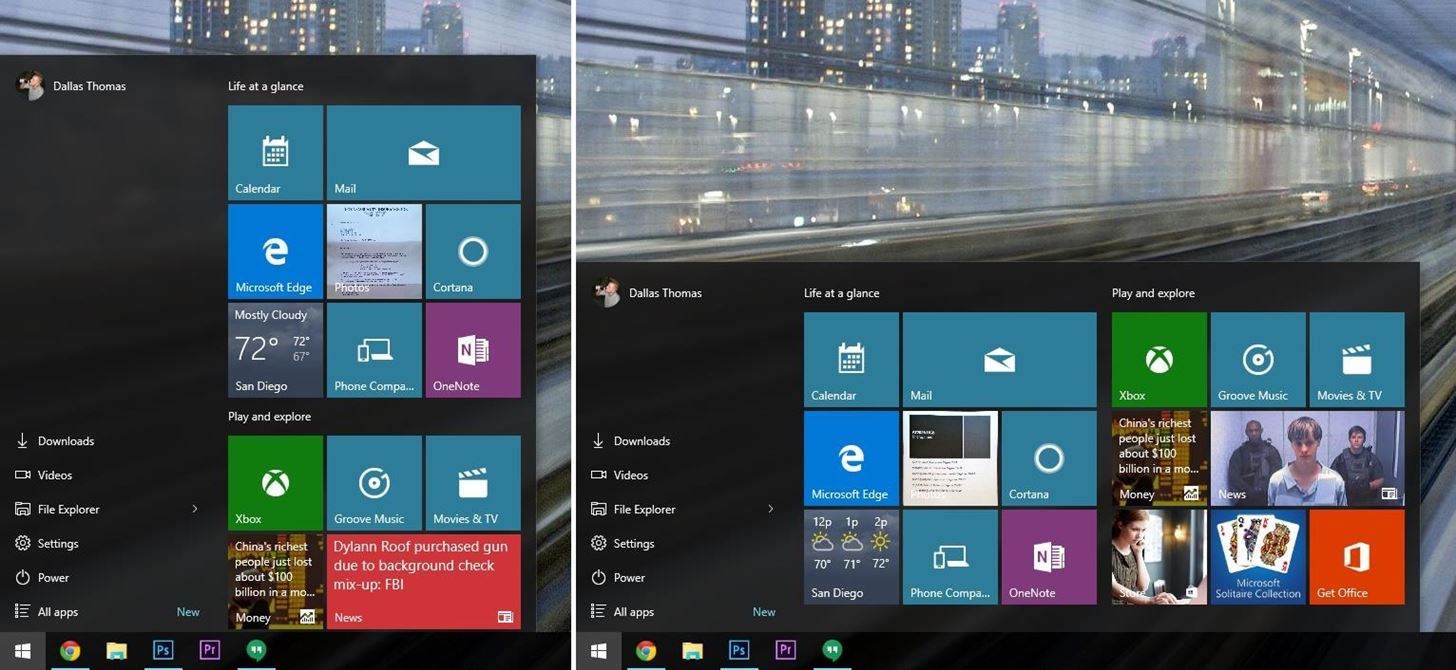
1. The Start Menu Can Now Be ResizedFirst up, one of the coolest features of the Windows 10 Start menu is that it can easily be resized. If you feel like the default view is too tall and narrow, just use your mouse pointer to drag from any edge of the Start menu, and it will be resized in real time. Left: Default size; Right: Adjusted to be short and wide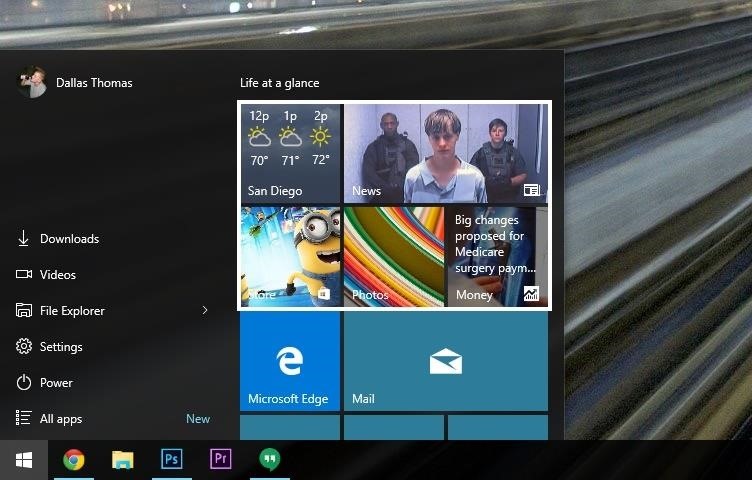
2. Live Tiles Offer Quick Information at a GlanceMuch like the full-screen Windows 8 Start Screen, native Windows apps can use icons that display at-a-glance information directly on the Windows 10 Start menu. These "Live Tiles," as they're called, update in real time with information such as weather, news, and stock prices. Live Tiles (highlighted in white) displaying at-a-glance information This functionality is generally reserved for apps that were installed through the Windows Store, though Live Tile support from some third-party software developers is beginning to ramp up.
3. Icons Can Be Rearranged, Resized, & RemovedIf the Start menu's default layout doesn't quite seem to prioritize the apps and information you deem most important, it's incredibly easy to reorganize. For starters, you can use your mouse to click and hold any icon, then drag it into a spot that works better for you. As you'll notice, some icons are larger than others—but they don't have to stay that way. If you'd like to resize any icon in your Start menu, just right-click it, then hover over the "Resize" option, and choose between small, medium, wide, or large. Left: Photos tile resizing options; Right: Photos tile resized This same right-click menu can be used to turn off the Live Tile feature for any app, or even remove an icon altogether. If you find the Live Tile animations too distracting, just right-click an icon and choose "Turn live tile off." To remove the tile altogether, choose "Unpin from Start" in this same menu. Disabling Live Tile feature for Photos app
4. Accessing All of Your AppsThe Windows 10 Start menu is more than just a place to put all of your Live Tiles. Much like previous Windows versions, you can access all of your installed apps through the Start menu with a few simple clicks. To begin, just open your Start menu and click the "All Apps" button near the bottom-left corner. From here, you'll get an alphabetized list of all your installed apps. You can scroll through the list using either your mouse wheel or the scroll bar directly to the right, then launch any app by clicking it once.
5. Adding Items to the Main Start MenuIf you find yourself using a particular app more than most, consider pinning it to your Start menu for quicker access. From your "All Apps" list, just right-click an app, then select "Pin to Start." From now on, this app will be accessible in the right pane of your Start menu. Pinning an app to the Start menu Apps aren't the only thing you can pin to the Windows 10 Start Menu—folders and other items can be pinned as well. Using Windows Explorer, just right-click an eligible item, then choose "Pin to Start" for quick access.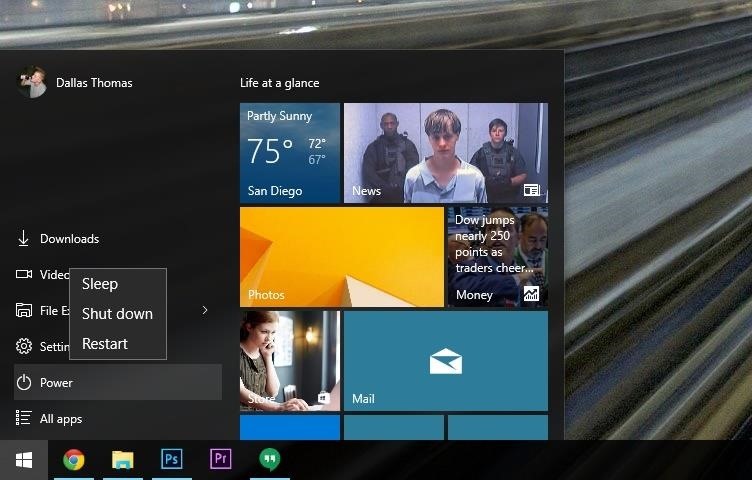
6. Rebooting & Turning Off Your PC from the New Start MenuIn past Windows versions, power options such as "Restart," "Shut Down," and "Sleep" have migrated from the Start menu to Windows 8's funky "Charms" bar, but in Windows 10, these options are right back where they should be. To restart, power off, or hibernate your PC, click the "Power" entry in the Start menu, then choose your preferred option.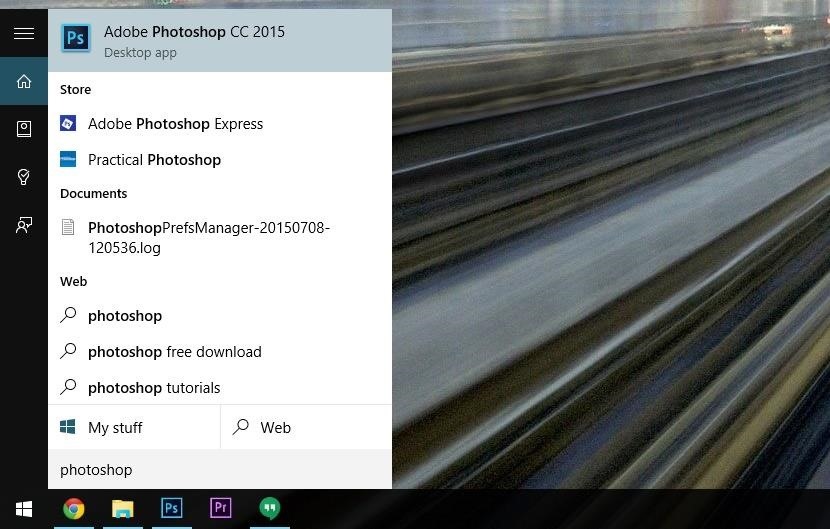
7. Searching from the Start MenuWindows 10 comes with an awesome new virtual assistant named Cortana that allows you to search your PC and the web using voice commands, but most of these same features can be accessed with a keyboard by way of the Start menu.To quickly find programs and files, or even perform a web search, just press the Windows key on your keyboard, then type your query as soon as the Start menu comes up (or hit the Windows key + S). Your installed programs will take precedence in this list, so launching an app with your keyboard is as simple as pressing the Windows key, typing the name, then hitting Enter. Searching "photoshop" through the Start menu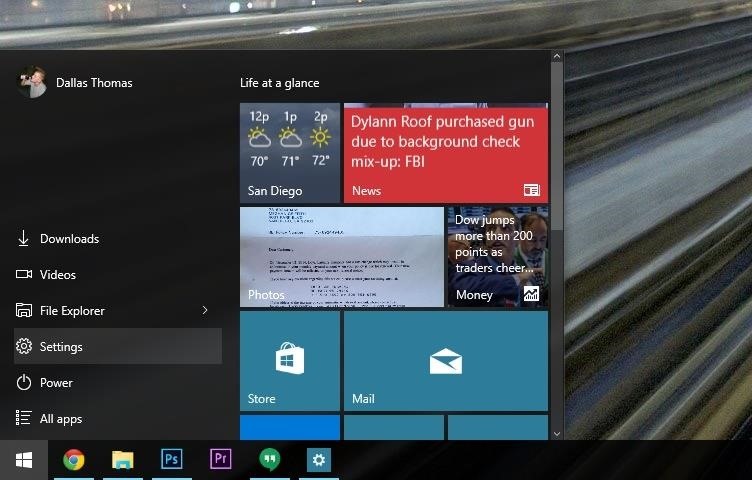
8. Customizing Colors & Other Start Menu SettingsTo change the overall appearance of the Windows 10 Start menu, begin by clicking the "Settings" option in the left pane of your Start menu. Next up, choose the "Personalization" option from the main Windows 10 Settings menu. From here, select the "Colors" option if you'd like to change the background color of your Start menu. Next, scroll down a bit and choose your accent color from the list, then make sure to enable the "Show color on Start, taskbar, and action center" option directly underneath. Next up, head to the "Start" tab in the left pane of the Personalization menu to access even more Start menu settings. From here, you can opt to hide the "Most Used" and "Recently Added" app listings in your Start menu, and you can even choose which folders appear in your Start menu, among other options. Overall, the new Start menu in Windows 10 is a lot more user-friendly than it was in Windows 8, and quite a bit more functional than its Windows 7 counterpart. What are your favorite features of the Windows 10 Start Menu? Let us know in the comment section below, or drop us a line on Facebook, Google+, or Twitter.
This wikiHow teaches you how to set up the LonelyScreen app on your computer to mirror your iPhone's screen on your desktop display, using a Windows PC. LonelyScreen allows you to use your iPhone's native screen mirroring feature to view your screen on your computer.
How to Mirror Your iPhone or iPad's Screen on Your Windows PC
How To: The Easiest Way to Completely Customize Your Samsung Galaxy S3 with Wallpapers, Ringtones, Games, & More How To : Shake Your Nexus 7 Tablet for a New Wallpaper Whenever You Want One
How to Set Rotating Lock Screen Wallpapers on Samsung Galaxy
iOS 11 Hidden Features! Top 20+ Cool iOS 11 Tips, tricks like hidden dark mode, AirPods Customization, Screen Recording, Control centre tweaks, QR Code scan, iPhone Storage and more! What's your
100+ Coolest New iOS 12 Features You Need to Know
Over the years, he has come up with a handy checklist that makes traveling international easier and more efficient. Here are his tips. When it comes to travel, heading abroad is an entirely different animal from your typical family beach vacation.
How to prepare your smartphone for a trip - USATODAY.com
News: Thanks to Google, iPhone Users Can Finally Pick a New Frame for Their Live Photos How To: Auto-Change Keyboards on Your Samsung Galaxy Note 2 Based on the S Pen's Position News: Samsung Jumps to Head of Mobile AR Class with Galaxy S10 5G & 3D Depth Sensor, Shows Off AR Concept Video
Create "Frame Within a Frame" Photo Effects on Android
Tutorial to Transfer Media Files from Samsung Phones yo PC/Mac. Step 1. Get Samsung Device Connected to the Computer. To start with, open the installed software on the computer and then get your Samsung phone connected to the computer via the USB cord. This software will detect your device and show you an interface as pictured in the below. Step 2.
How to Connect your phone to your Mac computer via bluetooth
Android file transfer: How to move data between your phone and computer Moving files from your Android device to a Windows PC or Mac (and vice versa) doesn't have to be difficult — or dependent
10 Ways to Share Files between Two Computers | TechWiser
Step 2 Import YouTube video. Click "Add File" on the menu bar to select and load video(s) you want to add logo to in this YouTube Watermark Maker. Step 3 Add watermark to YouTube video. Click "Edit" > "Watermark" to add watermark to video with text or logo pictures. And choose different effects for your watermark. Step 4 Confirm the operation
How to Integrate Two Computer Fans to Make You Chill
Android और iOS पर Google Search से सीधे फूड ऑर्डर करें
Food Ordering Features Now Available in Google's Mobile Apps
How to Retain Swipe to Unlock Effects with Lock Screen
However, those with 4.0 and higher (like use Samsung Galaxy S3 owners) can still take advantage of these power-saving notifications by simple enabling the app in the Accessibility settings.
How to Get Motorola's Active Display Features on Your Pixel
You're having a tough time reading text on your iPhone and you want to change the font size. There are two ways to change text size on an iPhone — in the Settings app, or in Control Center if your iPhone is running iOS 11.
How to Change Font Size and Style in iPhone, iPad on iOS 7/8
0 comments:
Post a Comment