How To: Send & Receive iMessages on Your Android Phone
One of Android's most glaring weaknesses is its lack of an iMessage equivalent. That is, of course, until now. There's one app that will allow Android users to experience iMessage on their non-Apple phone, complete with end-to-end encryption, message effects, and group messaging.While Google recently released Allo, it doesn't support always-on end-to-end encryption, sending and receiving messages from either phone or computer, or full-resolution images, among other things that iMessage can do.This brings us to weMessage, a free unofficial iMessage client app for Android. You will need to have a Mac computer, since weServer, the accompanying server-side application, requires it and since iMessage can't be spoofed on Windows yet.While programs like this have popped up in the past, they usually get taken down relatively quickly because of copyright claims. This app, which was developed by Roman Scott, an advanced 16-year-old programmer, has been up for over a month so far, so it has some degree of staying power.Scott also promised to keep it alive as long as possible and continually update it with new features, such as SMS support (so you can use it as your default messaging app on Android). Either way, you should take advantage of this program while it lasts.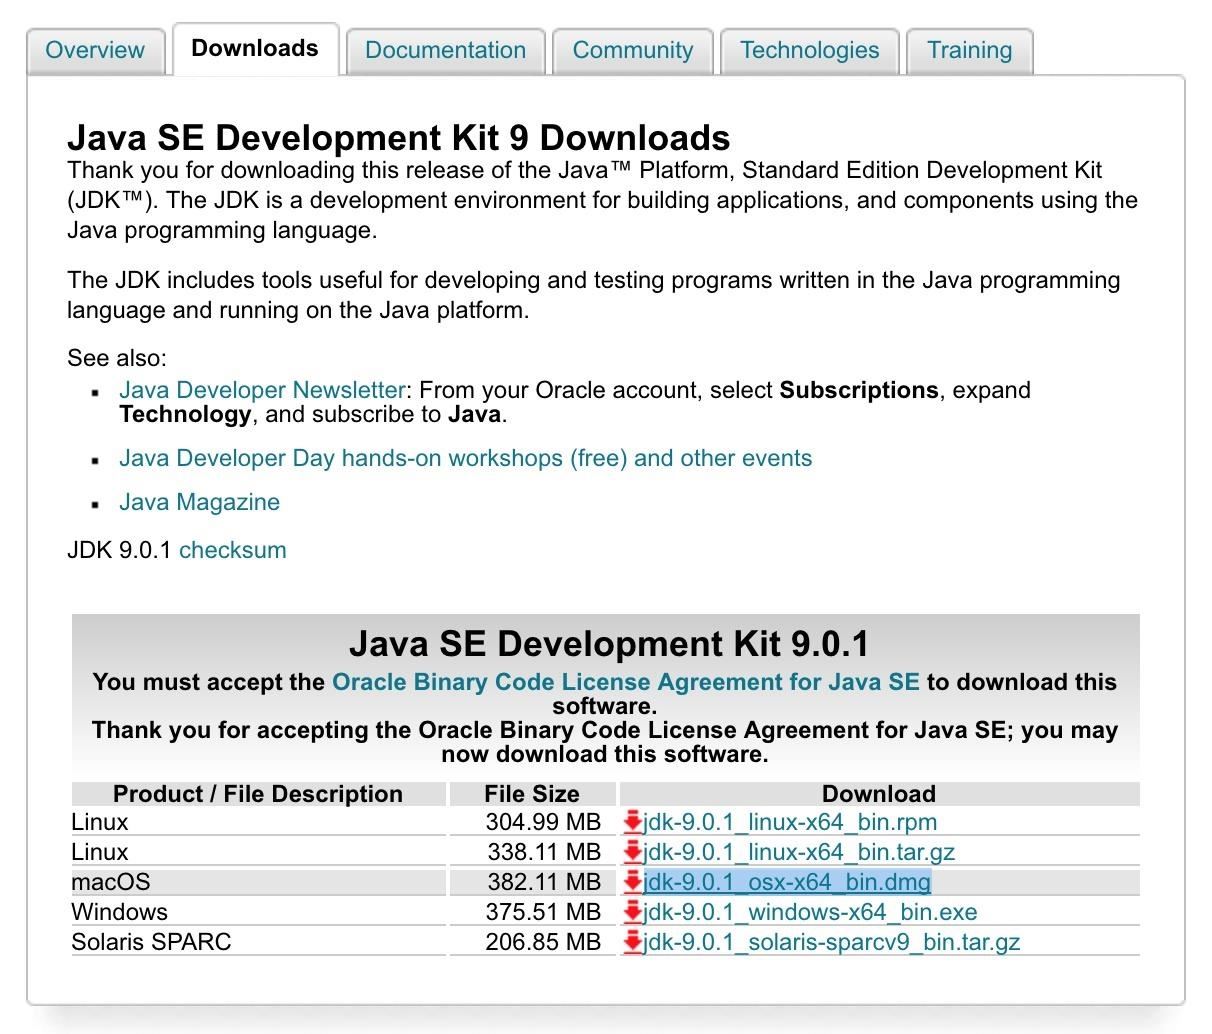
Step 1: Install the JDK on Your MacYou need the Java SE Development Kit (JDK) installed on your Mac in order to run the weServer program. Without having Java, the weServer application won't be able to start up.There's a good chance you've already installed the JDK at some point, but if you haven't (or aren't sure), you can easily check. Open up Terminal, then type in java to see. If you get an error saying to download it, then you obviously don't have it, so go ahead and download the Java JDK from Oracle.On the Downloads page, make sure to click on the button that says "Accept License Agreement," then click on the DMG file below it for the "macOS" version. It's a large file, so it may take a few minutes. Once it's downloaded, extract the files (they may automatically be extracted, depending on your settings).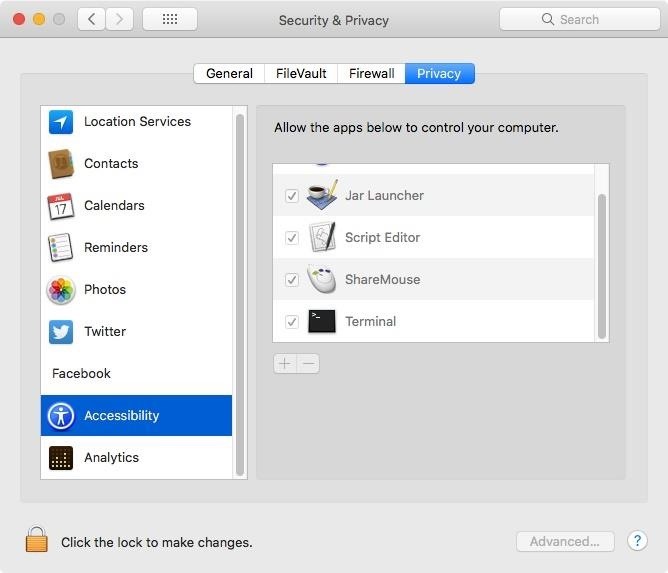
Step 2: Give Terminal Accessibility PermissionsThe weServer application runs inside of Terminal, therefore you need to give Terminal rights to control your computer so that it can properly run.Open up the "System Preferences" on your Mac, then go to "Security & Privacy." From there, click on the "Privacy" tab and navigate to "Accessibility" in the side menu. From the list on the right, if you see that Terminal is listed and checked, you have nothing more to do.If you see neither, click on the lock in the bottom-left corner and enter your password when prompted. Next, either check Terminal in the list or click on the + sign to add it to the list. You can find Terminal in Applications –> Utilities. Click on "Open" once selected, and Terminal will automatically be checked in the list.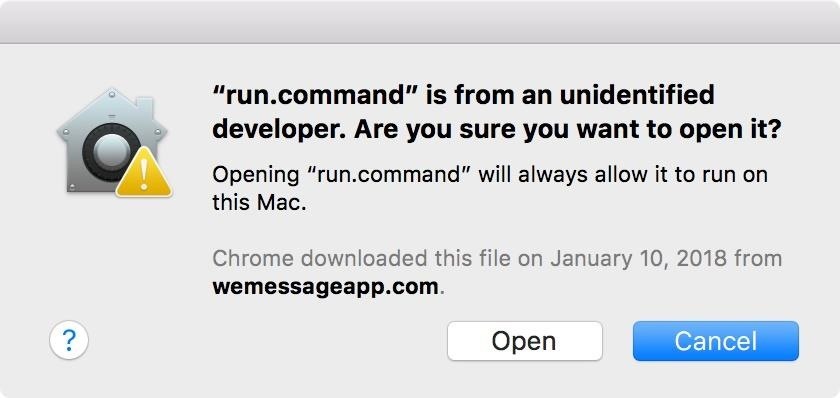
Step 3: Install weServer on Your MacNow, you need to download weServer, which does all the heavy lifting when sending and receiving iMessages on your Android device. From that link, select "Download for macOS" to get the newest version available.Warning: This service is free, though the developer did originally charge for it, but it's a closed-source application so there's no way to tell if something else is going on besides what is claimed. It could do anything with its granted permissions, including keylogging or accessing credentials, so be sure you're okay with the risk, especially if you plan on using this remotely.Once it's done downloading, extract the ZIP file, then double-click the "run.command" file in the weServer folder to start up weServer in Terminal.Depending on the Gatekeeper preferences on your Mac, you may get a popup that says it "can't be opened because it is from an unidentified developer." If that's the case, you can either adjust your security settings to allow apps from unidentified developers or open it this one time by right-clicking on run.command, selecting "Open" from the contextual menu, then "Open" again on the popup.More Info: Open Third-Party Apps from Unidentified Developers in macOS After opening up the run.command file, weServer will open up in Terminal, as that's the program it works through (as mentioned in Step 2).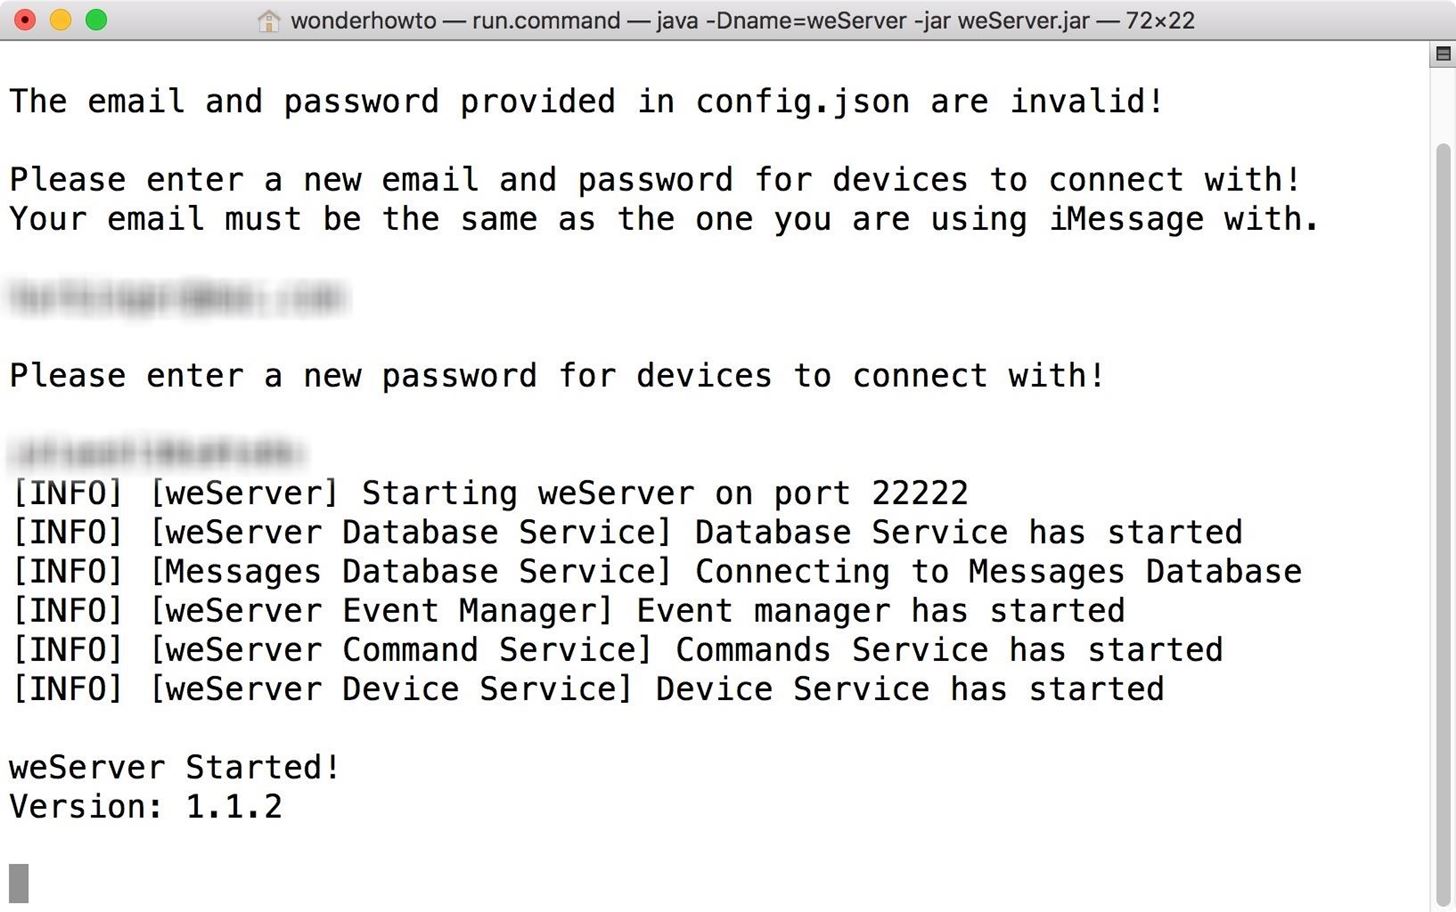
Step 4: Set Up Your iMessage Account with weServerRight after opening up the weServer in Terminal, it will ask you to enter your iMessage email and password. Your email needs to be the same one you use for iMessage, but your password can be anything. Don't use the password connected to your Apple ID, for security reasons. Create a new password just for weServer, and save it in LastPass or another password manager you have for safe keeping.Once you enter those successfully, your weServer will start, and will say so.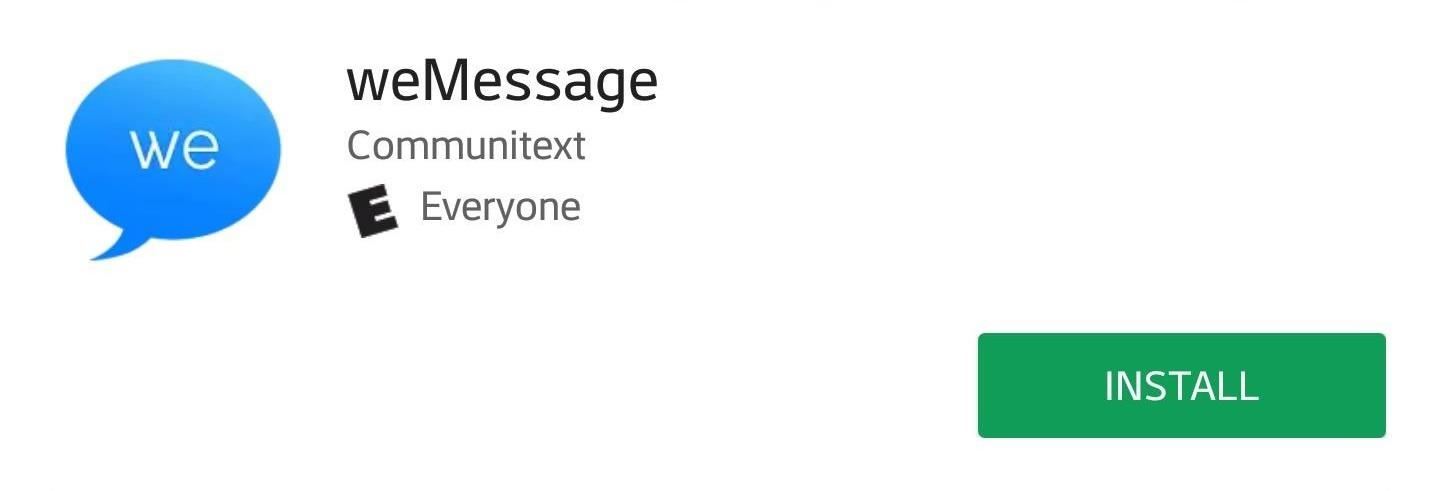
Step 5: Install weMessage on Your Android PhoneNext, you'll need to install the weMessage app on your Android phone. To do that, either search for "weMessage" on Google Play or use the link below to jump right to it. Tap on "Install" to download and install it, then open it up.Install weMessage for free from the Google Play Store When you open up weMessage, it'll ask you for the IP address of your weServer, your iMessage email address, and your weServer password. As you could probably guess, the email and password are the same from Step 4 above, but the IP address will either be the private or public IP address of your Mac, depending on how you want to use weMessage.
Step 6: Find Your Mac's IP AddressIf you only want to use weMessage when you're at home or on the same network that your Mac is connected to, you can use the private IP address to connect to the weServer. However, if you want to use weMessage no matter where you are, you'll want to choose a public IP address so that you don't have to be connected to the same local network as your Mac. Just note that this is a riskier option if weServer ever turns into a RAT or botnet since you're letting it bypass your firewall.
Option 1: Using a Private IP AddressTo find your Mac's private IP address to plug into the weMessage app's login page, open up "System Preferences," then click on "Network." You can also just click on the Wi-Fi logo in your menu bar, then select "Open Network Preferences."Next, click on the "Advanced" button, then navigate to the "TCP/IP" tab. Your Mac's private IP address for your local network will be next to the IPv4 Address label. Type this into the weMessage app login page to use weMessage whenever your Android and Mac are on the same network connection.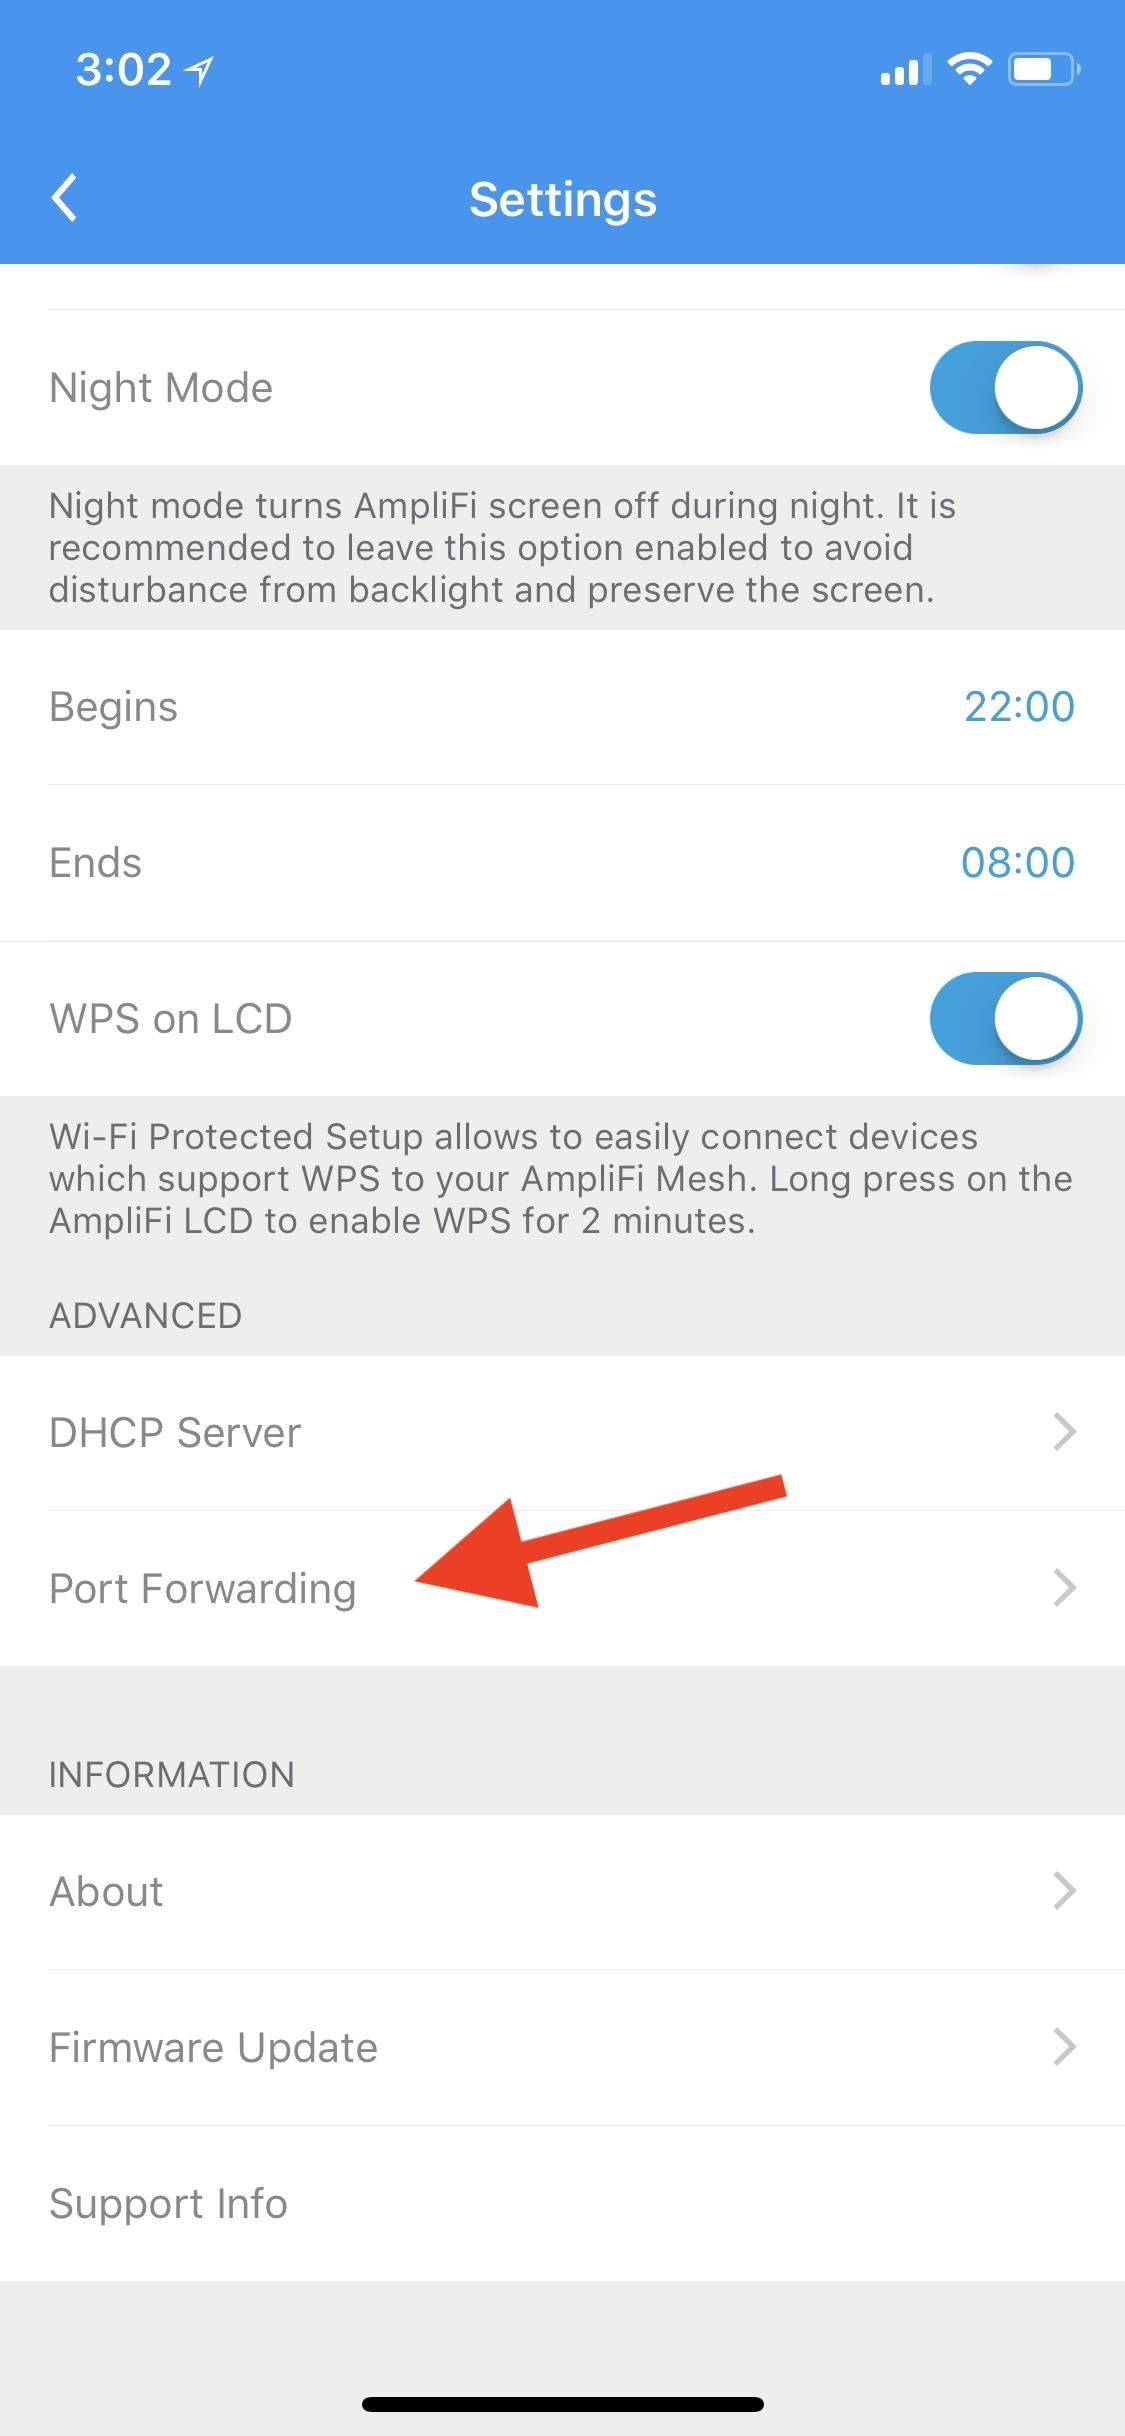
Option 2: Using a Public IP AddressIn order to connect to your Mac no matter where you are, you'll need to set up port forwarding, which opens up a part of your internet network to the outside world. As long as no one else knows your public IP address, you should remain safe. By using your public IP address with weMessage, you're allowing weServer to bypass the firewall on your network's router.Unfortunately, every router handles this process differently, so you'll need to check your router's manual or do a quick Google search to see how to access your router's settings. In general, to reach your router settings, there will either be an IP address or text URL that you need to type into the address bar of your web browserFor instance, Netgear routers would visit routerlogin.net or routerlogin.com, while most Belkin routers would use 192.168.2.1. To find the address easily, you could use the ipconfig/all command in a Windows command prompt or netstat -rn in Linux or macOS, then look for the IP address by "Default Gateway."Don't Miss: Configure Port Forwarding to Create Internet-Connected Services Digital Trends has a good list of common router addresses with default login credentials, but the address you need to log into, as well as the default router credentials, can sometimes be found printed right on the router itself. Some routers even have mobile apps you can use.Once you log in to your router, "Port Forwarding" will usually be in the "Advanced Settings." Here, you should be able to give the connection a name (we chose "weServer"), add your Mac's private IP address (which you can find in the previous option above), input the source and destination ports (for weServer, use 22222 for both), and select the right protocol (should say TCP or TCP/UDP). Now that all of that's done, the only thing left to do is find your Mac's public IP address. You can do this simply by going to a site like IP Chicken or WhatIsMyIP.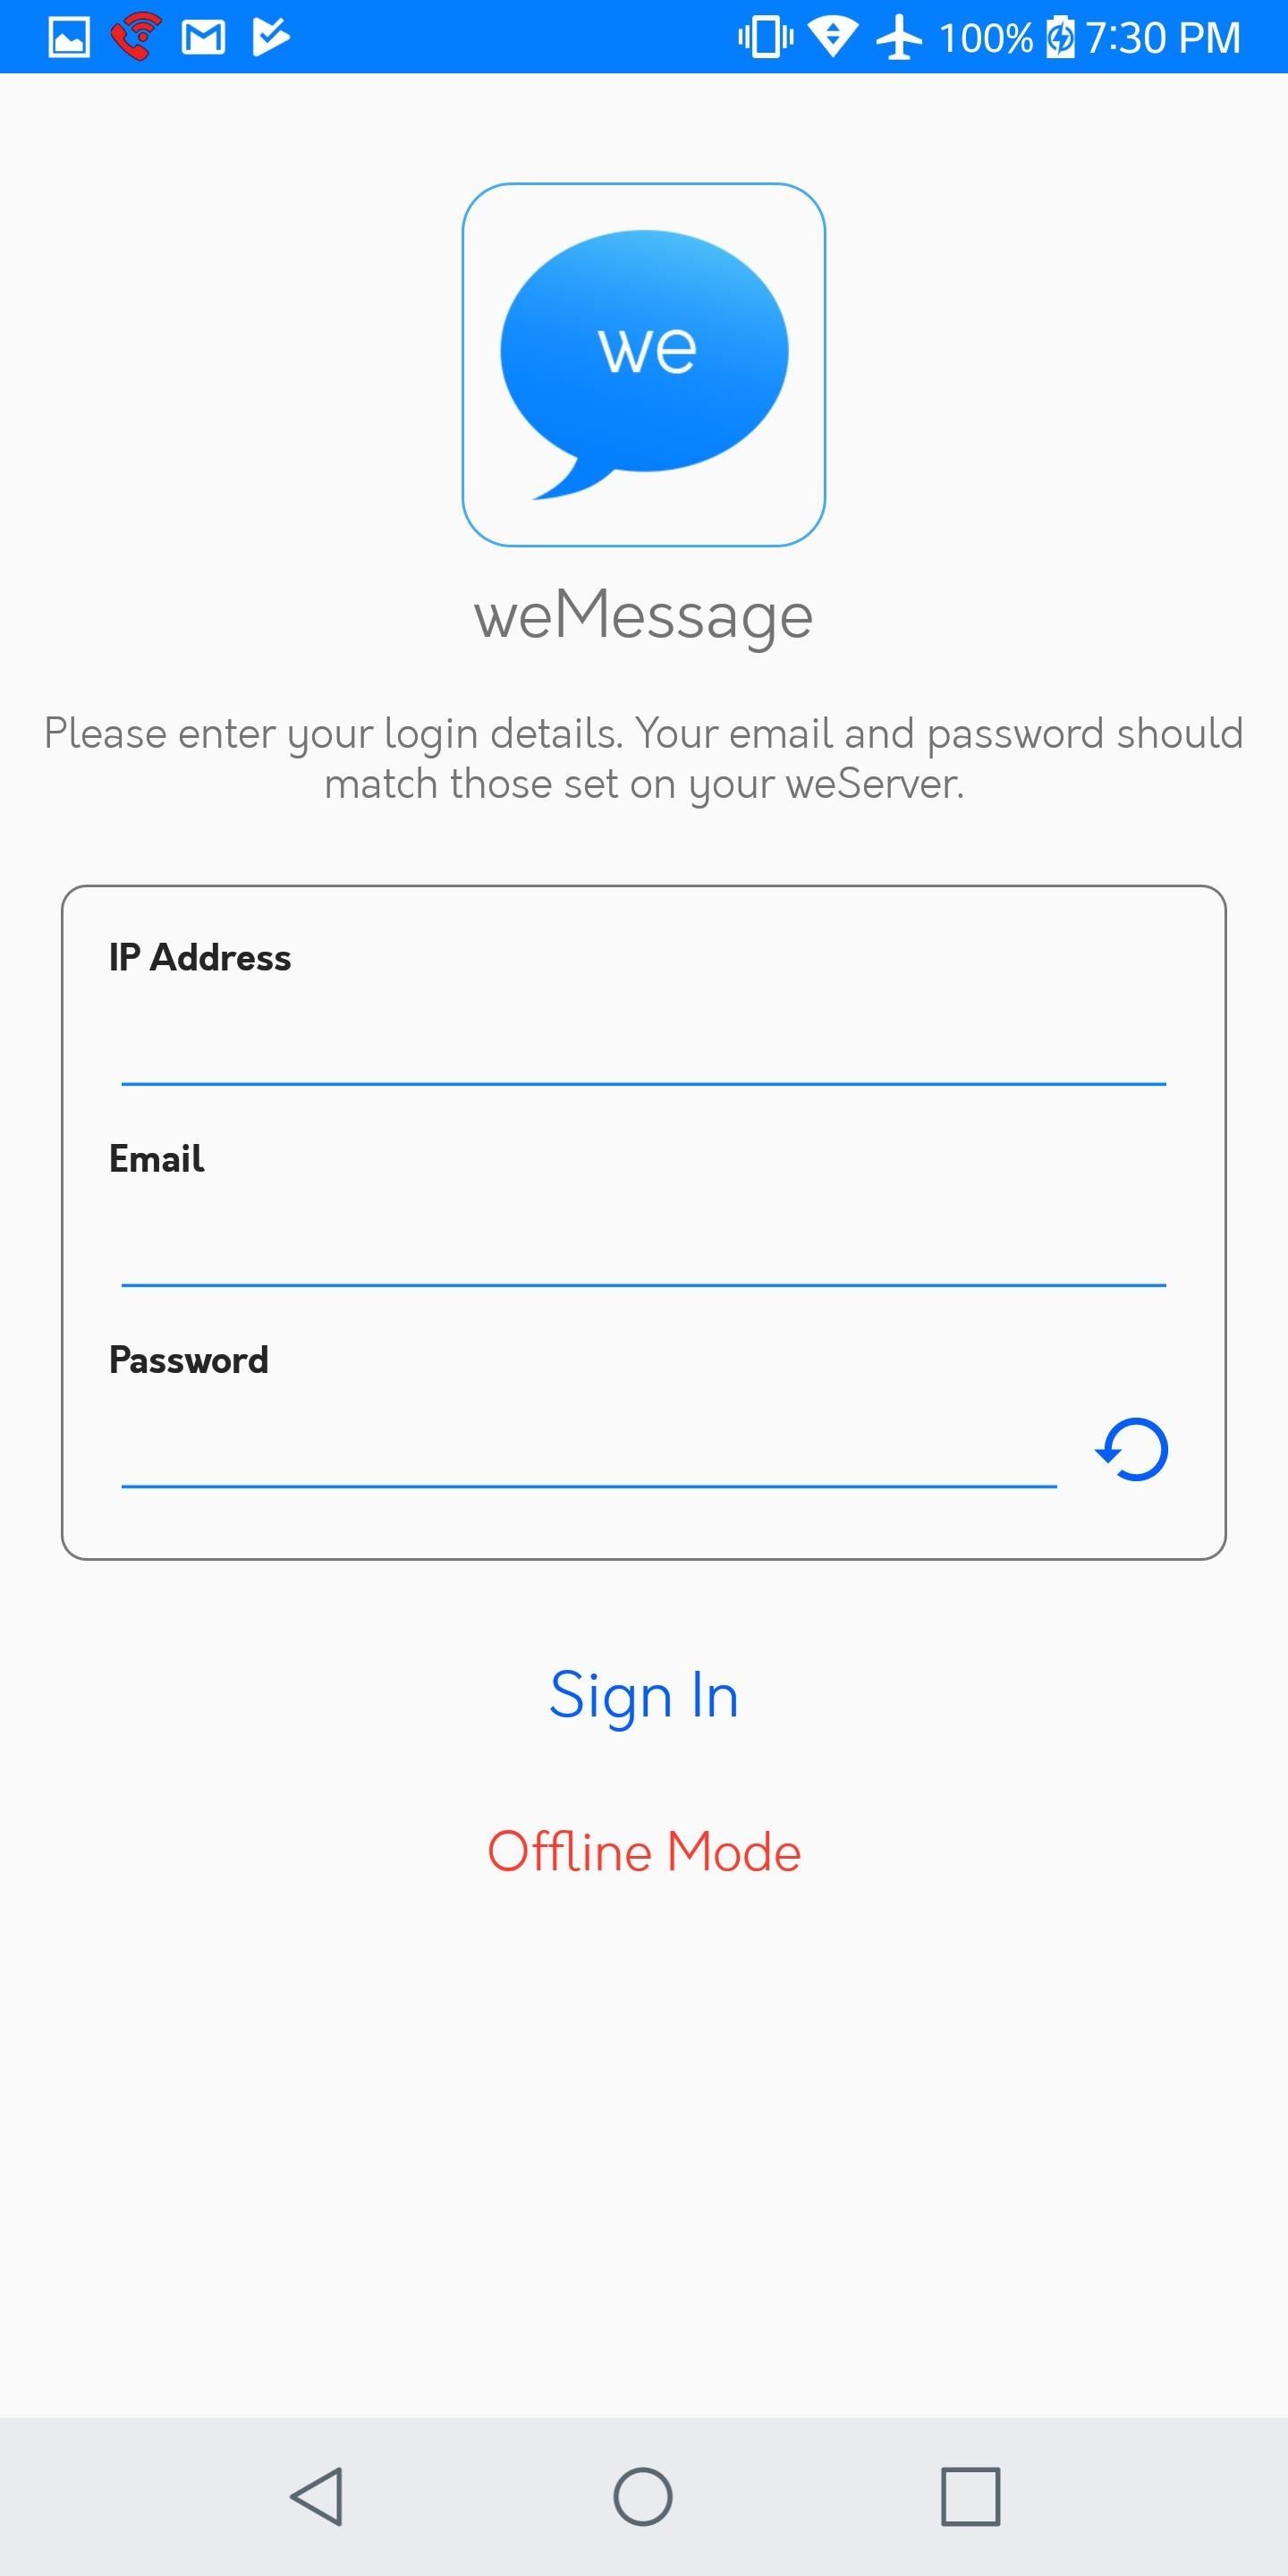
Step 7: Log into weMessage on Your Android PhoneAfter you've chosen whether to use your Mac's private or public IP address, enter it into the weMessage app on your Android phone, along with your iMessage email address and weServer password, then tap "Sign In."You'll know things are working when it says in weServer on your Mac that your Android phone has connected. Your current iMessages won't be imported, but you'll see all new conversations that take place as they happen.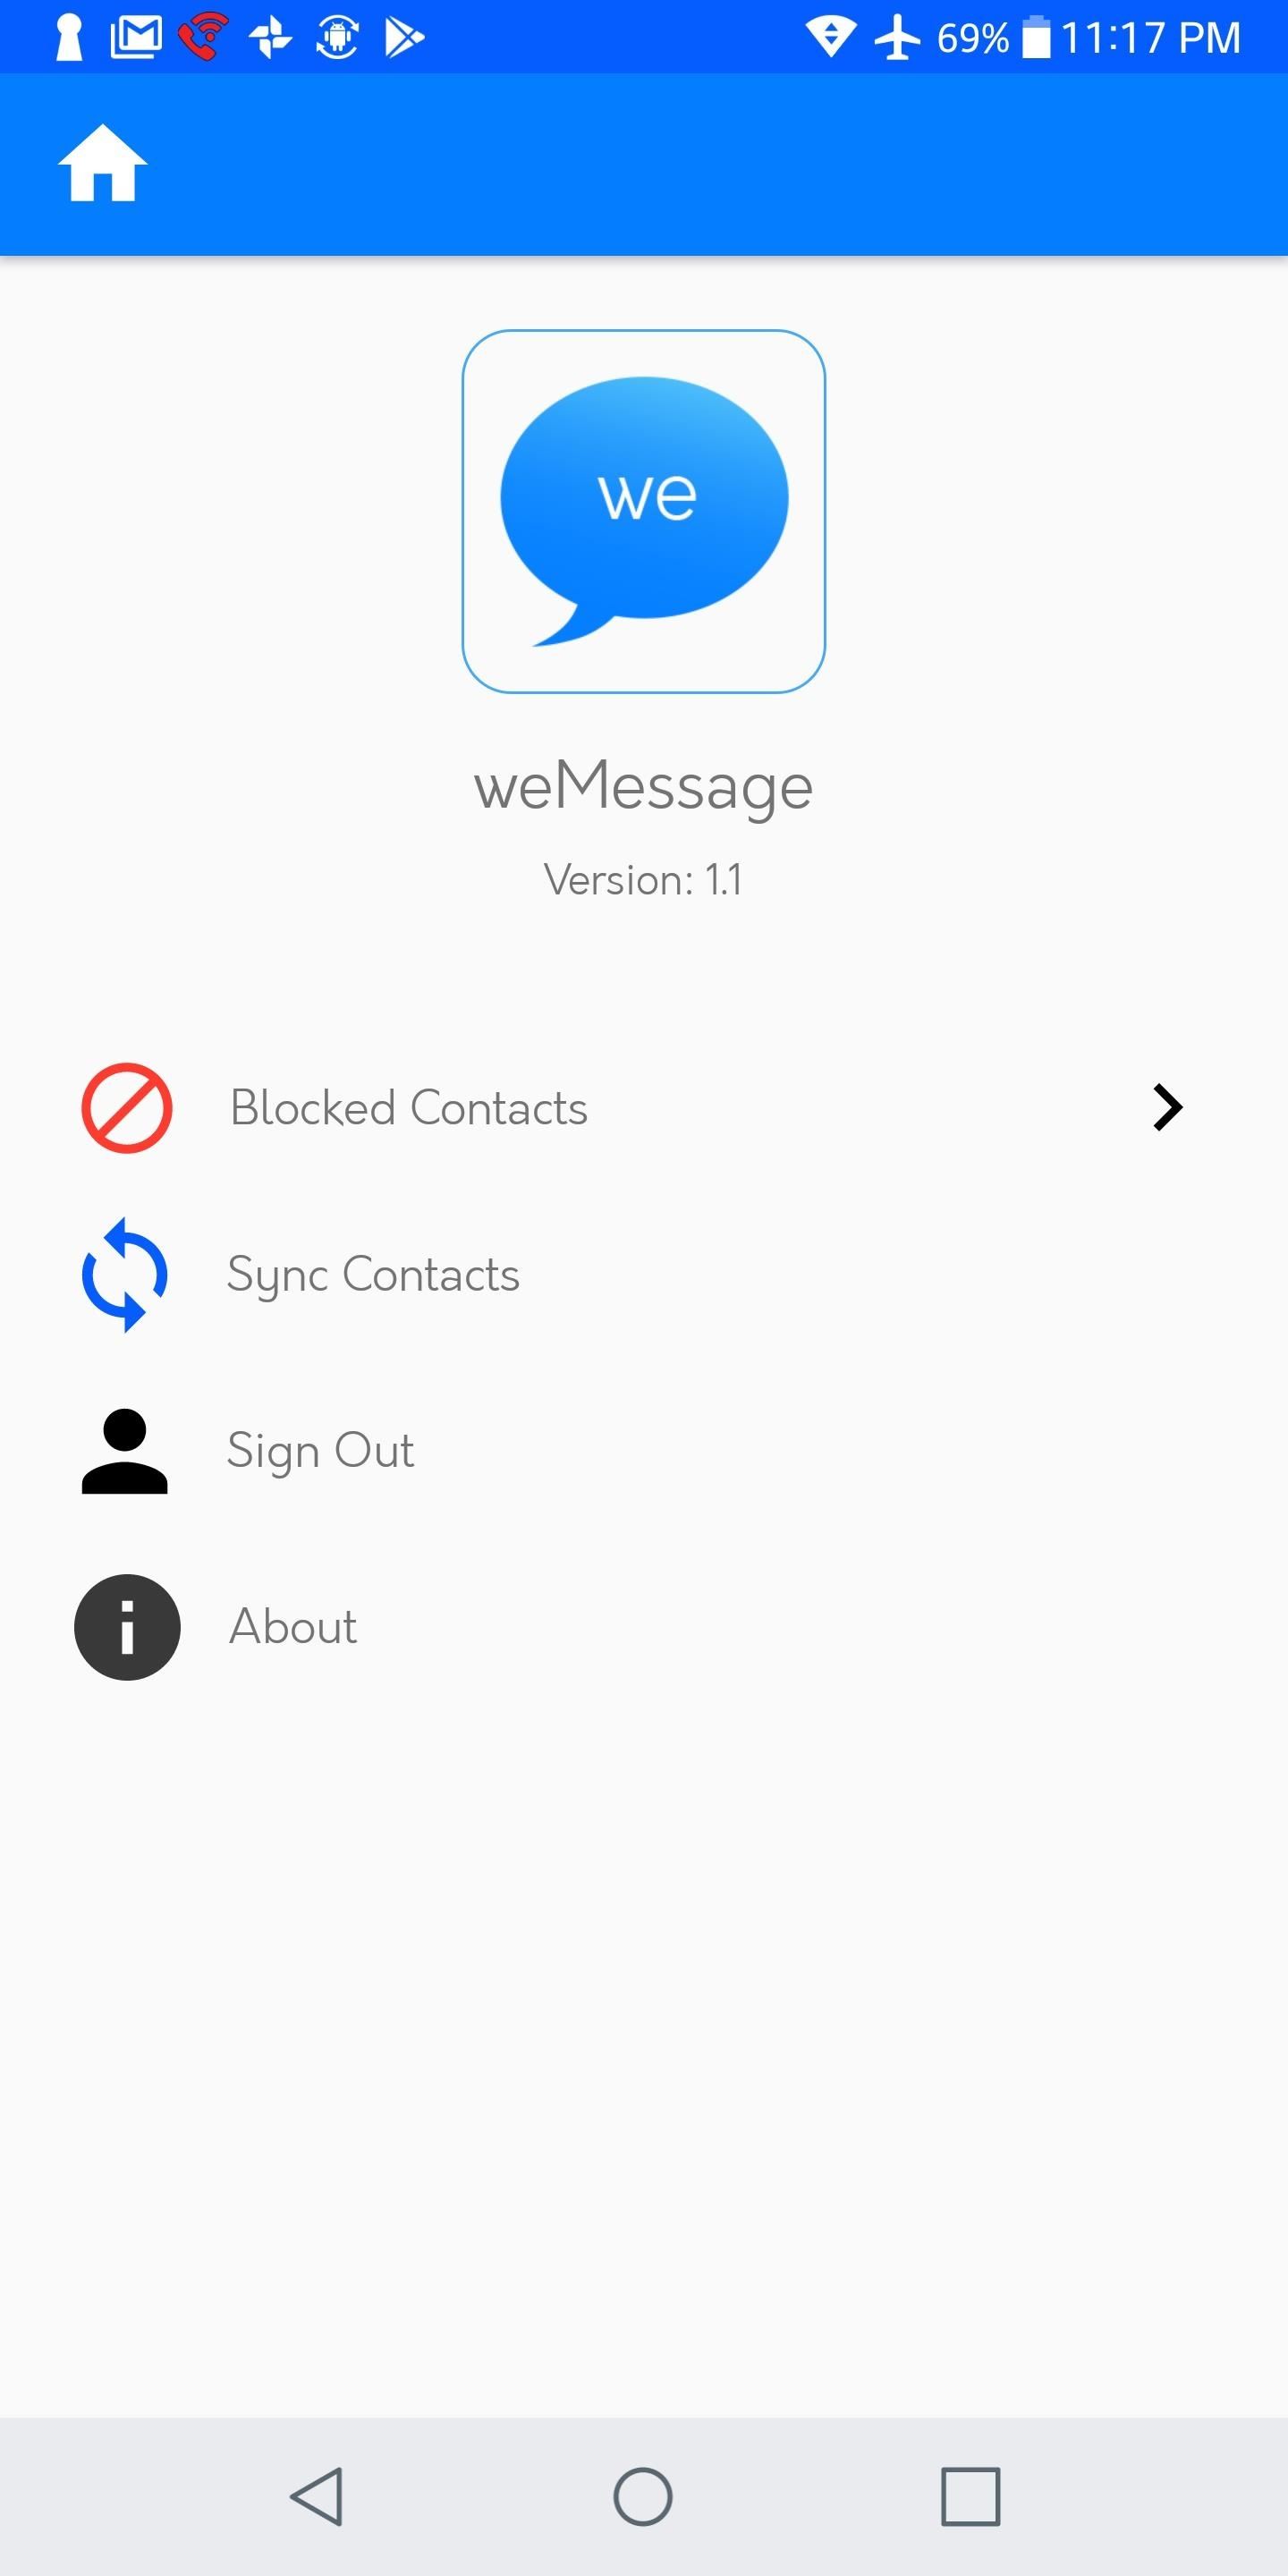
Step 8: Sync Your iMessage Contacts with weMessageBefore you start using weMessage, it's best to sync your iMessage contacts with weMessage. To do so, you need to give Terminal (on your Mac) access to your contacts so that your weServer can send your iMessage contacts to weMessage. In the weMessage app on your Android phone, tap on the "Settings" cog icon in the top-left corner. From here, tap on "Sync Contacts," then "Start Process." On your Mac, Terminal should automatically ask for permission to access your contacts, so follow the prompts to give it access.If you don't get prompted or weServer returns an error, open up "System Preferences," then go to "Security & Privacy." Click on the "Privacy" tab, then on "Contacts" from the left menu. Make sure "Terminal" is checked on the right side. If Terminal is open, you may need to restart it for the change to take effect, then tap on "Start Process" again in the weMessage settings. It will take a few moments for your contacts to sync, but when it's done, you should get a "Contact Sync Success" alert in the weMessage app on your Android phone. Tap "Okay" on that, then go back to the homepage to start messaging people.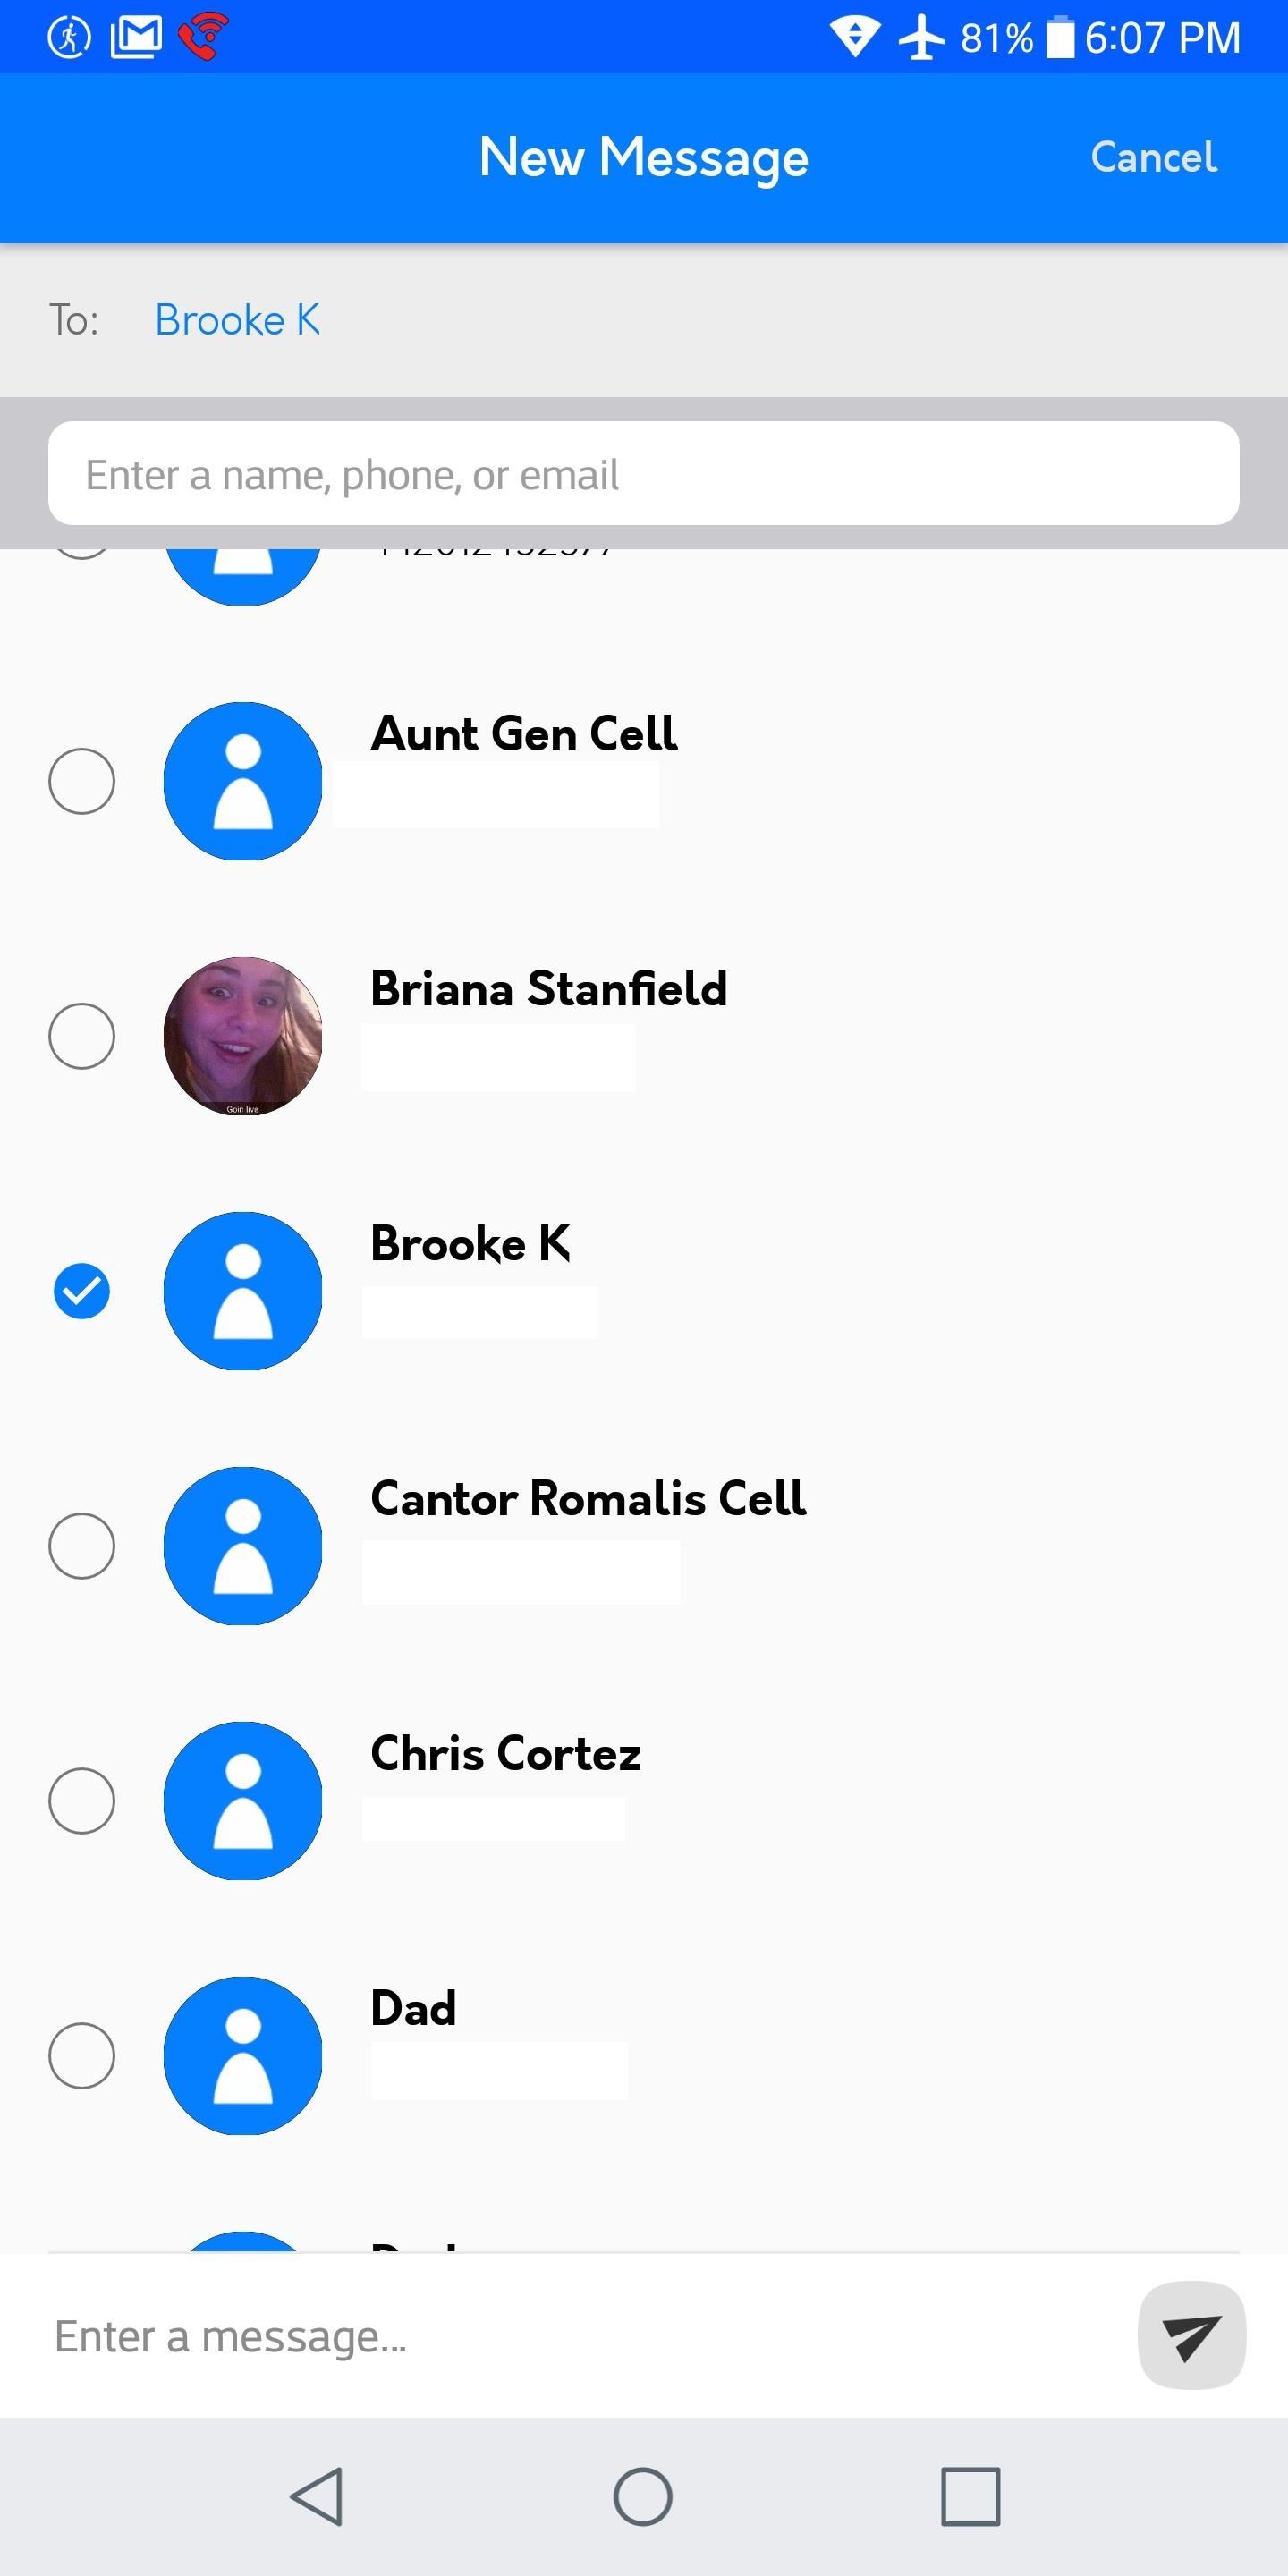
Step 9: Start Chatting via iMessage on AndroidBegin a new conversation by tapping the + icon in the bottom-right corner of the weMessage homepage. Your contacts should appear before you, but you can always enter a number or email manually yourself.After you hit the circle next to a contact to check them, you can start typing at the bottom where it says "Enter a message." To create a group message, simply tap on multiple circles before typing. Note: There is a bug that can prevent your contacts' names from being displayed in the list of "Conversations," but you can still message them all the same.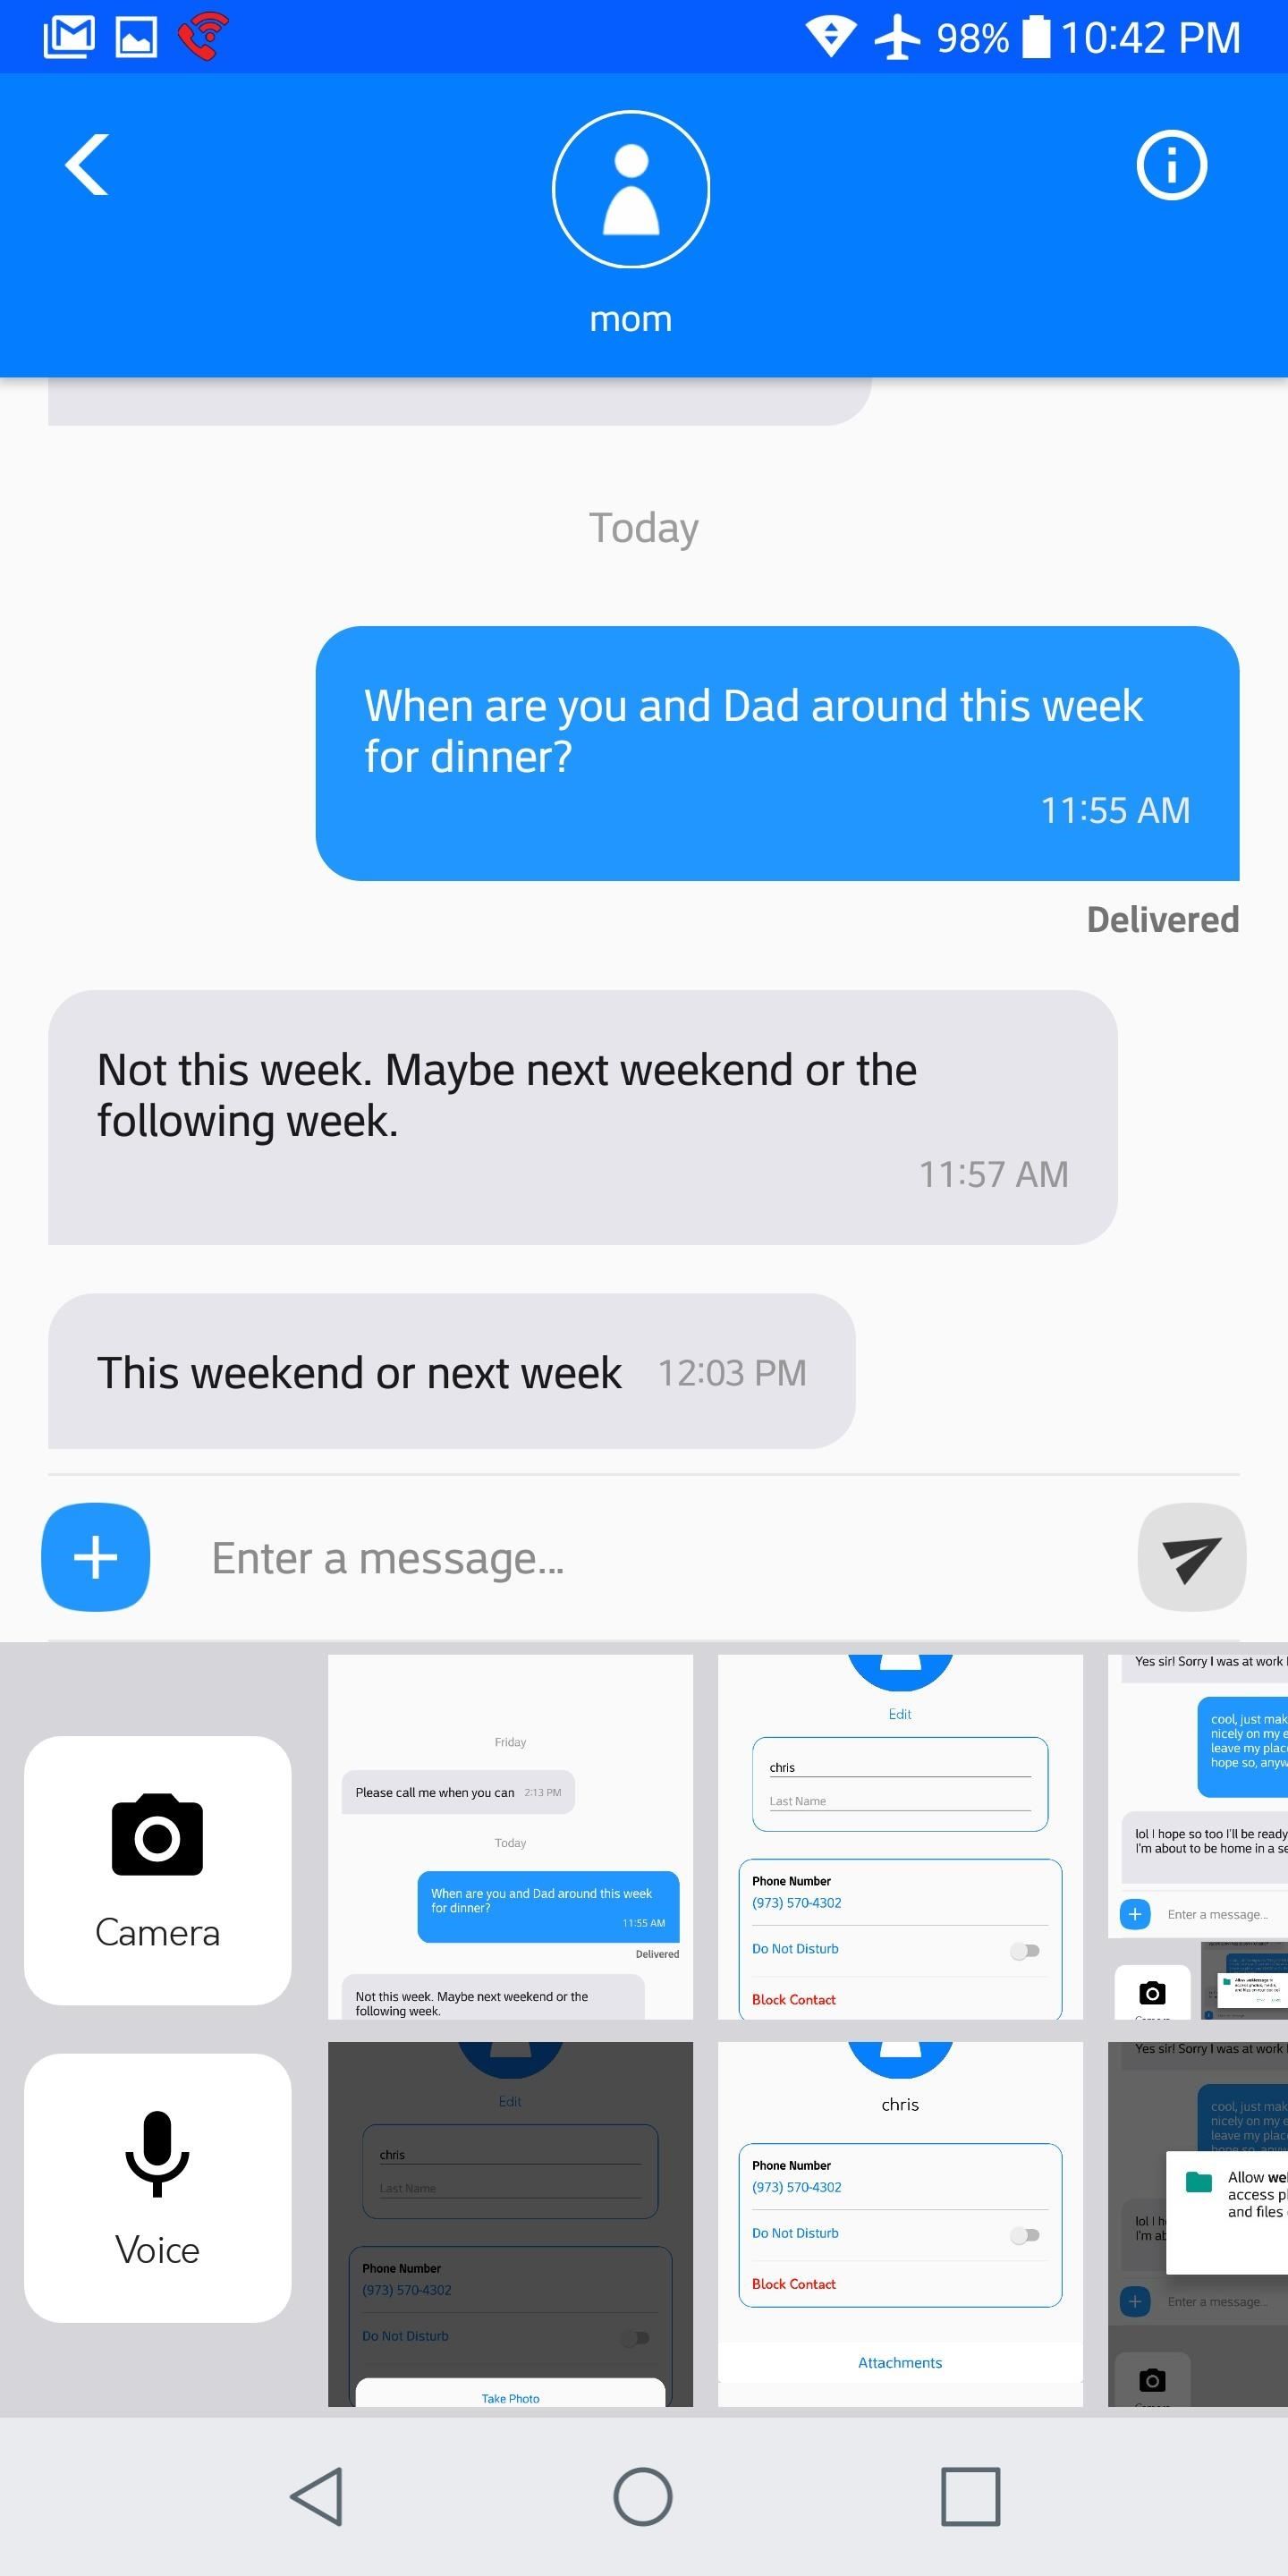
iMessage Features You Can Use on weMessagesWhile weMessage doesn't integrate all of iMessage's features, it added a few key features from its iOS counterpart. For starters, when you're in a conversation in weMessage, you can tap the + icon on the left of the text box to add media to enrich your messages. Your screenshots and pictures will appear by default, but tapping the camera icon will allow you to take a brand new picture. By tapping "Voice," you can record your own voice messages to send. You can also tap on the "i" in the top-right corner to bring up more information about your contact. Here, you can turn on a "Do Not Disturb" mode that silences notifications from that individual, and you can also "Block" them. Tapping "Edit" in the top-right corner will also allow you to change the contact's name and picture. Also, some iMessage screen and message effects work. While you can't send any of these effects, you can receive them. We tested them all out and found out the only ones that work right now are Loud, Gentle, Invisible Ink, Confetti, Fireworks, and Shooting Star.
Step 10: Make Sure weServer Is Always OnIn order for your weServer to work properly, it will need to be able to access the internet at all times. As long as you keep weServer running in Terminal, you should be good to go, even if your Mac falls asleep. If for some reason your Mac is not responding when sending and receiving iMessages, you could use the caffeinate command in Terminal to keep it awake until you deactivate it. If you have a MacBook and want to close the display, you can try using InsomniaX to keep the computer on with the display closed, but keep in mind that the developer no longer supports this software, so don't expect updates of any kind.
Useful Commands for weServer on Your MacWhenever you want to stop using the weServer, you can just type stop into the weServer Terminal window and hit enter. Aside from that, there are other Terminal commands you can use on your weServer. You can find a complete list of weServer commands on the developer's website.Don't Miss: 8 Great New Messages Features in iOS 11 for iPhoneFollow Gadget Hacks on Facebook, Twitter, YouTube, and Flipboard Follow WonderHowTo on Facebook, Twitter, Pinterest, and Flipboard
Cover image and screenshots by Brian Lang/Gadget Hacks
The HP tx1000 tablet has a defective NVIDIA chip which causes the laptop to get stuck at a black screen and not not boot over time. Conveniently, shortly after the 1yr warantee ends. This video
How to fix Black Screen of Death - HP laptop - YouTube
With embedded notifications in Firefox, you're stripped of Facebook's busy interface and instead given a simple toolbar on the top right side of the browser that keeps you updated with notifications, messages and friend requests.
How to Enable Facebook Notifications and Chat in Firefox Toolbar
How To Get The Galaxy S9's Translation Feature On Any Phone. Emily Price. Kotaku and Lifehacker Australia. Yesterday at Mobile World Congress in Barcelona Samsung unveiled the Galaxy S9
How to Set Speed Dial on Android. Android is an operating system developed by Google for a variety of smart phone devices. Setting a speed dial may be an old-fashioned thing, but it is still used by many people all across the world.
How to Speed Dial via Favorite Contacts on Any Android
Need to send an email to someone's phone as a short text instead? Learn how to send a text from your email account using any carrier by following our guide. We have instructions with gateway
Send Text-To-Email or Email-To-Text Messages - att.com
Apple definitely wasn't first to the widget game, but any iPhone running iOS 8 or higher can add widgets to their Today View found via a swipe down from the top of the screen when on the home screen or in any app. There's even access to widgets on the lock screen via the same swipe down on iOS 8 and
How to Remove Widgets from Your iPhone's Lock Screen « iOS
Skip navigation Sign in. Search
Auto-Mute Group Chat Notifications Before They Get Annoying
once you have all the ringtones you want set, go back into your contacts, select "options" and then ringtone, your list will pull up and you can select them from there and it works 100% I had used a couple different ringtone apps and for some reason when I "set as ringtone" in the app, it just does not apply correctly to the phone..
Save Money on Hulu by Picking the Plan That's Right for You By admin On 19 maggio 2019 · Hulu used to be simple — just a site with all the latest clips and episodes from your favorite shows.
Buy Hulu Plus Tv Commercial, 5 Reasons - Ispot.tv On Sale
americanpsychostreamingonlinefreebuy.dogtong.myftp.org/r/5723/traditional-anniversary-gifts---democrat.xhtml?x=1dayofchristmasbuyprayot
Save Money On Hulu By Picking The Plan Thats Right For You. How To Skip Or Block Hulu Ads Guide - Premiuminfo. You Can No Longer Stream Hulu For Free Huffpost. Hulu With Live Tv Review: A True Cord-Cutting Contender. Hulu Adds Showtime As Costs Of Streaming Services Quickly Mount. Hulu Wants To Charge You An Extra $4 Per Month To Remove Ads.
Remove Embarrassing or Irrelevant Titles from Your Hulu Watch
How To: Change the Home Screen Icon Shapes on Your Pixel in Android 10 How To: Effortlessly Hack & Mod Your Samsung Galaxy Note 2 Using the Android Everything Tool Android Basics: How to Find Your Phone's Screen Density Value (320 DPI, 480 DPI, 640 DPI, Etc.)
How to Change DPI Scaling on the LG V30 « Android :: Gadget Hacks
Need a new iPhone for iOS 13? Sell your old one and upgrade today Everything you need to know about location sharing in iOS. if you let it. Many apps ask to know where you are so that they
iPhone Notes App: Everything You Need to Know
0 comments:
Post a Comment