How To: Return Your HTC One to 100% Stock (Unroot & Update)
Returning your device to stock, whether it is because you need to sell it or just want to receive OTAs again, is not always a simple process. Since HTC has released countless variations of both the M7 and M8 HTC One, it can be a pain in the ass finding the right files and tools to get your phone back to stock settings.The general process is mostly the same across all devices, but the files and exact steps vary depending if you are using a Sense or Google Play Edition device. Before getting started, I'd recommend reading this entire guide one time to make sure your device meets all the qualifications.
PrerequisitesYour HTC One MUST be S-Off. Root permission will also be needed if you plan on resetting the warning flags on your bootloader menu. In order to avoid any hiccups during file transfers, you will need to use a USB 2.0 port when connecting your One to your computer. ADB and Fastboot will be need in order to send the install commands to your device. It does not matter whether you are using a Windows PC or Mac, just be sure that you are using the latest version of ADB/fastboot. Enable USB Debugging in order to send ADB commands to your One. It should go without saying, but this will completely wipe your device, so be sure to back up your pictures, music, and videos before starting.
If You Are Coming from a Converted Google Play Edition M8The Google Play Edition version of the HTC One M7 is fairly simple to convert back and forth between Sense and Vanilla Android, but that is not the case with the M8. Due to some system partition size differences, you must first flash a Sense firmware file before being able to go back to stock Sense. If you are using a converted M7, you can skip this section and go directly to "Reset Warning Flags" below.
Step 1: Reset CIDThe CID of your device is one of the many indicators that decides which firmware and ROMs you can install. Since you converted your original CID to the Google version you will need to bring it back to a Sense compatible version to install the appropriate firmware file. In this case we will use the universal Super CID. To get started plug your device into your computer, open up either Command Prompt (Windows) or Terminal (Mac/Linux), and then enter the following commands:adb reboot bootloader fastboot oem writecid 11111111 fastboot reboot Once your device reboots, do not unplug it from your computer.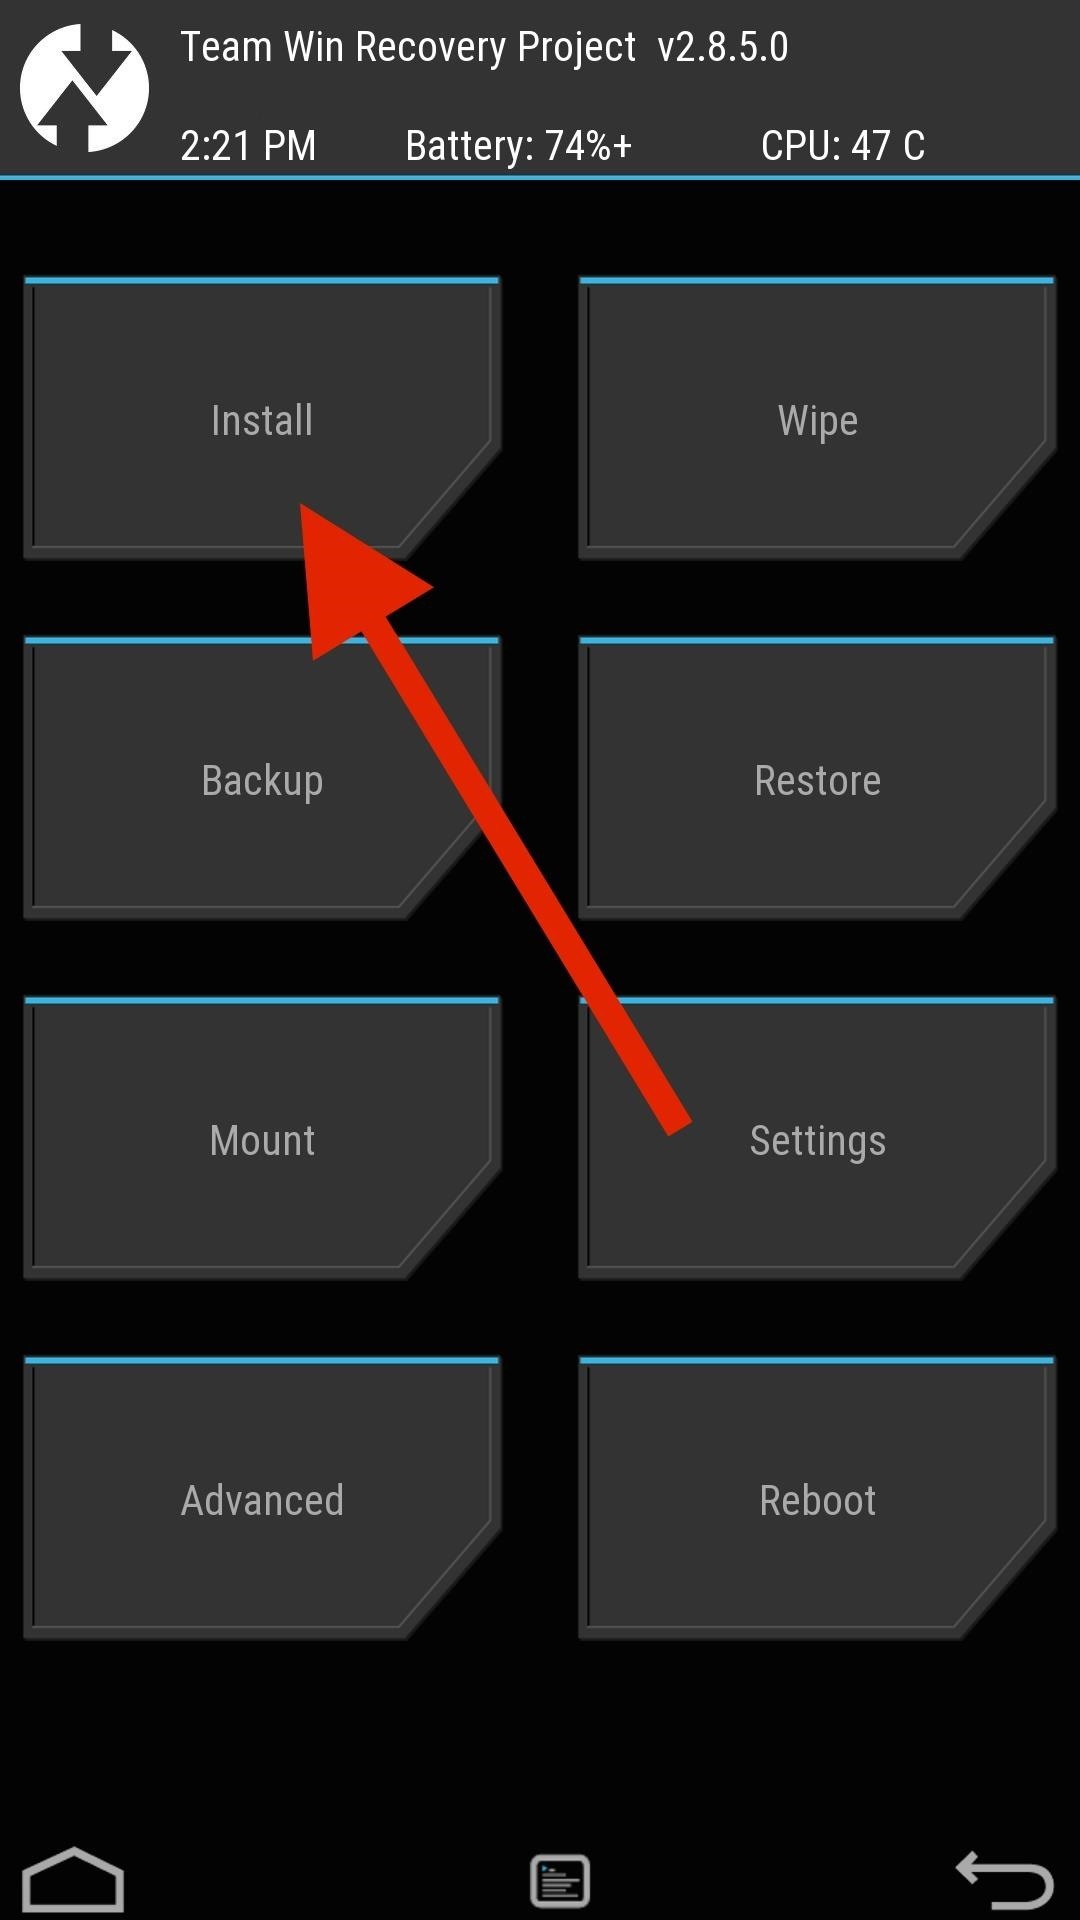
Step 2: Reset MIDIf you needed to change your MID in order to flash the Google Play Edition RUU, you now need to change it back in order to flash your original carrier's ROM.Download the MID Changer Tool, created by XDA user squabbi, onto your phone and flash it in TWRP recovery.To boot into recovery mode, press and hold down the power and volume down buttons until you see the bootloader menu. Under HBOOT, you will see Recovery, so select it with the power button and wait for TWRP to start. Once you are in TWRP, tap Install, select the MID Changer Tool file, and then swipe to install. The Aroma installer will then start automatically, so go through the warning screen and when prompted, select the carrier you want to revert back to. After the flash is completed, do not tap reboot—instead, go back to the main menu, tap Reboot and select Bootloader.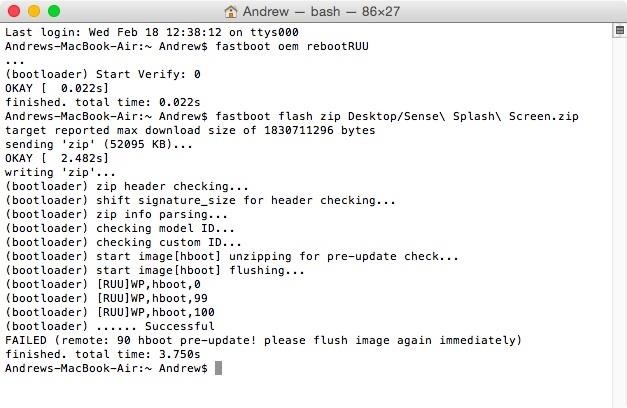
Step 3: Flash Sense Splash ScreenYou may have noticed that when you converted your M8 that the HTC logo that appeared when you turned on your device was switched to a Google logo. Unfortunately, this image cannot be restored when flashing the original carrier files, so instead we will need to flash a file through fastboot. Download the original Sense splash screen to your computer, then enter the following fastboot commands:fastboot oem rebootRUU fastboot flash zip "location-of-splash-screen.zip" This command will then take about a minute to complete, but once it does, you will see a line that reads FAILED (remote: 90 hboot pre-update! please flush image again immediately). Your One will also reboot once that last command is issued, so wait until you see the HTC logo again before continuing with the following:fastboot flash zip "location-of-splash-screen.zip" fastboot reboot-bootloader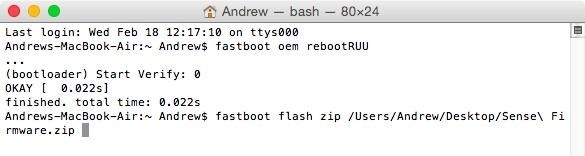
Step 4: Flash Sense FirmwareNow that you have the Super CID and original MID flashed onto your One, you are ready to install the Sense firmware. Download the Sense firmware onto your computer and place it somewhere you can easily access it. With your device still at the bootloader menu and plugged into your computer, use these commands to install the firmware ZIP file:fastboot oem rebootRUU fastboot flash zip "location-of-firmware.zip" Just like in the previous step, wait until you see FAILED (remote: 90 hboot pre-update! please flush image again immediately) in the terminal windows and for your M8 to display the silver HTC logo. Now issue the following:fastboot flash zip "location-of-firmware.zip" fastboot reboot-bootloader Again, leave your device plugged in and at the bootloader menu once the command are completed.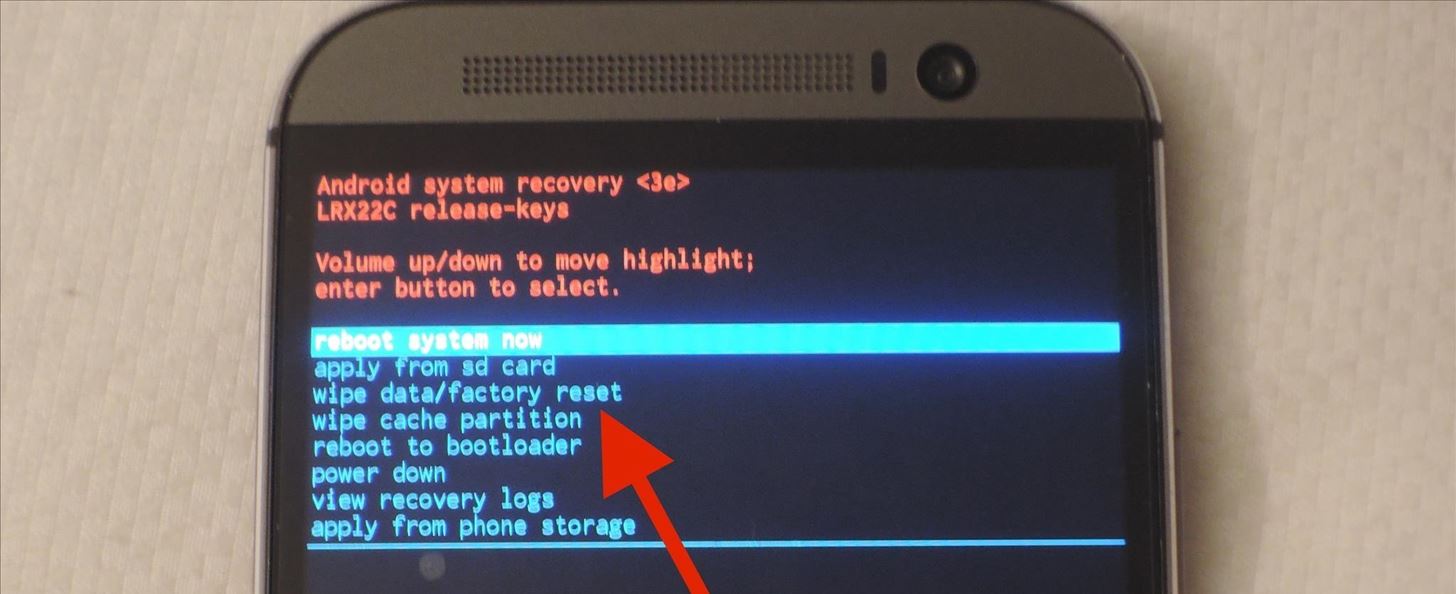
Step 5: Wipe Your Device from Stock RecoveryYour M8 is now running a Sense-based firmware, but it is still not partitioned correctly to accept the stock Sense ROM files, so you'll need to boot into the stock recovery and factory reset your device storage.Make sure that HBOOT is highlighted in your bootloader menu, then press the power button. From the HBOOT menu, scroll down to Recovery using the volume down button, then press the power button again. Once you see the HTC One with a red exclamation point, hold down the volume up button and press the power button. Scroll down to wipe data/factory reset, press the power button, and scroll down to the "Yes" option. After the reset is finished, select reboot to bootloader.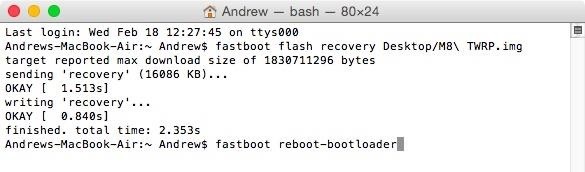
Step 6: Install TWRPThe last thing to do is flash a Sense-based ROM so that we can eventually get rid of the warning flags at the top of the bootloader menu.In order to flash a ROM, you'll need to download a copy of the latest M8 TWRP file and flash it to your device. Place the downloaded TWRP.img file somewhere safe on your computer, then enter the following commands:fastboot flash recovery "location-of-TWRP.img" fastboot reboot-bootloader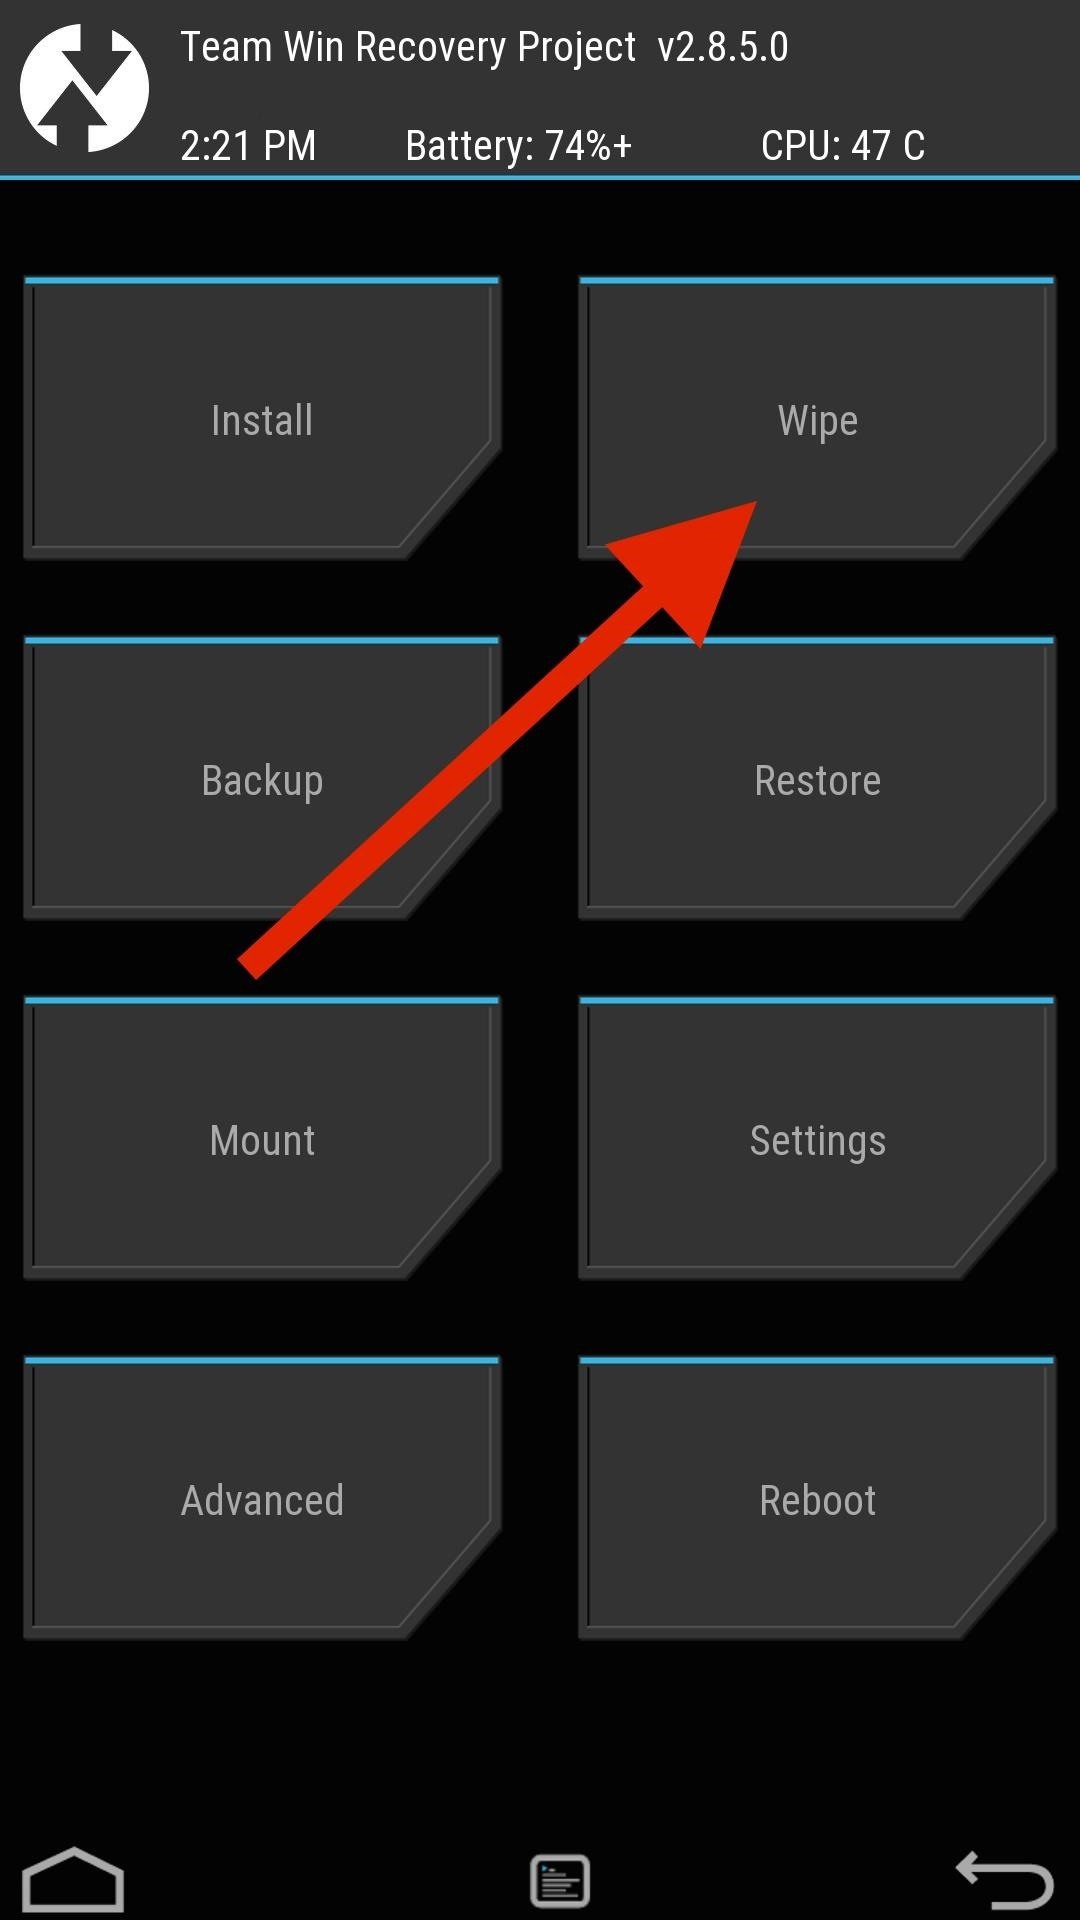
Step 7: Wipe in TWRPNow TWRP is installed on your device as a custom recovery, so use the HBOOT menu to boot into it like we did in Step 3. Once TWRP boots up, tap Wipe and swipe to perform a full factory reset.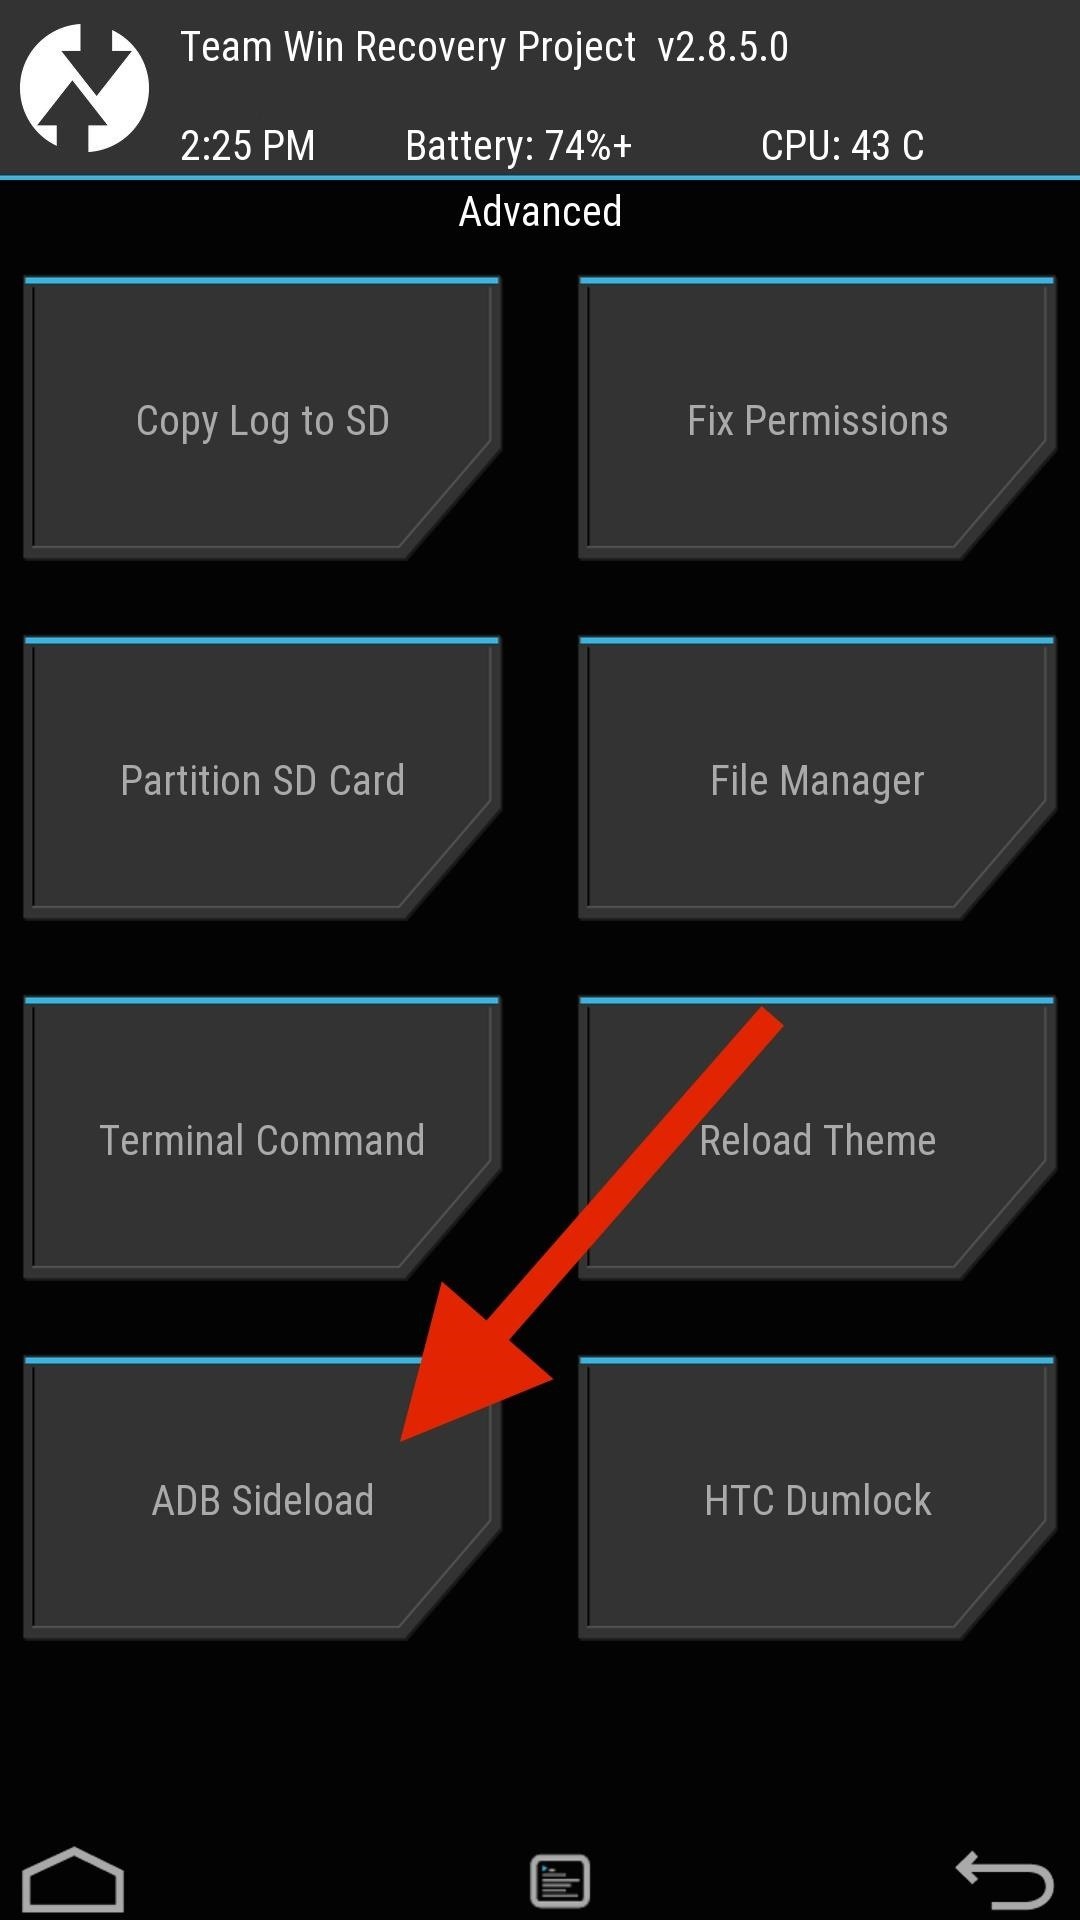
Step 8: Sideload Sense ROMTo install a Sense ROM onto your M8, I'll be using the latest ARHD ROM by Android Revolution HD. However, unlike traditional ROM installatios, we will need to sideload it since we do not have a ROM.zip file in internal storage. To start the process, tap Advanced -> ADB Sideload and swipe. Now sideload the ROM to your phone using the following ADB command:adb sideload "location-of-ROM.zip You may also want to check the description of your ROM to see if there is an Aroma installer associated with the installation. If there is, make sure you keep your M8's screen on the entire time because if it locks, you'll have to start over. After the sideload is complete, tap Reboot, set up your M8 as if it was brand new, and enable USB Debugging. Your M8 is now running a rooted, Sense-based ROM so we can finally get started on returning it to HTC's factory conditions.
Reset Warning FlagsThe telltale sign that your device has been modified is the Warning Flags at the top of your bootloader menu. These either say something like "UNLOCKED" or "TAMPERED" and can prevent you from getting your phone serviced if you send it to HTC.In order to set those indicators back to their original state, you'll need to enter a few ADB commands while your device is booted to a Sense-based ROM. The commands vary between the M7 and M8, so make sure you are using the correct one. After the commands are issued, leave your One plugged into your computer and on the bootloader menu.
M8 CommandsTo remove TAMPERED:adb shell su echo -ne '\x00' | dd of=/dev/block/mmcblk0p6 bs=1 seek=5314564 exit exit adb reboot To switch from UNLOCKED to LOCKED:adb shell su echo -ne '\x00\x00\x00\x00' | dd of=/dev/block/mmcblk0p2 bs=1 seek=33796 exit exit adb reboot-bootloader Your bootloader menu should now only display LOCKED at the top.
M7 CommandsTo remove TAMPERED:adb shell su echo -ne '\x00' | dd of=/dev/block/mmcblk0p7 bs=1 seek=4265988 exit exit adb reboot To switch from UNLOCKED to LOCKED:adb shell su echo -ne '\x00\x00\x00\x00' | dd of=/dev/block/mmcblk0p3 bs=1 seek=33796 exit exit adb reboot-bootloader Your bootloader menu should now only display LOCKED at the top.
Finding the Right RUU for YouYou now have a device that has no indication of being modified, but in order to get the software back to stock, you'll need to use a RUU, aka ROM Update Utility. The RUU installs all of the original, carrier-specific system files that shipped with your device, so be sure to download the file that matches your device exactly.M8 RUU.zip FilessVerizon M8 RUU.zip (courtesy of Dottat). T-Mobile M8 RUU.zip (courtesy of Sapplegater) AT&T M8 RUU.zip (courtesy of An0ther) Sprint (non-Harman Kardon Edition) M8 RUU.zip (courtesy of O.M.J) Sprint (Harman Kardon Edition) M8 RUU.zip (courtesy of O.M.J) Developer Edition M8 RUU.zip (courtesy of Nkk71) M7 RUU.zip FilesVerizon M7 RUU.zip (courtesy of Ak074) T-Mobile M7 RUU.zip (courtesy of HTC1Guru) AT&T M7 RUU.zip (courtesy of clsA) Sprint M7 RUU.zip (courtesy of O.M.J) Developer Edition M7 RUU.zip (courtesy of HTC1Guru)
Flash RUU FileDownload your RUU.zip file directly to your computer and enter the following commands to begin the flashing process:adb reboot bootloader fastboot oem rebootRUU fastboot flash zip "location-of-RUU.zip" This command will take about a minute to complete, and once it does, you'll see a line that reads FAILED (remote: 90 hboot pre-update! please flush image again immediately). Your One will reboot once that last command goes through, so wait until you see the HTC logo again before continuing with the following:fastboot flash zip "location-of-RUU.zip" fastboot reboot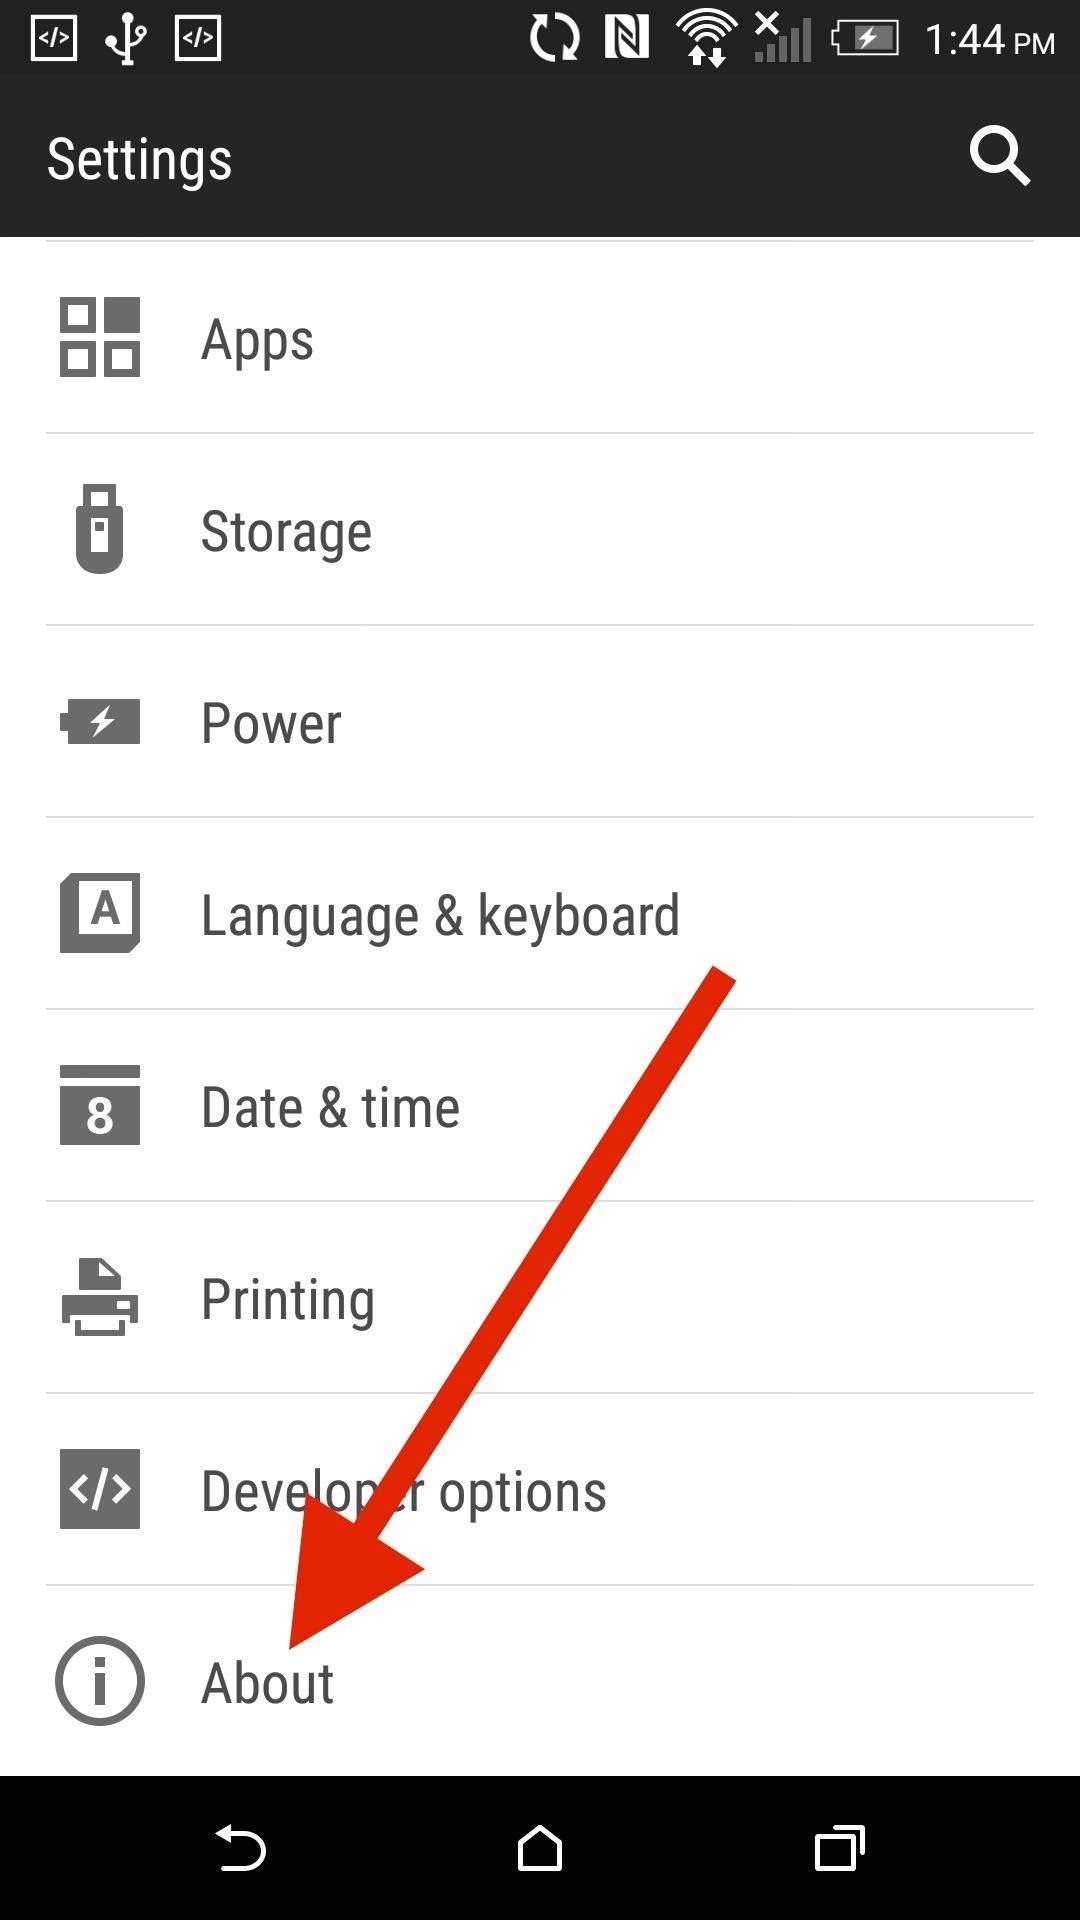
Check for OTAsYour One will now boot up as if it were a brand new device, so go ahead and enter your Google credentials to begin restoring all of your apps and contacts.You will also need to check for OTA updates since some of these RUUs are outdated (Settings -> About -> Software Updates). It may take a few hours for updates to be pushed to your device, so be patient. OTAs will install just fine as long as you have an unrooted, unmodified device.
Set HTC One to S-OnIf you're planning on sending your device in for repairs, you need to go from S-Off to S-On. Know that if you do this, there is no way of going back without paying for the Sunshine utility, so only do this if you really need to. To go back to S-On, enable USB Debugging and reset your security settings with the following commands:adb reboot bootloader fastboot oem writesecureflag 3 fastboot reboot And if you find yourself having any problems or are stuck at a particular step, be sure to drop me a comment below.Follow Android Hacks over on Facebook and Twitter, or Gadget Hacks over on Facebook, Google+, and Twitter, for more Android tips.
If you want to clear your all default apps or want to change default app in Android Lollipop, Marshmallow or Nougat, then it would be difficult to search that app, because all apps don't have a default option. So you can install Default app manager lite application from Google Play Store to set and change different apps in Androids.
How to change text message notification sound on android
When it comes to monitoring someone's activities, Spyzie has no contender. It allows you to read text messages, view incoming and outgoing calls, monitor app activities, restrict app usage and much more. The screenshot feature in Android version can be used to take a secret Snapchat screenshot without the sender being notified.
How to Screenshot Snapchat on Android and iPhone
Once you've removed the app or game, it should no longer post to your timeline. If you still see a past post, you can remove it . Note: The app or game may have stored info from when you were using it, but you can contact the developer to ask that they delete any info they may still have.
How can I remove unwanted apps from Windows 10? | Technology
You can get iPhone push notifications from lots of online services, but what if you want something from your home to send you alerts? Learn how to get iPhone push notifications when your letter
Send Push Notifications to your iOS app - Pusher | Leader In
First of all, search and download your favorite iPhone or iPod wallpapers, which have an immense library of beautiful wallpapers for iPhone or iPod Touch. Because iPhone integrates iPod Touch, the wallpapers for iPod Touch can be used on iPhone as well. Now, you may find the rest of the steps very familiar to you.
Top 5 Free Wallpaper Apps for Your iPhone « iOS & iPhone
Best Windows Phone alternatives for people who miss their Microsoft phones. Microsoft struggled to gain the users and top apps it It should work on most Android phones (you may need to
Verizon to pre-install a 'Spyware' app on its Android phones
The accuracy is anything but. Depending on current app and how hard the iPod is working the percent will jump wildly and make you nuts if you watch it. example: say when at rest, sleep mode your iPod displays 90%, start playing an online video game, it drops to 65%, stop the game and and start listening to music and it shows 75%, etc.
How can I show the battery as a percentage on my iPod Touch
Chrome 101: How to Block Popups & Intrusive Ads on Android
Your Apple Watch can receive these alerts if your iPhone can receive them and is nearby, or your Apple Watch is on a Wi-Fi network. With a cellular plan from a supported carrier, your Apple Watch Series 3 (GPS + cellular) can receive these alerts without your iPhone nearby. For more information, contact your carrier.
Emergency: Alerts on the App Store - iTunes - Apple
Force-closing an app in iOS 11 on the iPhone X. Image by Dallas Thomas/Gadget Hacks. But the swipe-to-dismiss gesture isn't completely gone in iOS 11 on an iPhone X. When the red minus buttons are displayed, you can then swipe up on cards to force-close them. So you still can swipe up to close, but only with those red minus buttons present.
How to Force Close Apps on iPhone X - iphonehacks.com
LED YO-YO SIDE CAPS Spin-activated lights for your butterfl y. By Eric Chu There aren't many low-budget ways to customize one's yo-yo. The most common ones are painting or dyeing; both look great, but they're limited: paint chips off, and dyeing is only for plastic yo-yos. Being a yo-yo fanatic, I regularly visit the blog
How to Make an aquarium with a USB powered LED light - Fish
How To: Install Nova Launcher on Your Samsung Galaxy Gear for a More Standard Android Look How To: Bring iOS 7-Style Notifications to Your Samsung Galaxy S3 or Other Android Device How To: Get the LG G3's Exclusive "Home" Launcher on Your HTC One or Other Android Device
How to install Android 4.4 KitKat launcher on the Samsung
Your iPhone, iPad, or iPod touch may not support all of iOS 10's new features, but there's a good change it can still handle at least some of them. Here's which devices support iOS 10: iPhone
Coolmuster iOS Assistant - Freely Manage iPhone/iPad/iPod
2019 Gift Guide: Must-Have Phone Accessories for Photographers . By Justin Meyers; Smartphones; Photography; 2019 Gift Guides; With smartphone cameras and software getting better and better every year, more and more users are getting passionate about photography.
2018 Gift Guide: Must-Have Phone Accessories for Audiophiles
Wirefly takes to the road with Google Maps Navigation on the Motorola DROID. Read reviews and learn more about the DROID at
0 comments:
Post a Comment