How To: Completely Disable Bixby on Your Samsung Galaxy
Sorry Samsung. I know you really wanted Bixby to be the next Siri, Google Assistant, or Alexa — but it just isn't. Burying the option to disable the app won't change that. Sure, Bixby has some redeeming qualities, but there are many of us who don't want it shoved down our throats. We'll show you how to disable the app to prevent it from launching every time you try to access just about anything.You might be wondering what we're even talking about — perhaps the option to disable Bixby is right there in the settings. While this is true for many, this has not been the case with the Galaxy Note 9 and a few other device. Also, the path to get there isn't totally intuitive, and it can be a frustrating when the app constantly pops up like a pushy salesman. For Note 9 users, a Bixby update with an option to at least partially disable the button is headed your way soon, if it isn't already here.To ensure you have as many options at your disposal as possible, make sure Bixby is up-to-date. You can access the Bixby app by pressing the dedicated Bixby button. Tap "More Options," which is represented by three vertical dots in the right corner. Select "Settings" and scroll down to find the "About Bixby" option. If you receive a popup that notifies you an update is available, tap "Update" to start the process. Alternatively, you can manually press "Update" from the About Bixby screen.Don't Miss: How to Remap the Bixby Button on Your Galaxy Note 9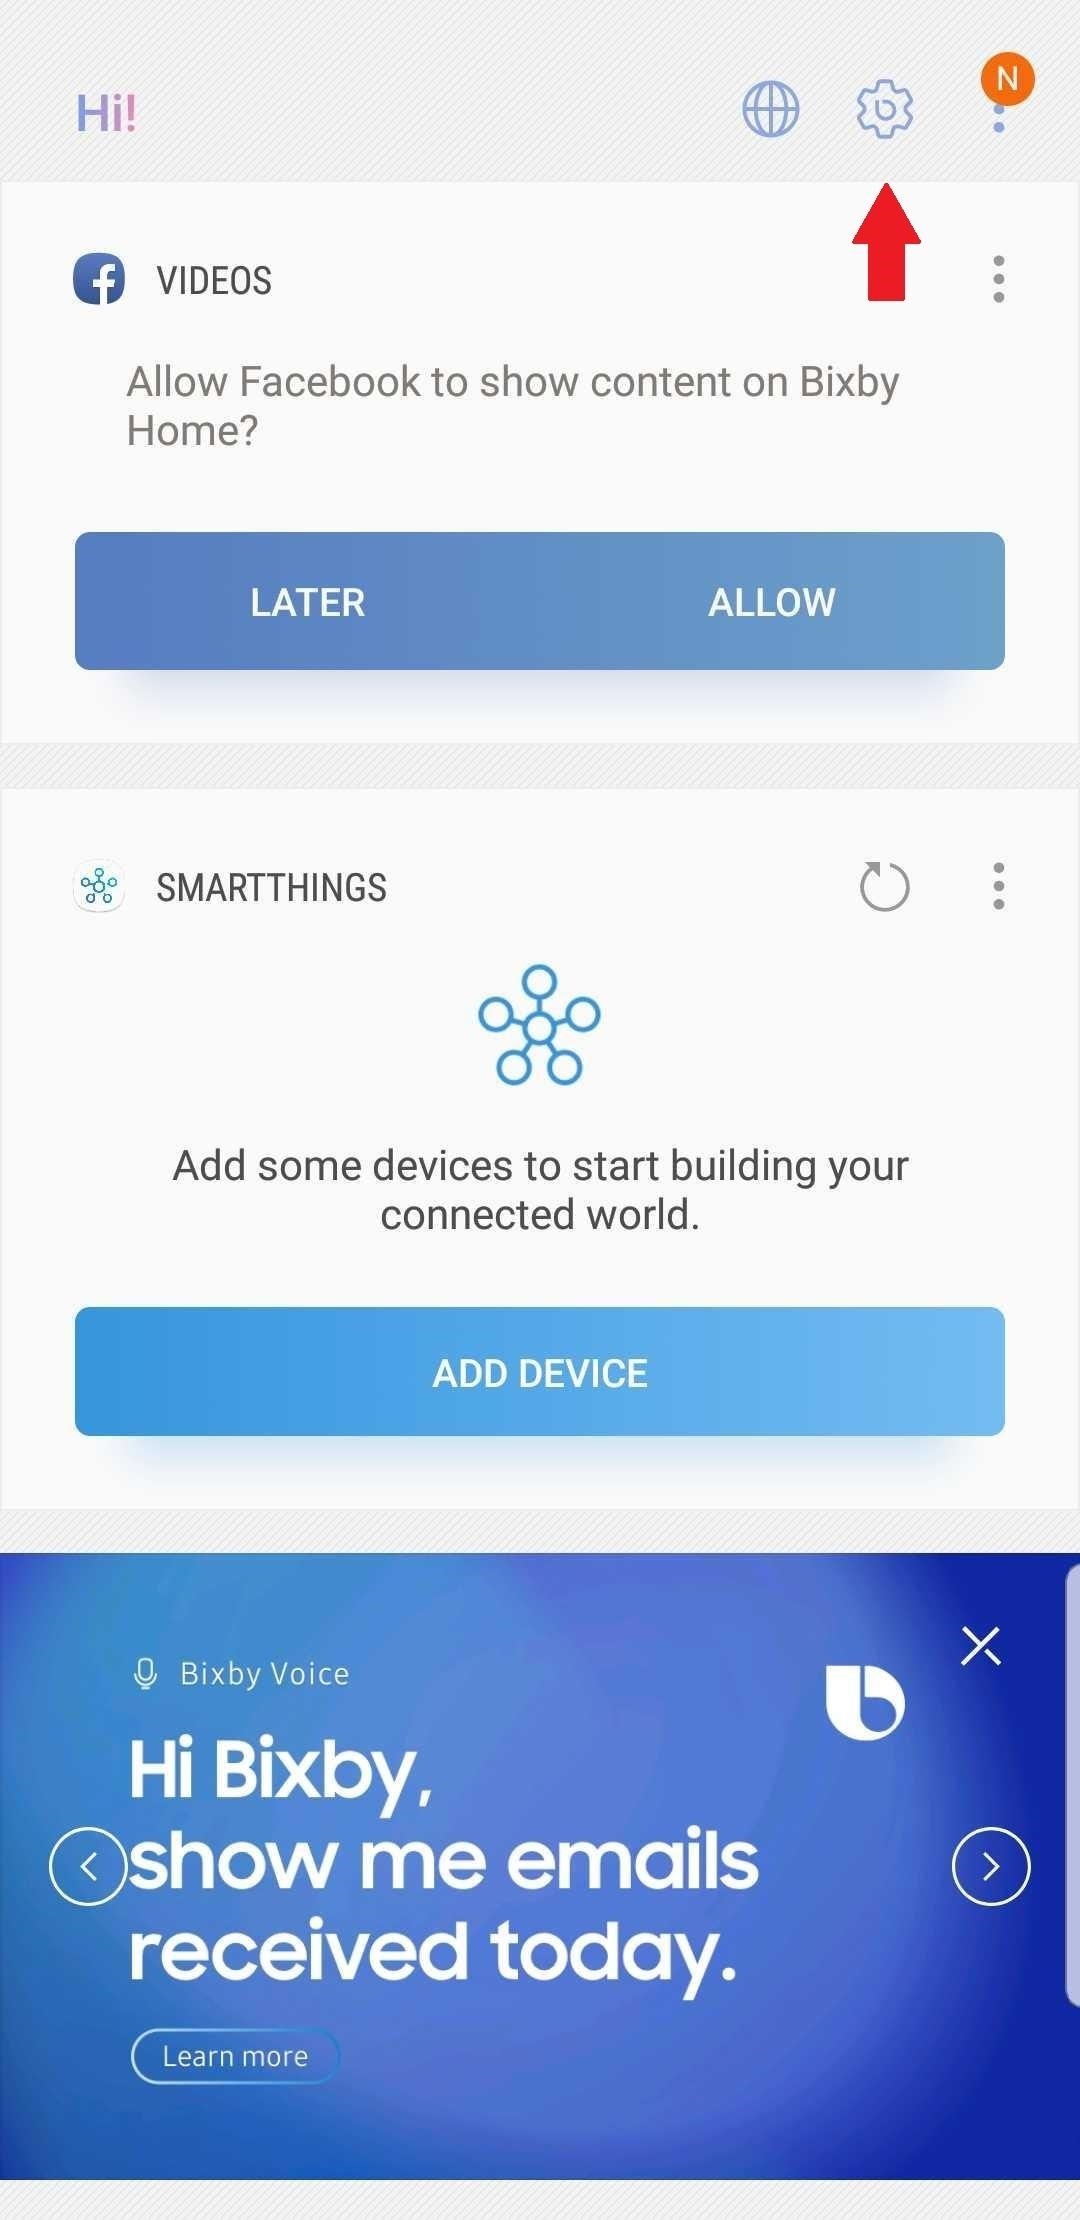
Method 1: Disable Bixby Button from SettingsSo if you do have the option to disable Bixby from Settings (lucky you), here's how it's done. Launch the Bixby Assistant by pressing the unnecessarily large button located directly below the volume rocker on the left side of your Samsung. In the upper-right corner of your screen, you'll see the Settings icon, which resembles a cog or gear. Tap it, and you will be presented with the option to toggle or slide the Bixby setting to an OFF position. You can also go to the Bixby Menu (three vertical dots stacked in the upper-right corner) to get to Settings. Once you've tapped the Settings option, scroll down to find the "General" section. Select "Bixby key." Now choose "Don't open anything." If you ever decide you want to turn this back on, long-press any blank space on your home screen, then swipe over to the right and make sure the toggle next to "Bixby Home" is enabled. Then, press your home button and swipe over to the leftmost page (Bixby Home). From there, tap the settings cog again, then enable the switch next to "Bixby key."
Method 2: Turn Off Bixby Voice via SettingsThe option to disable Bixby Voice is available from Bixby's Home settings, so it makes sense to address Voice before Home. If you went the route of accessing the Bixby Menu in the previous method, you will find this procedure quite similar.Start by launching the Bixby app. If you've disabled the button, you'll need to open Bixby by swiping to the right on your home screen until you reach Bixby Home. If you've disabled Bixby Home, you may have to enable it again by long-pressing any blank space on your home screen, then swiping to the right and turning on the "Bixby Home" toggle. If you're using a third-party home screen, you'll have to temporarily switch back to Samsung Experience Home to do this. The Bixby button can also get you there if you haven't already disabled it.Once you are inside of the Bixby app, tap the three vertical dots in the top-right corner. Go to Settings. Swipe down to locate the "Voice" section. There you'll find the toggle that you can tap or slide to shut off the service. Again, if you decide you want to turn this feature back on, make sure Bixby Home is enabled by long-pressing any empty space on your home screen and swiping over to the right, then enabling the toggle. Afterwards, hit your home button and swipe over to the leftmost home screen page, then repeat the above steps to turn the Bixby Voice toggle back on.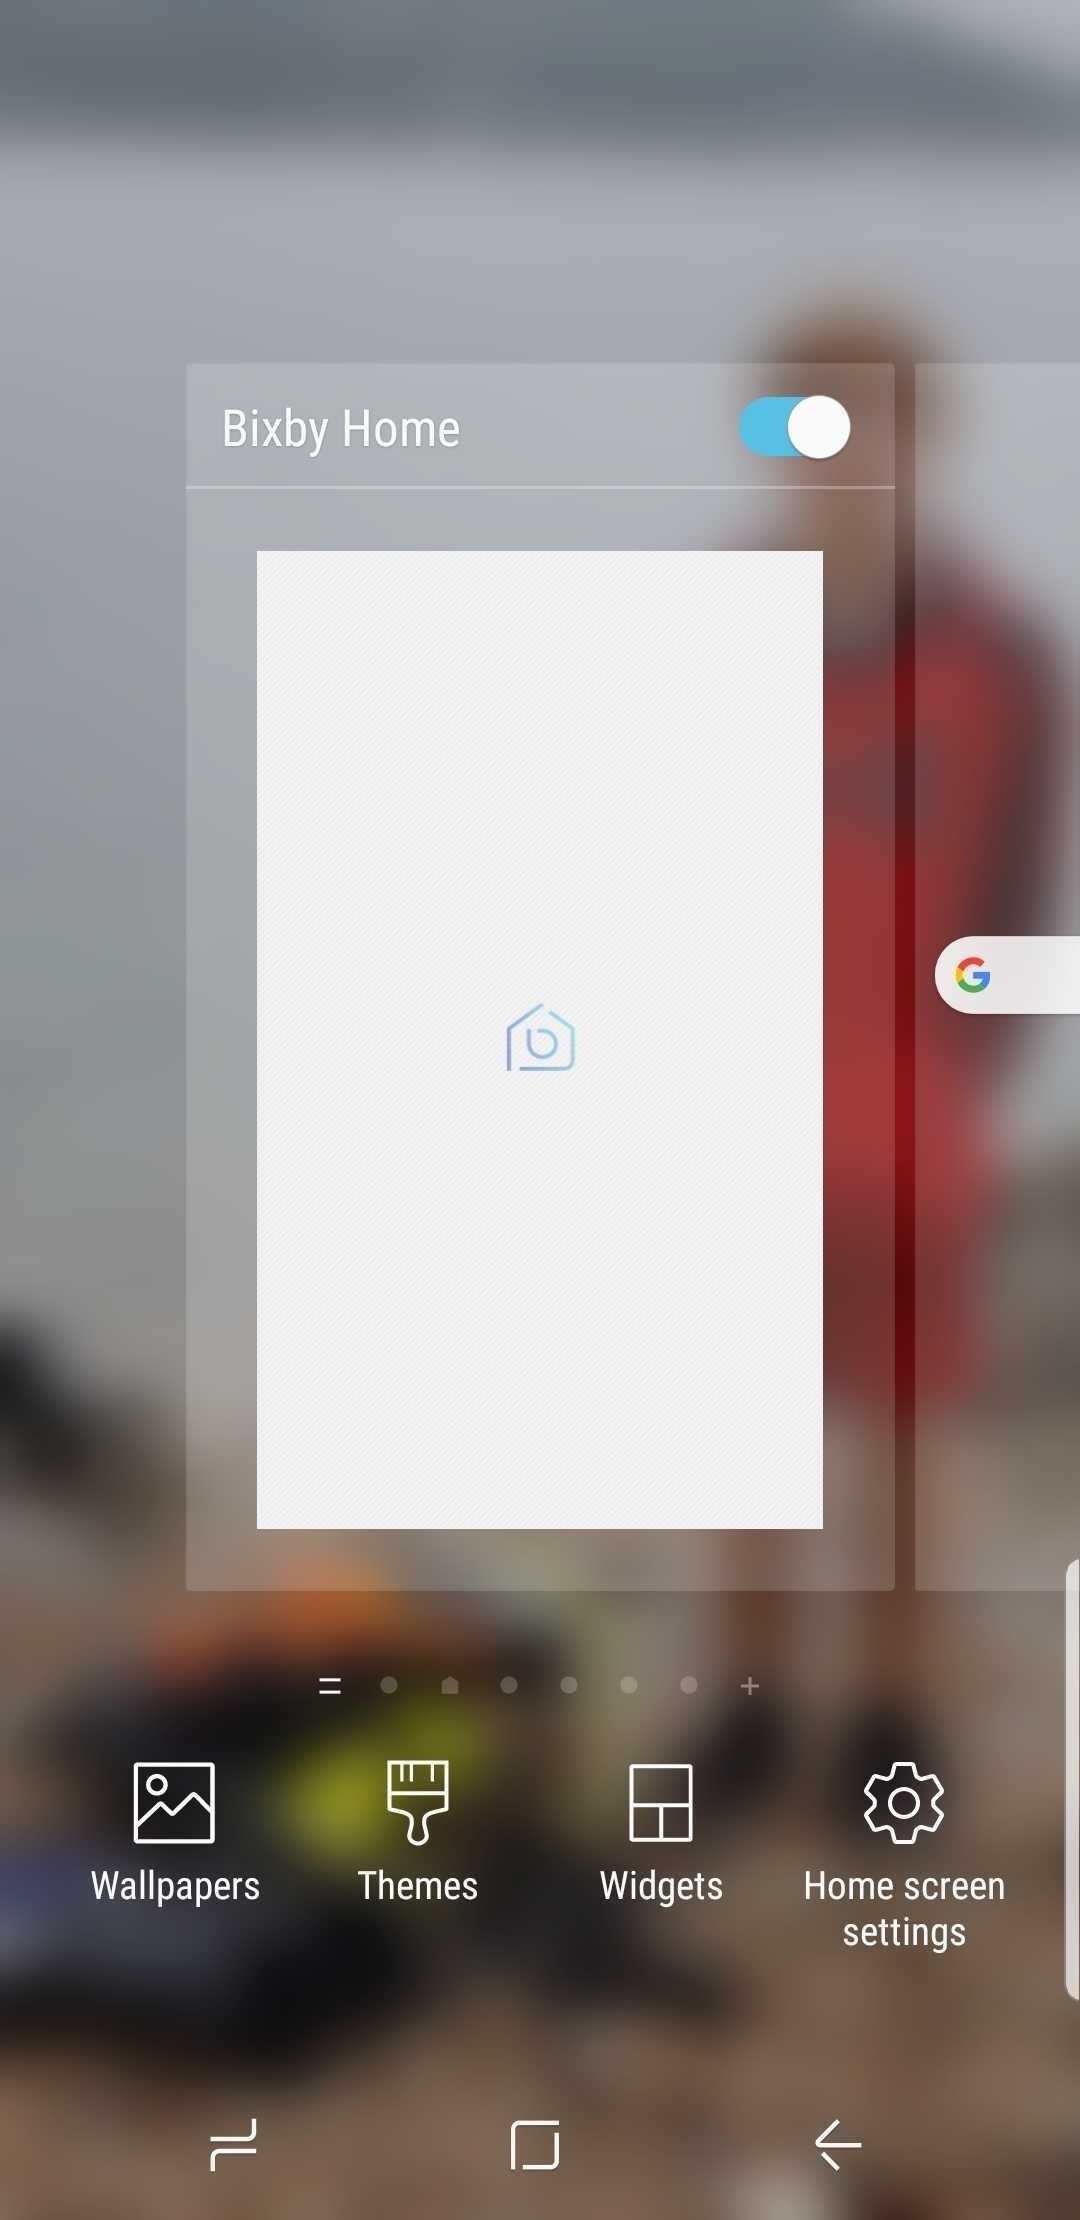
Method 3: Disable Bixby Home with a Long-PressIf you've conquered the giant button but Bixby is still popping up like a pesky fly, the culprit is Bixby Home. This Bixby service resides on the left side of your home screen, ever so eager to assist. To get rid of it, long-press any blank space on your home screen. Swipe to the right to find Bixby Home, and tap the toggle switch to turn it off. If you ever want to turn this feature back on, simply repeat the above steps, but set the toggle to the "On" position instead.
Method 4: Use a 3rd-Party Launcher to Avoid Bixby HomeBixby Home is tied to the Bixby key and to the default Samsung Experience launcher. Therefore, if you disable the key using Method 1 above, and use different launcher, you won't be bumping into Bixby Home on accident anymore.So as an alternative to Method 3, you can simply install a new home screen app to disable Bixby Home's dedicated page. Two of the best third-party launchers are Nova Launcher and Action Launcher. Nova is smooth, light, and customizable; with the option to create actionable widgets and shortcuts. Action can give you a taste of some of Android Pie's features. To try either out, simply install the app, press your home button, then choose "Nova" or "Action" from the prompt.Play Store Links: Nova Launcher (free) | Action Launcher (free) (1) Nova Launcher, (2) Action Launcher
Method 5: Disable Bixby PackagesYou may have been thinking you could disable Bixby the same way it's possible to with numerous other apps: through the App Manager. Yet if you visit Bixby through Settings –> Apps, you'll only find the option to disable is grayed out. Really? Bixby is that critical?Bixby can be disabled with the aid of a package disabler, but these apps are quickly shut down by Samsung. For a more permanent solution — one that will completely obliterate Bixby — we recommend using ADB to disable Bixby and any other bloatware you want to remove. No rooting is required, and the process is completely free, though you will need to hook your phone up to your computer and install Google's SDK tools to try this.Once you've got your computer set up, just find all of the packages with the word "Bixby" in their name and disable them. Not only will this disable the Bixby key, but it will also remove Bixby Home, Bixby Voice, and Bixby Vision in one shot. To see how this all works, check out our in-depth guide on the subject below.More Info: How to Disable Any Bloatware App on Your Samsung Galaxy
Method 6: For Samsung Note 9 Users Running 2.0.36.14 or LaterFor Note 9 users, there's some good news and bad news. The bad news is that you still can't disable the Bixby key completely (unless you use Method 5 above). The good news is that you can change your settings to prevent pressing the key accidentally. You can now choose for the Bixby activation button to require a double-tap instead of just a single-tap to open.To check it out, try pressing your Bixby key. Then visit the three-dot menu to the upper-right, and select Settings from there. Tap "Bixby key." It's here that you can opt to "Press twice to open Bixby." Hey, it's a step in the right direction, at least. Perhaps you'll discover that you miss Bixby, and want it back. For the most part, you can go back through the same first couple of steps required to disable Bixby, only this time sliding the toggle to enable it instead. You will probably want to start by enabling Bixby Home first, in order to have easier access to the other Bixby settings. The current version of Bixby does include a new interface, improved language processing, and smarter, more customizable recommendations, after all.Don't Miss: Tips & Tricks for Mastering Your Galaxy Note 9Follow Gadget Hacks on Pinterest, Twitter, YouTube, and Flipboard Sign up for Gadget Hacks' daily newsletter or weekly Android and iOS updates Follow WonderHowTo on Facebook, Twitter, Pinterest, and Flipboard
Cover image and screenshots by Delani Clatfelter/Gadget Hacks
Any temporary file types with checkmarks next to them will be deleted when you erase the data. The temporary file types are as follows: Browsing History - The list of pages you've visited in the Chrome app. Cookies, Site Data - Saved pieces of data that help load your frequently visited sites faster.
Erase temporary files | Clean up with an expert tool
AD
This video tutorial belongs to the Computers & Programming category which is going to show you how to block websites in Firefox with the BlockSite add-on. Do a Google search for add-ons for Firefox and click the first link.
How to block websites on Firefox using BlockSite add-on
Realizing your PC or laptop might be infected with a virus or malware is worrying, but with careful and decisive action, removing a virus is quicker and easier than you might think. It's not always obvious that your computer is infected. Some of the warning signs your PC or laptop might have a
How to remove malware from your Windows PC | PCWorld
How to Use "Adapt Sound" on the Galaxy S7 and S8 for Better Sound Quality Cameron Summerson @Summerson July 31, 2017, 9:00am EDT Samsung's build of Android Nougat has an incredible new feature that allows users to completely customize their listening experience based completely off their ears.
6 Tips for getting better sounding music out of your Galaxy S
***** in new version they patch this now.. so i think it stop working. new video will be soon .. stay tune..***** Remove Xcon from cydia Like me O
How to Use Snapchat on Your iPhone: The Ultimate Guide
They don't provide a way to convert new-style documents to legacy-style documents, so unfortunately you'll need to create a new document after unchecking the "latest version of the editor" box and copy any new-style document that you want to do serious formatting on into that new document. Google's official statement is thus:
How to use Google Docs - Computer - Docs Editors Help
Homemade Night Vision - How to Make Night Vision Goggles
For Samsung phones with a physical home button, you can use the home + power button combo to take screenshots. Just press the two buttons simultaneously until the sides of the screen flash and you
How To Take Screenshot Without Buttons On Android, iPhone
Switch GBoard to the Default keyboard. Tap and Hold on Earth icon from keyboard > Next Keyboard from Popup. This might be useful: Trick to fix Google's Gboard app not working on iOS or Crash. Now, Install and use Google Gboard keyboard app fluently and more efficient on iPhone/ iPad. Don't miss to share your experience with us.
How to Use the keyboard on the Apple iPhone 3G « Smartphones
Session Hijacking with a Pineapple, Hamster and Ferret and cell phone? A free and easy way to virtualize physical servers! And is WPA Broken? Ikea clusters, screencasting, and canvas technolust
Sneak Pineapple peak: Hak5 creates even more lethal Wi-Fi hot
How to Secure Photos, Videos, & More on Your Galaxy S6 Using
0 comments:
Post a Comment