How To: Make Your Android Automatically Switch to the Strongest WiFi Network
Wi-Fi signals have limited range, so if you live in a two-story house or work in a larger office, you may have set up multiple routers or repeaters to ensure full wireless coverage. Sadly, Android handles the transition between networks pretty poorly.The main issue here is that Android won't disconnect from the first Wi-Fi network until the signal strength drops all the way to zero. When this happens, your device won't switch to another network, even if it's stronger and closer than your original network.Well, thank the developer gods, because the Cloudie Development team created an app to fix all of this. For starters, it lets you set preferred Wi-Fi networks—but then, it even lets you choose the lowest signal strength you're willing to put up with before switching to the next preferred network. It does all of this without requiring root access, and it works on 2.4 and 5 GhZ networks just the same, so you'll always stay connected to the best Wi-Fi network available. 
Step 1: Install Wifi SwitcherTo put an end to your Android Wi-Fi woes, start by installing an app called Wifi Switcher. Make sure it's the one by Cloudie Development, as there are other apps with the same name.Install Wifi Switcher for free from the Google Play Store Then, if you're running Android Marshmallow or higher, you'll have to grant Wifi Switcher permission to access your location on first-run. There's a bug in Marshmallow that won't allow apps to scan for Wi-Fi networks without this permission, so make sure to tap "Allow" when prompted.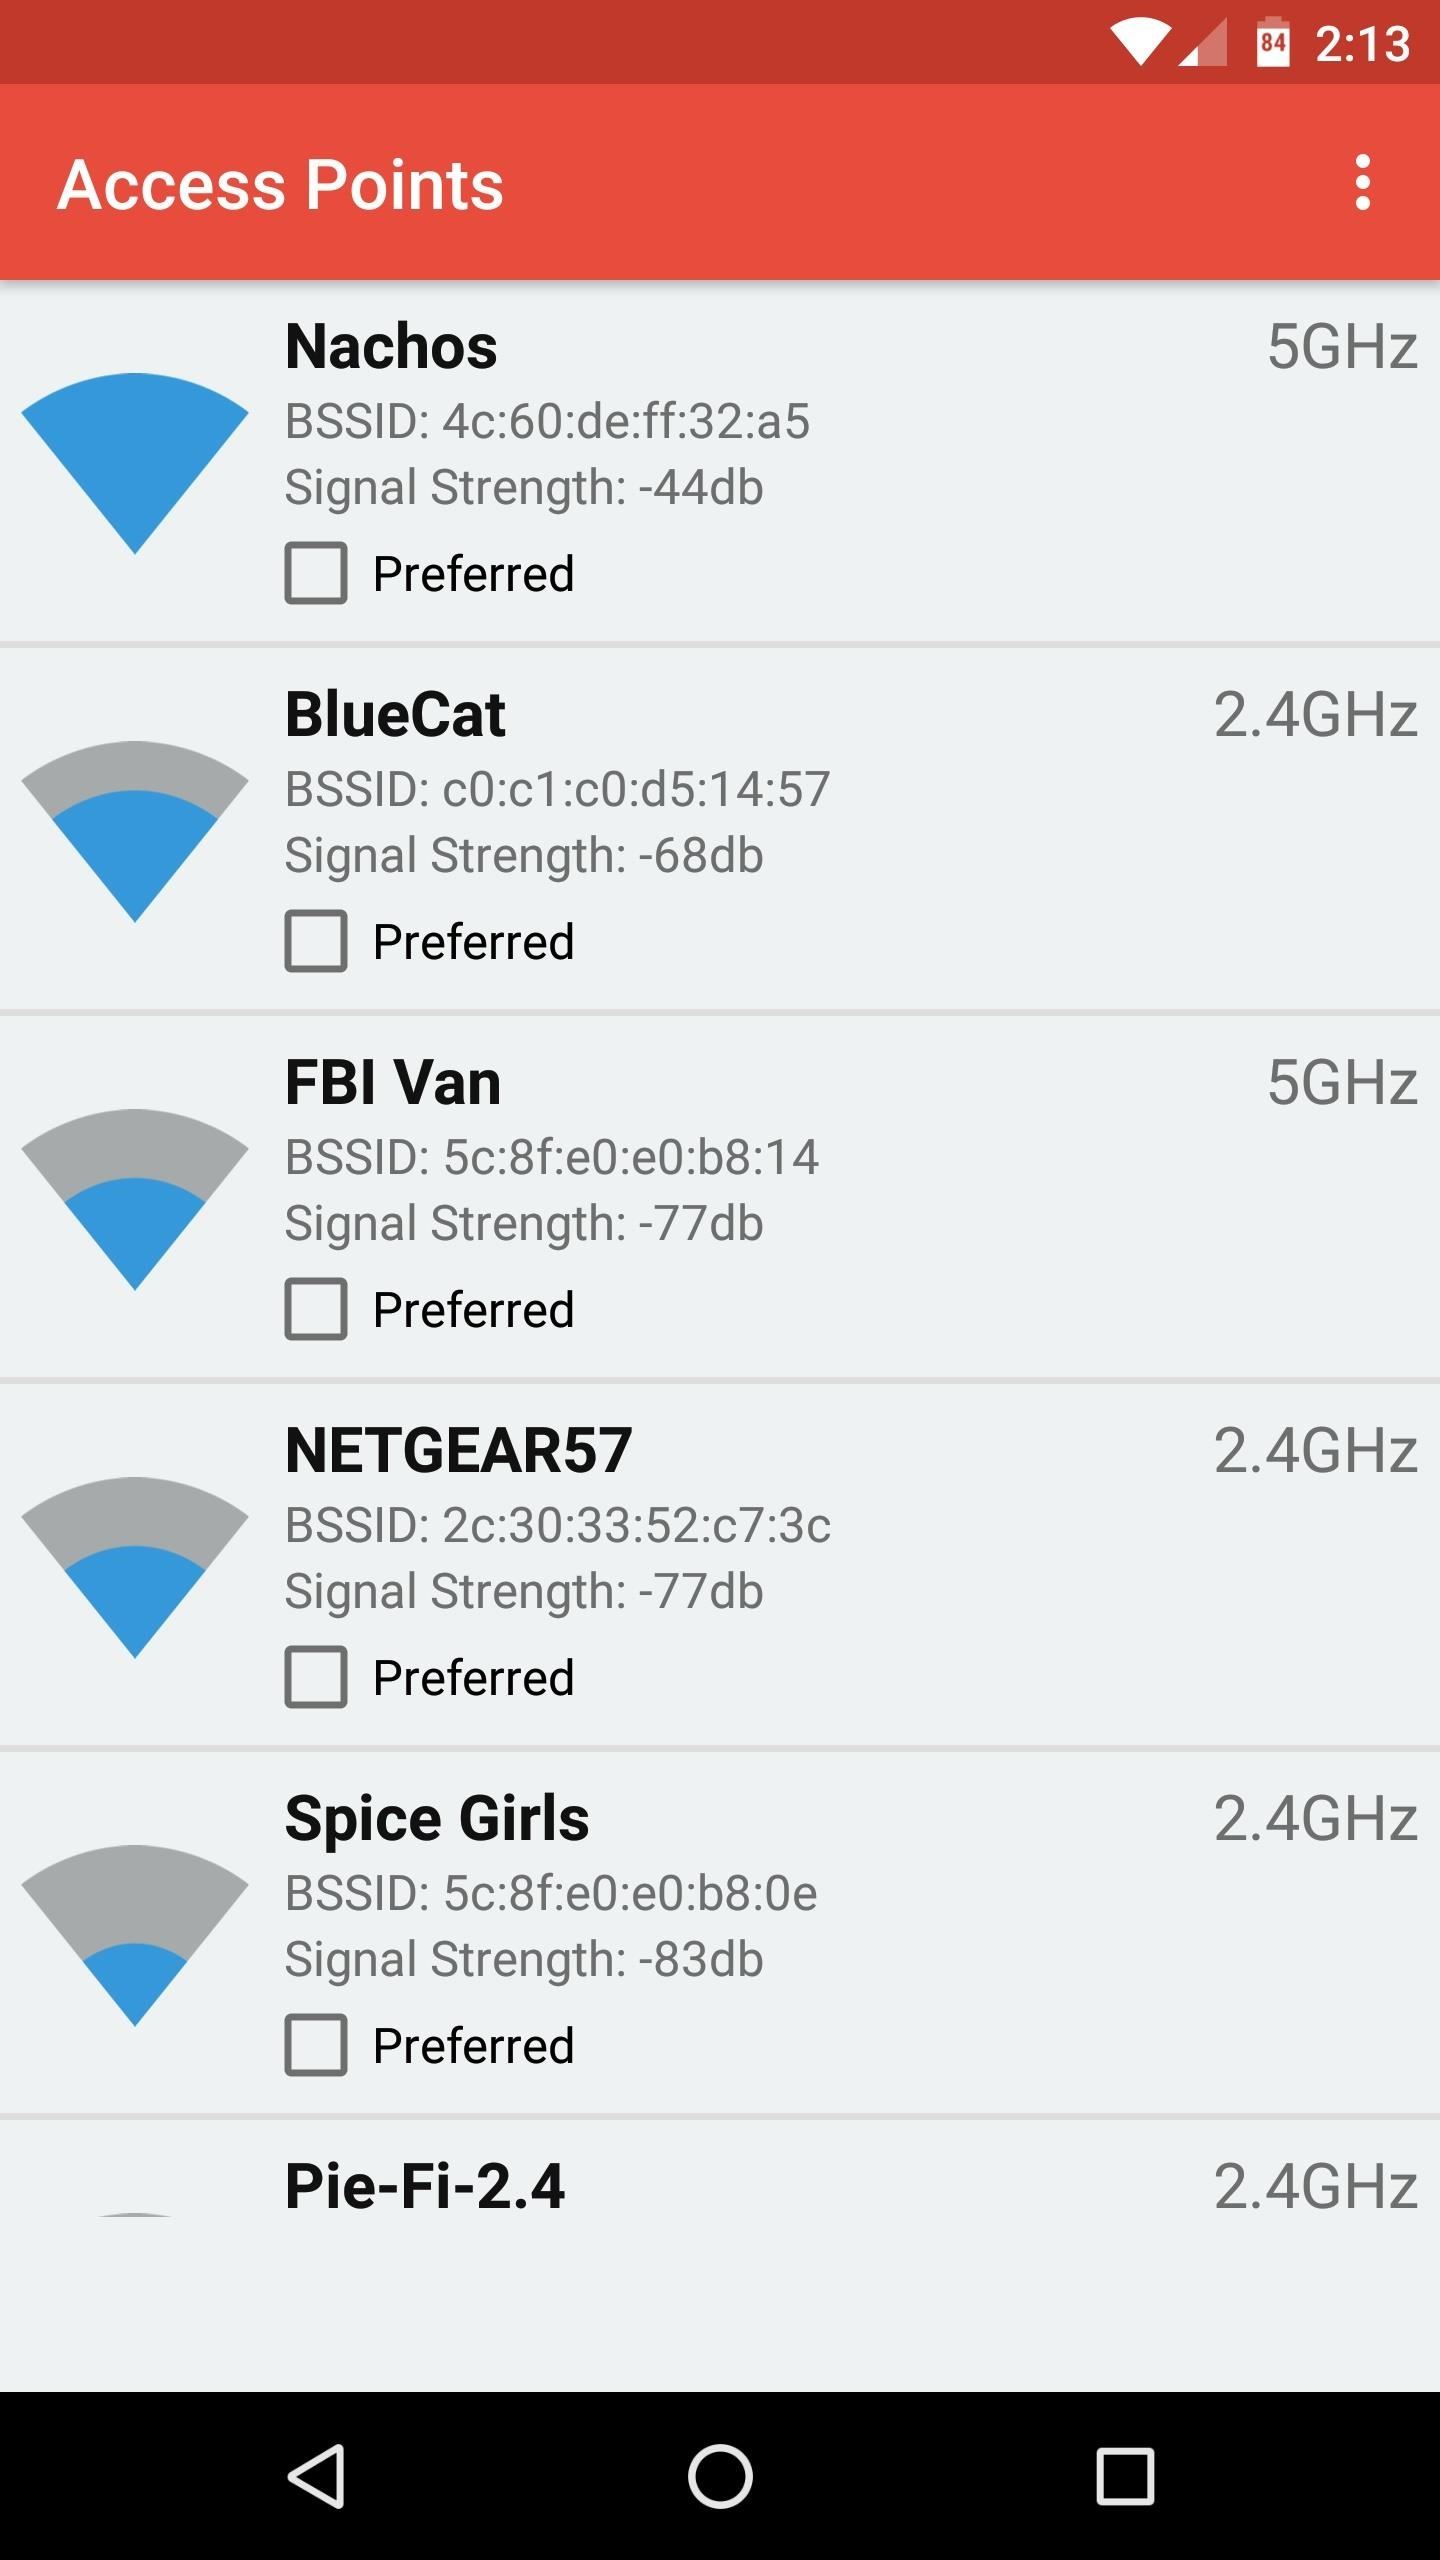
Step 2: Set Preferred NetworksAfter you make it to the main menu, Wifi Switcher should show you a list of all the nearby Wi-Fi networks—if it doesn't, just pull down to refresh.From here, just scroll through the list, find all of the networks you would like to connect to (this part may require that you move around your home or office a bit if you're out of range) and tick the boxes next to the "Preferred" option. Wifi Switcher will ensure that your device only connects to the networks marked as "Preferred" from now on.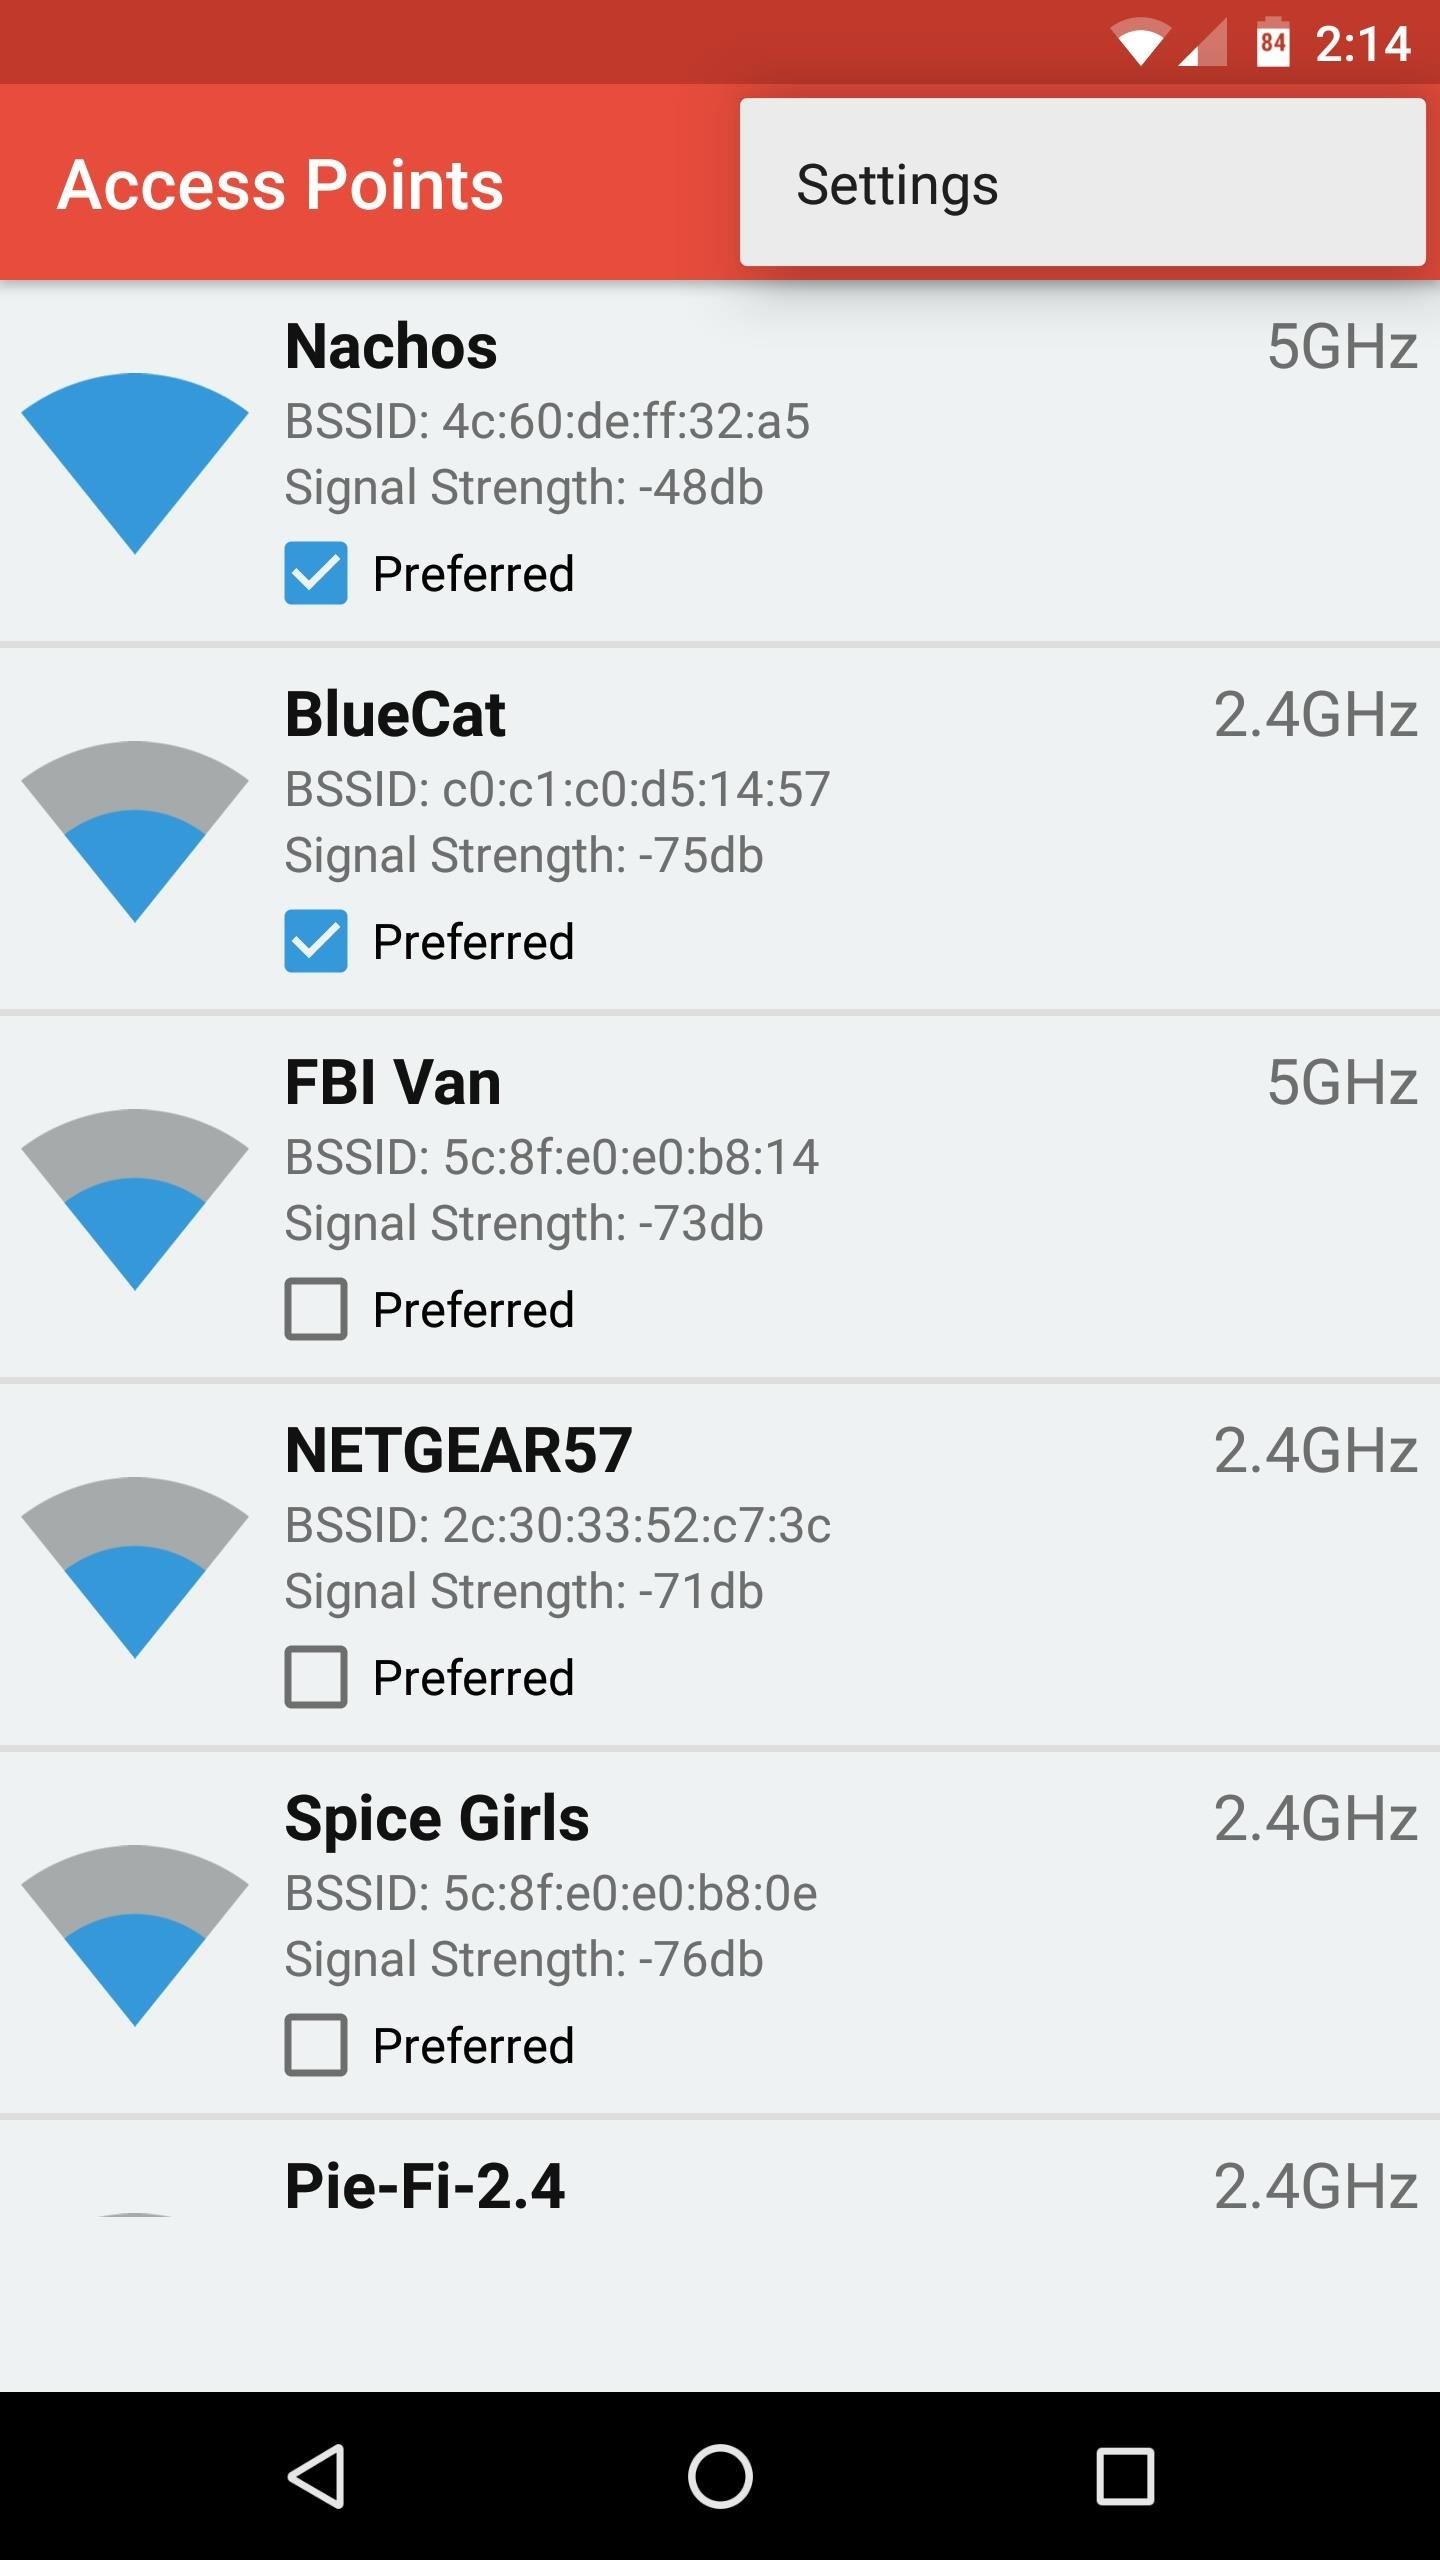
Step 3: Set a Signal Strength ThresholdNow that you've created a group of preferred networks, the only thing left to do is to choose a signal strength threshold, or "Switch Range." Think of this as the farthest you're willing to move away from one preferred router or repeater before your device connects to the next-strongest one.So tap the three-dot menu button in the top-right corner, then open the "Settings" menu. From here, use the slider next to the Switch Range entry to set a signal strength threshold. Setting this anywhere above zero (Android's default switch) will push you off the fading network and onto a stronger one earlier.Setting this to one or two bars should do the trick, but you might need to experiment here to find the best fit for your particular setup. Beyond that, you can enable the "Ask Before Switching" option to get a notification with the option to switch or not when your phone finds another network, but this will disable the automatic switching. Also, the "Show Full SSID" option should be helpful if your routers have really long names and are truncated in the list of networks.
Step 4: Enjoy Better WiFi SignalsFrom now on, your phone or tablet will only connect to your group of preferred networks, so long as you've saved the Wi-Fi password for each network in Android's Settings menu. This makes sure that your device doesn't struggle to connect to a nearby learned network that never has decent signal strength.But the best part about all of this is that Wifi Switcher will start looking for a better network as soon as your signal strength drops below the threshold you set in Step 3. When that happens, your device should automatically switch over to the best available network—a far cry from the annoying behavior that Android exhibits by default.Follow Gadget Hacks on Facebook, Twitter, Google+, and YouTube Follow Apple Hacks on Facebook and Twitter Follow Android Hacks on Facebook and Twitter Follow WonderHowTo on Facebook, Twitter, and Google+
Cover photo and screenshots by Dallas Thomas/Gadget Hacks
In this video i show you how to SSH into your iphone or ipod touch. SSH allows you yo v
How to SSH into a jailbroken iPod Touch or iPhone
As a soft-launched game, PAC-MAN Maker is still technically in development, so you may encounter some issues while playing. In our testing, however, the game ran perfectly fine on an iPhone 8, iPhone SE, and iPad Pro that were all on iOS 11.2.2.
Mario Kart Pro Gamer Hacks « Android :: Gadget Hacks
News: Use Android's Airdrop-Like Nearby Service to Share Things More Easily How To: Customize Skip Length in Your iPhone's Podcasts App How To: Raw Cyrus from Spill.com How To: Make and distribute a successful podcast
Is There Software Similar to Wifikill, That Kills Nearby
If you read the user guide carefully, it turns out there are actually two ways in which Apple Watch can measure heart rate: via infrared sensors (usually used for the periodic background measurements while you're wearing the watch but not in a training) and via the green LEDs emitting visible light (only used during training or when you open the heart rate check).
Health & Fitness « Gadget Hacks
Easy Unique Way to Boil and Peel Potatoes To prepare the potatoes take a very sharp knife and score the potato entirely around the center. With a pair of cooking
The Easy Way to Peel Boiled Potatoes - instructables.com
When you install Truecaller application on your phone, it simply uploads each and every contact and information linked to it from your phone's contact list to its servers. When someone searches for the mobile number or a specific name, Truecaller uses numbers and their information uploaded from your phone to show results for that search.
To Junkie Of Know A Credit Everything You Need Avoid
(Repetitive text removed to save space, all key codes are public static final int.) /** Unknown key code. */ KEYCODE_UNKNOWN = 0; /** Soft Left key. * Usually situated below the display on phones and used as a multi-function * feature key for selecting a software defined function shown on the bottom left * of the display.
Galaxy Nexus First Impressions - Q&A : Android
Many of you have already seen or probably heard of the new Barnes and Noble NOOK Tablet. Let's go ahead and have the rundown of all the steps on how to root your NOOK Tablet. file needed
Devs Root the Barnes & Noble Nook - androidguys.com
How To: Customize Your iPhone with a New Default Font from Disney, the Simpsons, & Many More How To: Set Different Downtime Schedules on Your iPhone for Each Day of the Week How To: The Cool New Features in iOS 7.1 for iPad, iPhone, & iPod Touch
How to Change the Default Font in Excel 2010 - WonderHowTo
It is a nightmare that someone view your private photos without your permission. To avoid similar disasters, you can lock secret photos with the password you know only. So, here is the complete tutorial video about the image encryption software. Just take a look and have a try.
Samsung Internet 101: How to Password-Protect Your Private
Perhaps the title might have shocked some of you, but it appears that a study suggests no less than 70% of Android users prefer to have pre-installed apps on their devices.
The Best News Apps for Android and iOS | Digital Trends
Fix Samsung Galaxy S6 Edge that shows overheating notice, not charging properly & other power issues If it shows red, then it's tripped. Turn off your Samsung Galaxy S6 Edge.
How to Factory Reset Your Android the Right Way - Gadget Hacks
From your News Feed, click your name in the top left and hover over your profile picture. Click Update. You can: Upload a photo from your computer. Add frame. Select a photo you've already uploaded or one you're tagged in. Crop your photo and click Save. If you don't want to crop your photo, click Skip Cropping in the bottom left, then click Save.
Your Profile Picture and Cover Photo | Facebook Help Center
How To: Enable the New Multitasking Swipe Gestures in Android 9.0 Pie How To: Get Oreo's Simpler Split Screen Mode Back on Android Pie How To: Get "Anywhere" Gesture Support, Themes, Call Counts, & More with Blinq for Android
How to Access Your Android Apps from Anywhere with the GYF
0 comments:
Post a Comment