Xposed 101: How to Install the Xposed Framework on Lollipop or Marshmallow
The Xposed Framework is still alive and kicking despite the fact that development has slowed down a bit lately. Rovo89 is the only true developer behind Xposed, so it's really a one-man show. This means the popular root mod doesn't typically support the latest Android version, but it's usually only one version number behind.For example, Xposed for Nougat is looking like it's almost ready, and that means it'll be released around the same time as Android 8.0. So this mod isn't for the folks who always run the latest Android versions, but it's still very handy for the vast majority of users whose phones don't get updated as fast as a Pixel or Nexus.There are actually two parts to Xposed. First is the Xposed Installer app, which is a central hub for installing and managing modules. But behind it all, there's the Xposed Framework, which is a code base that modules use to perform all of their various tweaks. Installing both of these elements is actually pretty simple nowadays, so I'll show you how it all works below.Don't Miss: The 5 Best Phones for Rooting & Modding
Requirementsrooted Android device TWRP recovery installed Android Lollipop or Marshmallow "Unknown Sources" enabled
A Note About Android Versions & OEM SkinsFor this guide to work as written, your phone will need to be rooted and running either Android Lollipop (5.0–5.1.1) or Android Marshmallow (6.0–6.0.1).On top of that, it's best if your phone is running stock Android with little or no manufacture skinning. If you're using a Samsung device, know that TouchWiz is not officially supported by Xposed.You can attempt to install Xposed on a device with heavy manufacturer skinning, but there's a good chance you'll experience bugs. As a result, we only recommend proceeding if you have a full NANDroid backup on standby in case things go wrong.Don't Miss: Why Samsung & Other Phone Makers Need to Stop Messing with Android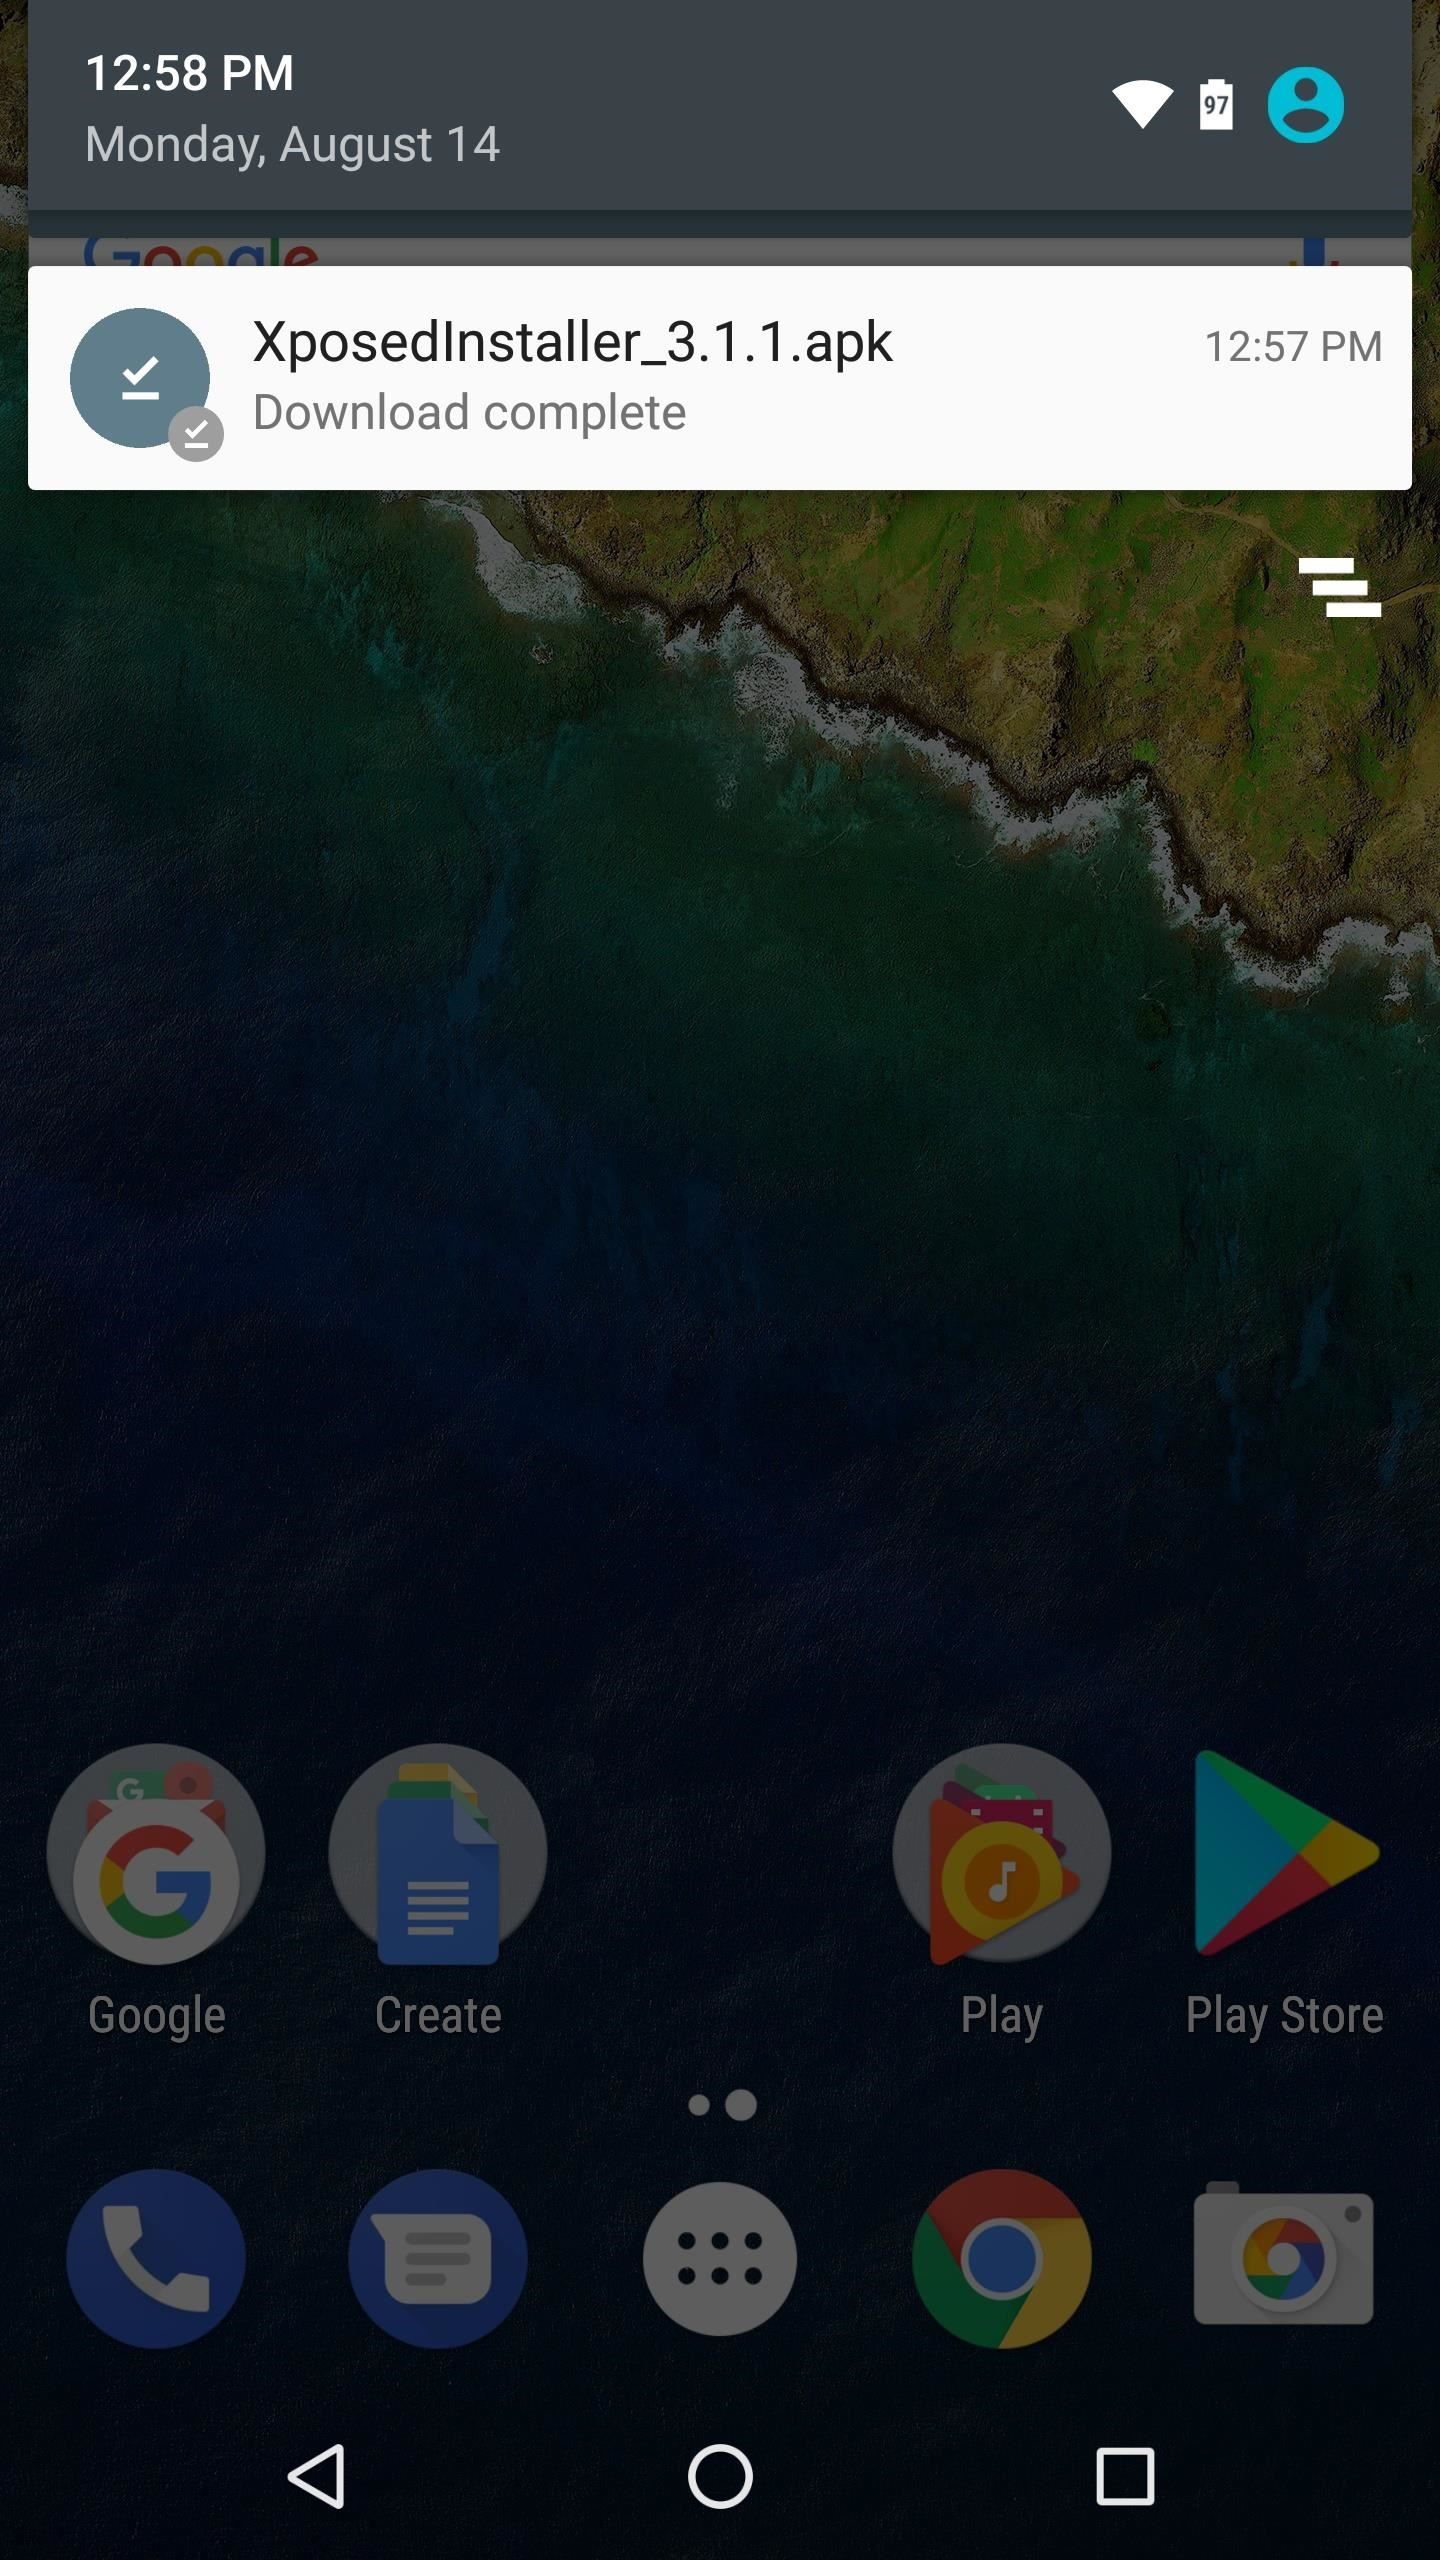
Step 1: Download the Xposed Installer AppFirst up, you'll need to download the Xposed Installer app. This app lets you download and install Xposed modules, and it even lets you install the Xposed Framework itself. So to start, make sure "Unknown Sources" is enabled, then tap the following link. From there, just tap the Download complete notification, then press "Install" when prompted.Download the latest version of the Xposed Installer app (.apk)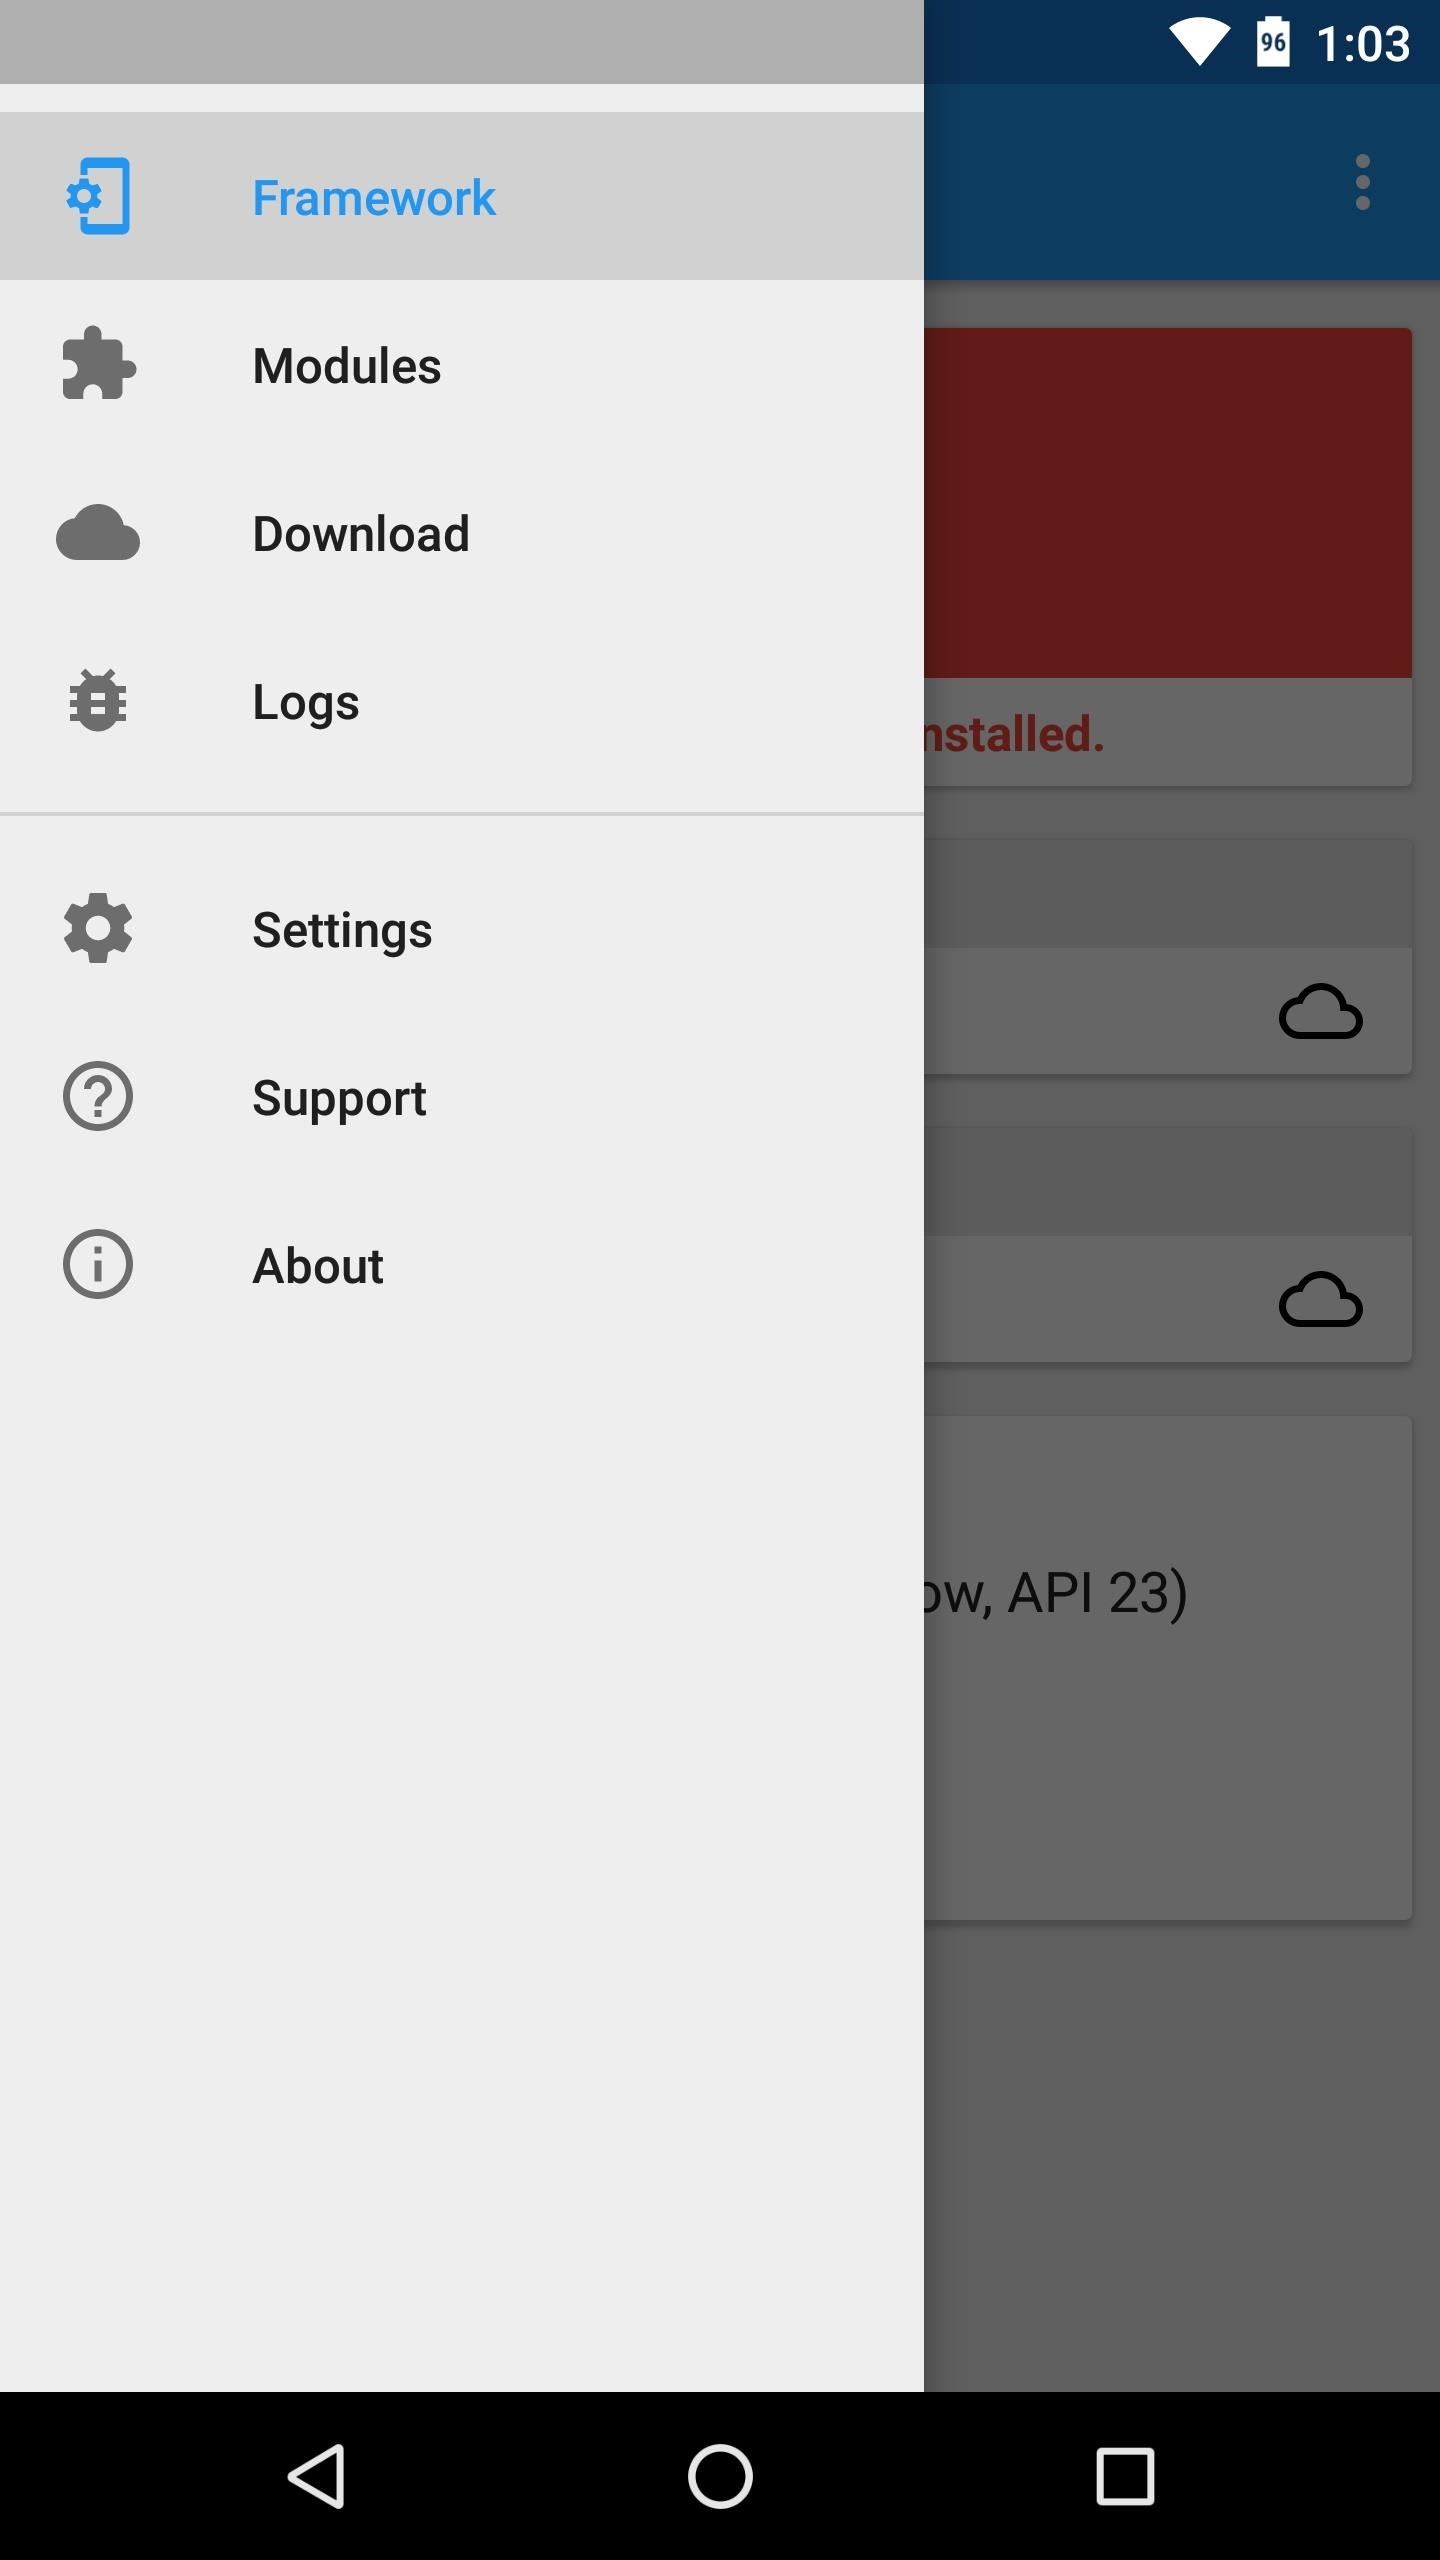
Step 2: Install the Xposed FrameworkNext, open the Xposed Installer app and head to the Framework section in the side navigation menu. From here, tap the "Install/Update" button towards the top of the screen, then select "Install" when prompted. Next, the Xposed Installer will ask for root access, so tap "Grant" on the Superuser request popup. From there, wait about 30 seconds while the app installs the actual Xposed Framework, then you'll see a screen with a reboot countdown. To speed things up, go ahead and tap "Reboot" here. Note that this first time rebooting after installing Xposed will take longer than usual. Note: If the above method fails for any reason, repeat this step, but choose "Install via recovery" to automatically install Xposed from within TWRP.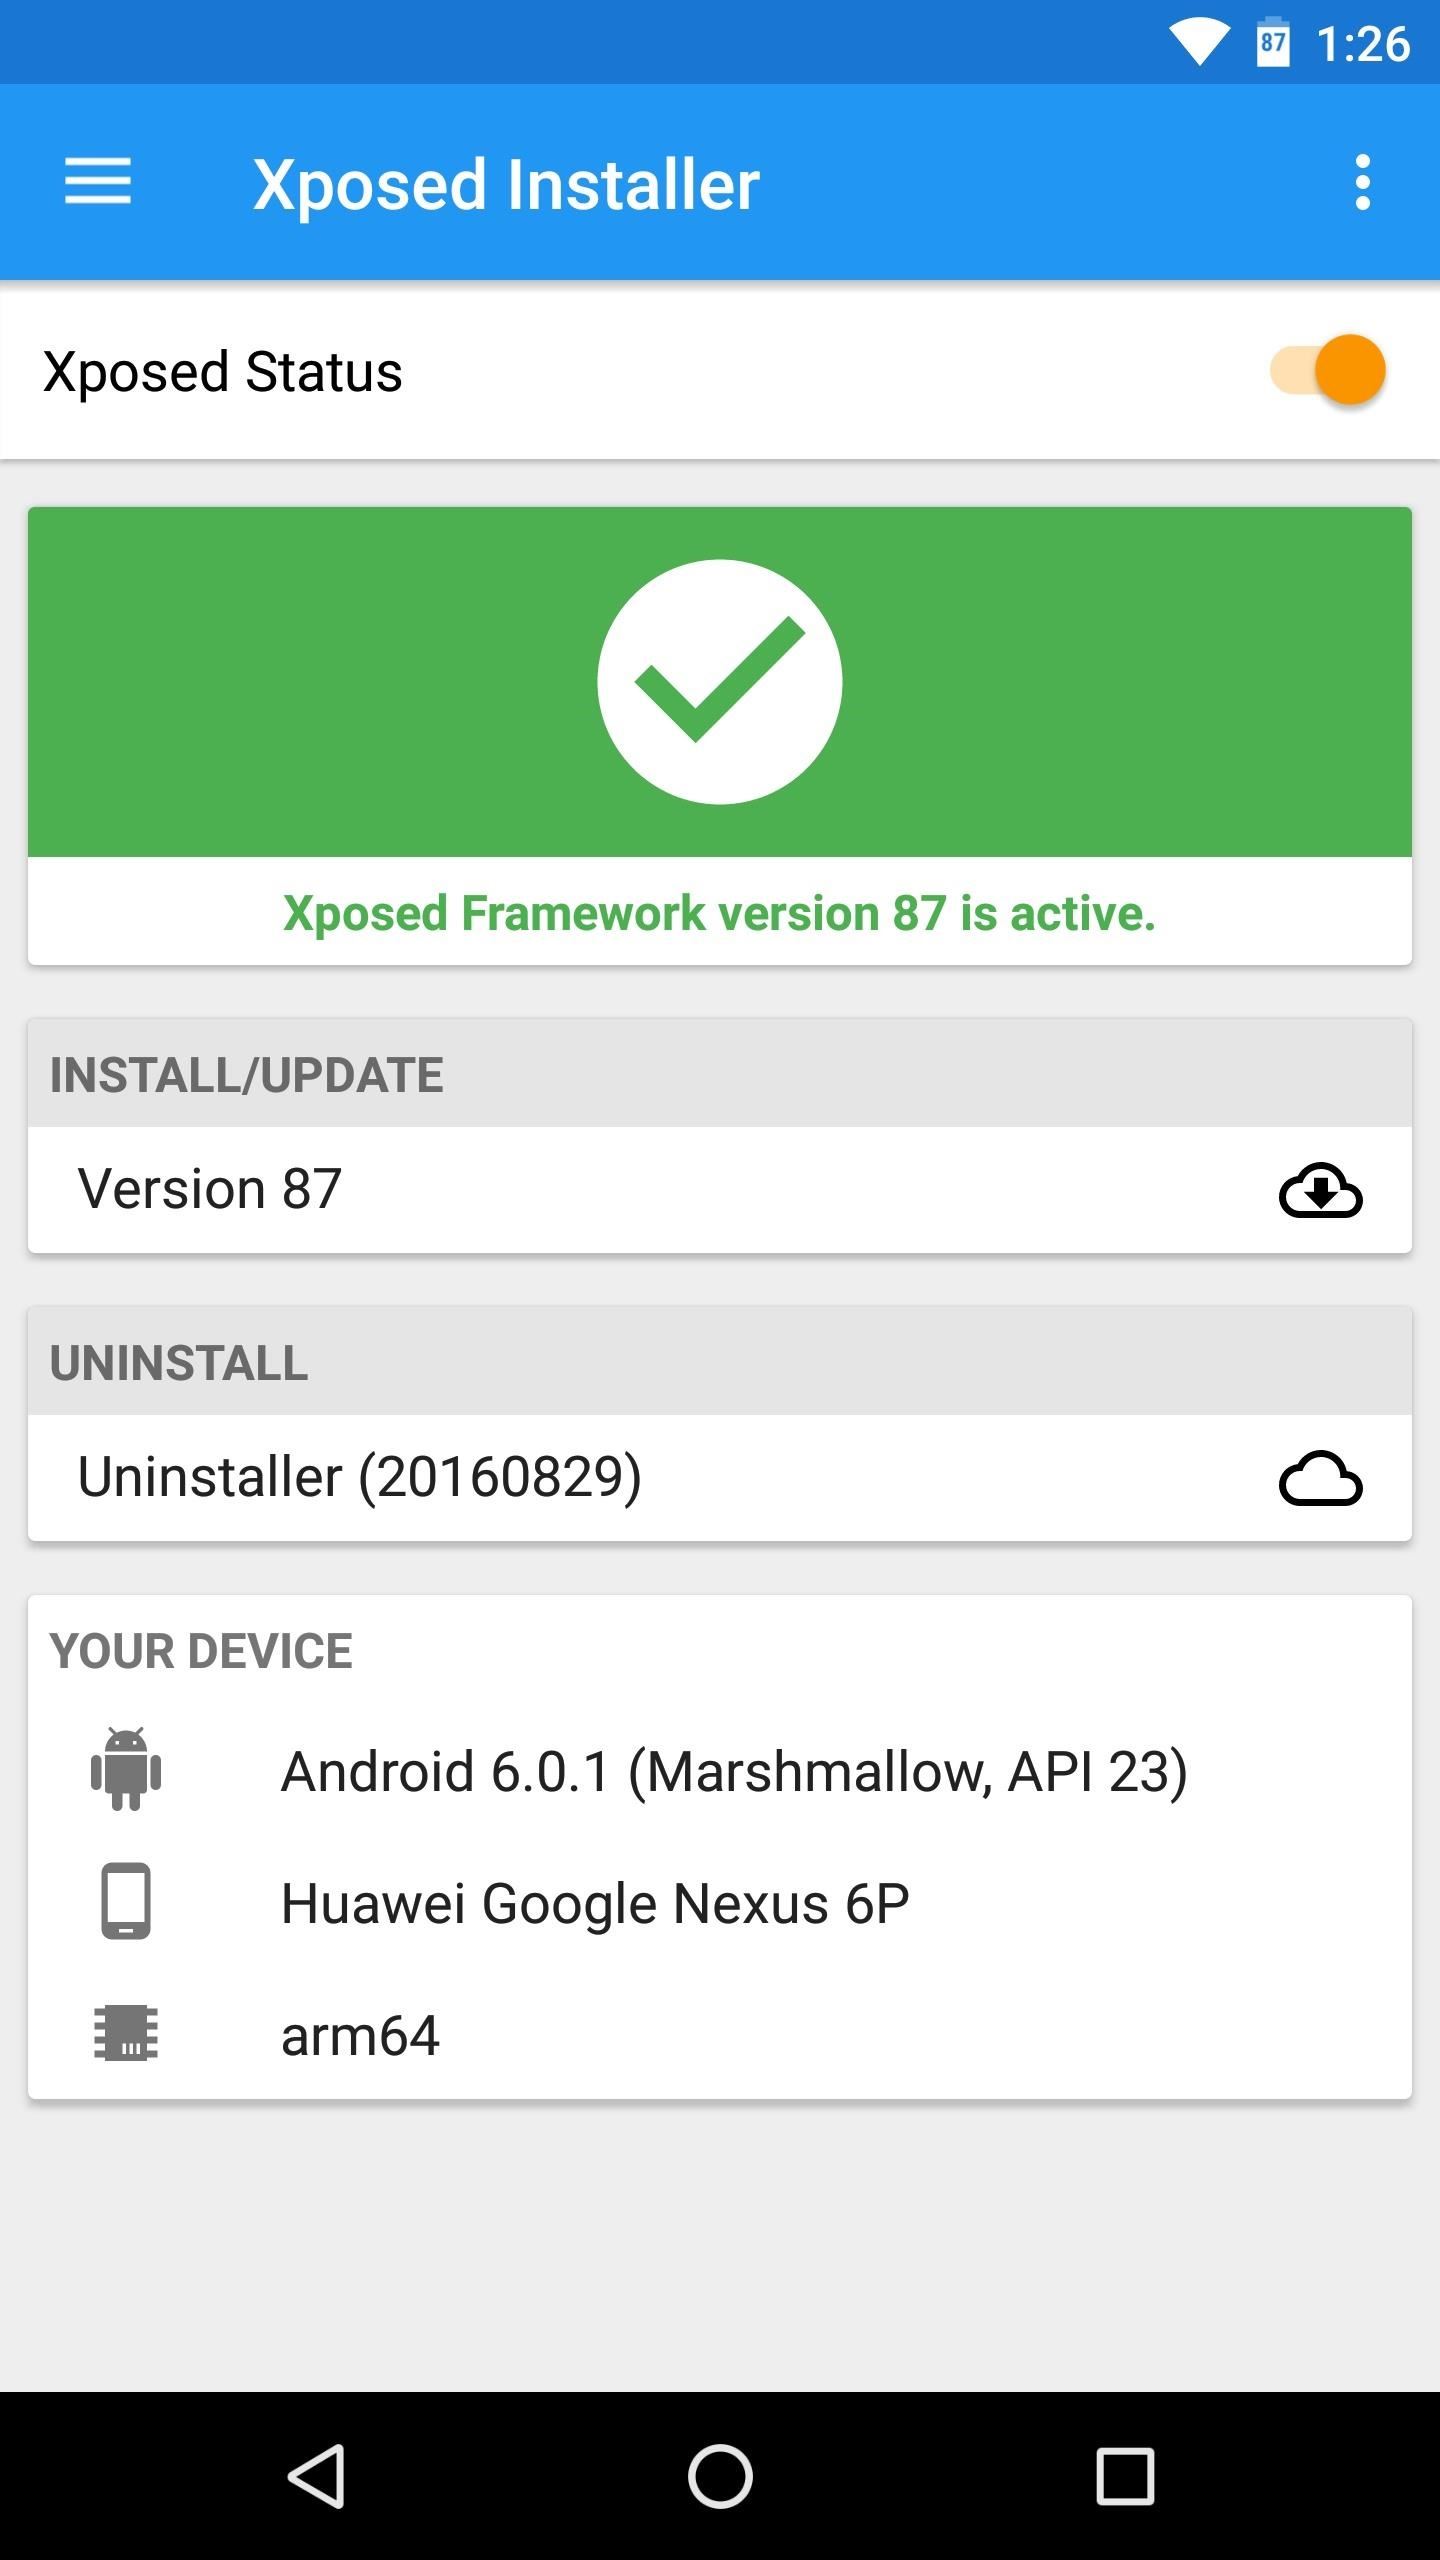
Step 3: Install Modules & Enjoy XposedWhen you get back up, you should be all set to go. To double check that everything went off without a hitch, head to the Framework section in the Xposed installer app, and if you see a message saying "Xposed Framework version XX is active," you'll be ready to install Xposed modules.To try it out, head to the Download section in the Xposed Installer app and browse the wide selection. When you find a module you want to install, simply select it, then swipe over to the Versions tab and hit the "Download" button. After that, just make sure to activate the module and reboot. What are some of the first modules you installed after setting up Xposed on your device? Personally, GravityBox is always the first one I grab, but what about you? Let us know in the comment section below.Don't Miss: Why Linux Kernel Exploits Aren't Really an Android ProblemFollow Gadget Hacks on Facebook, Twitter, Google+, YouTube, and Instagram Follow WonderHowTo on Facebook, Twitter, Pinterest, and Google+
Cover image and screenshots by Dallas Thomas/Gadget Hacks
Now we want to make it even easier to catch up with shows you love. Introducing Watch. We're introducing Watch, a new platform for shows on Facebook. Watch will be available on mobile, on desktop and laptop, and in our TV apps. Shows are made up of episodes — live or recorded — and follow a theme or storyline.
If you wish to disable all notification previews when iPhone is both locked and unlocked, choose "Never". Disable Notification Previews for All Apps in iOS 11. Disable Notification Previews for Individual App in iOS 11. Also you can disable notification previews for individual app. Take News app as an example. Step 1.
How To Disable Push Notification Previews On iPhone Locked
With over 150 million active users, Snapchat is a hugely popular online messaging service. David Bisson reports on how to know if your Snapchat account has been attacked by hackers, and the steps you need to take to regain control.
Snapchat account gone? This is how you can regain access
Please do. Such an ability is the basic tenet of a white-list strategy per user. This is going to be a mandatory concept for parents of young children who should only be dealing with a short list of certain websites (wixie.com for school projects, learning sites, etc.) I'll be investigating other 3rd party "net nanny" style utilities now.
NetNanny image search block. How to? - Experts Exchange
Apple is removing the Do Not Track toggle from Safari, but for a good reason is part of the upcoming iOS 12.2 and macOS 10.1.4—Apple will be removing the toggle Apple will add options as
Safari's now the only major browser supporting Do Not Track
(1) Your menu may look slightly different. (2) Option is available on Android 5.1.1. Remove S Finder & Quick Connect. If you don't use one or either of these, or you just want them gone from the notification tray, simply pull down on the tray and hit the edit/pencil icon next to the Settings gear.
There's an app in the App Store called Mass Delete. That's what I use and it does what the app's name suggests. Just login your Instagram account & then select the photos you wanna remove all at once. Done. Ps.
Instagram 101: The Quickest Way to Like All Photos in Your
Samsung just announced that the Galaxy S8 is getting a fresh coat of paint, launching a burgundy red color of the flagship in their home market of Korea. There is currently little information about whether this color will come to the US for the S8, but this could be a preview of things to come.…
New Samsung Galaxy S9, S9 Plus With Gold and burgundy Color
You can individually change notification sound of all (text message, ringtone, S planner, alarm) from your android device. Here you can see the two different ways to change text message notification sound on android lollipop and upcoming android 6.0 marshmallow device.
Control Volume Directly from the Notification Tray in Lollipop
I'm testing it out on my Samsung Galaxy S4, in which only a portion of the shade will be translucent. If you're using an AOSP device, the full shade should have the effect.
How to Get a Transparent Quick Settings Panel on Your Galaxy
The software released in the 2015 iterations of the Samsung Galaxy line of devices—the S6, S6 Active, S6 Edge, S6 Edge+, and Note 5—have some pretty neat camera features that give these devices arguably the best smartphone camera on the market today.
0 comments:
Post a Comment