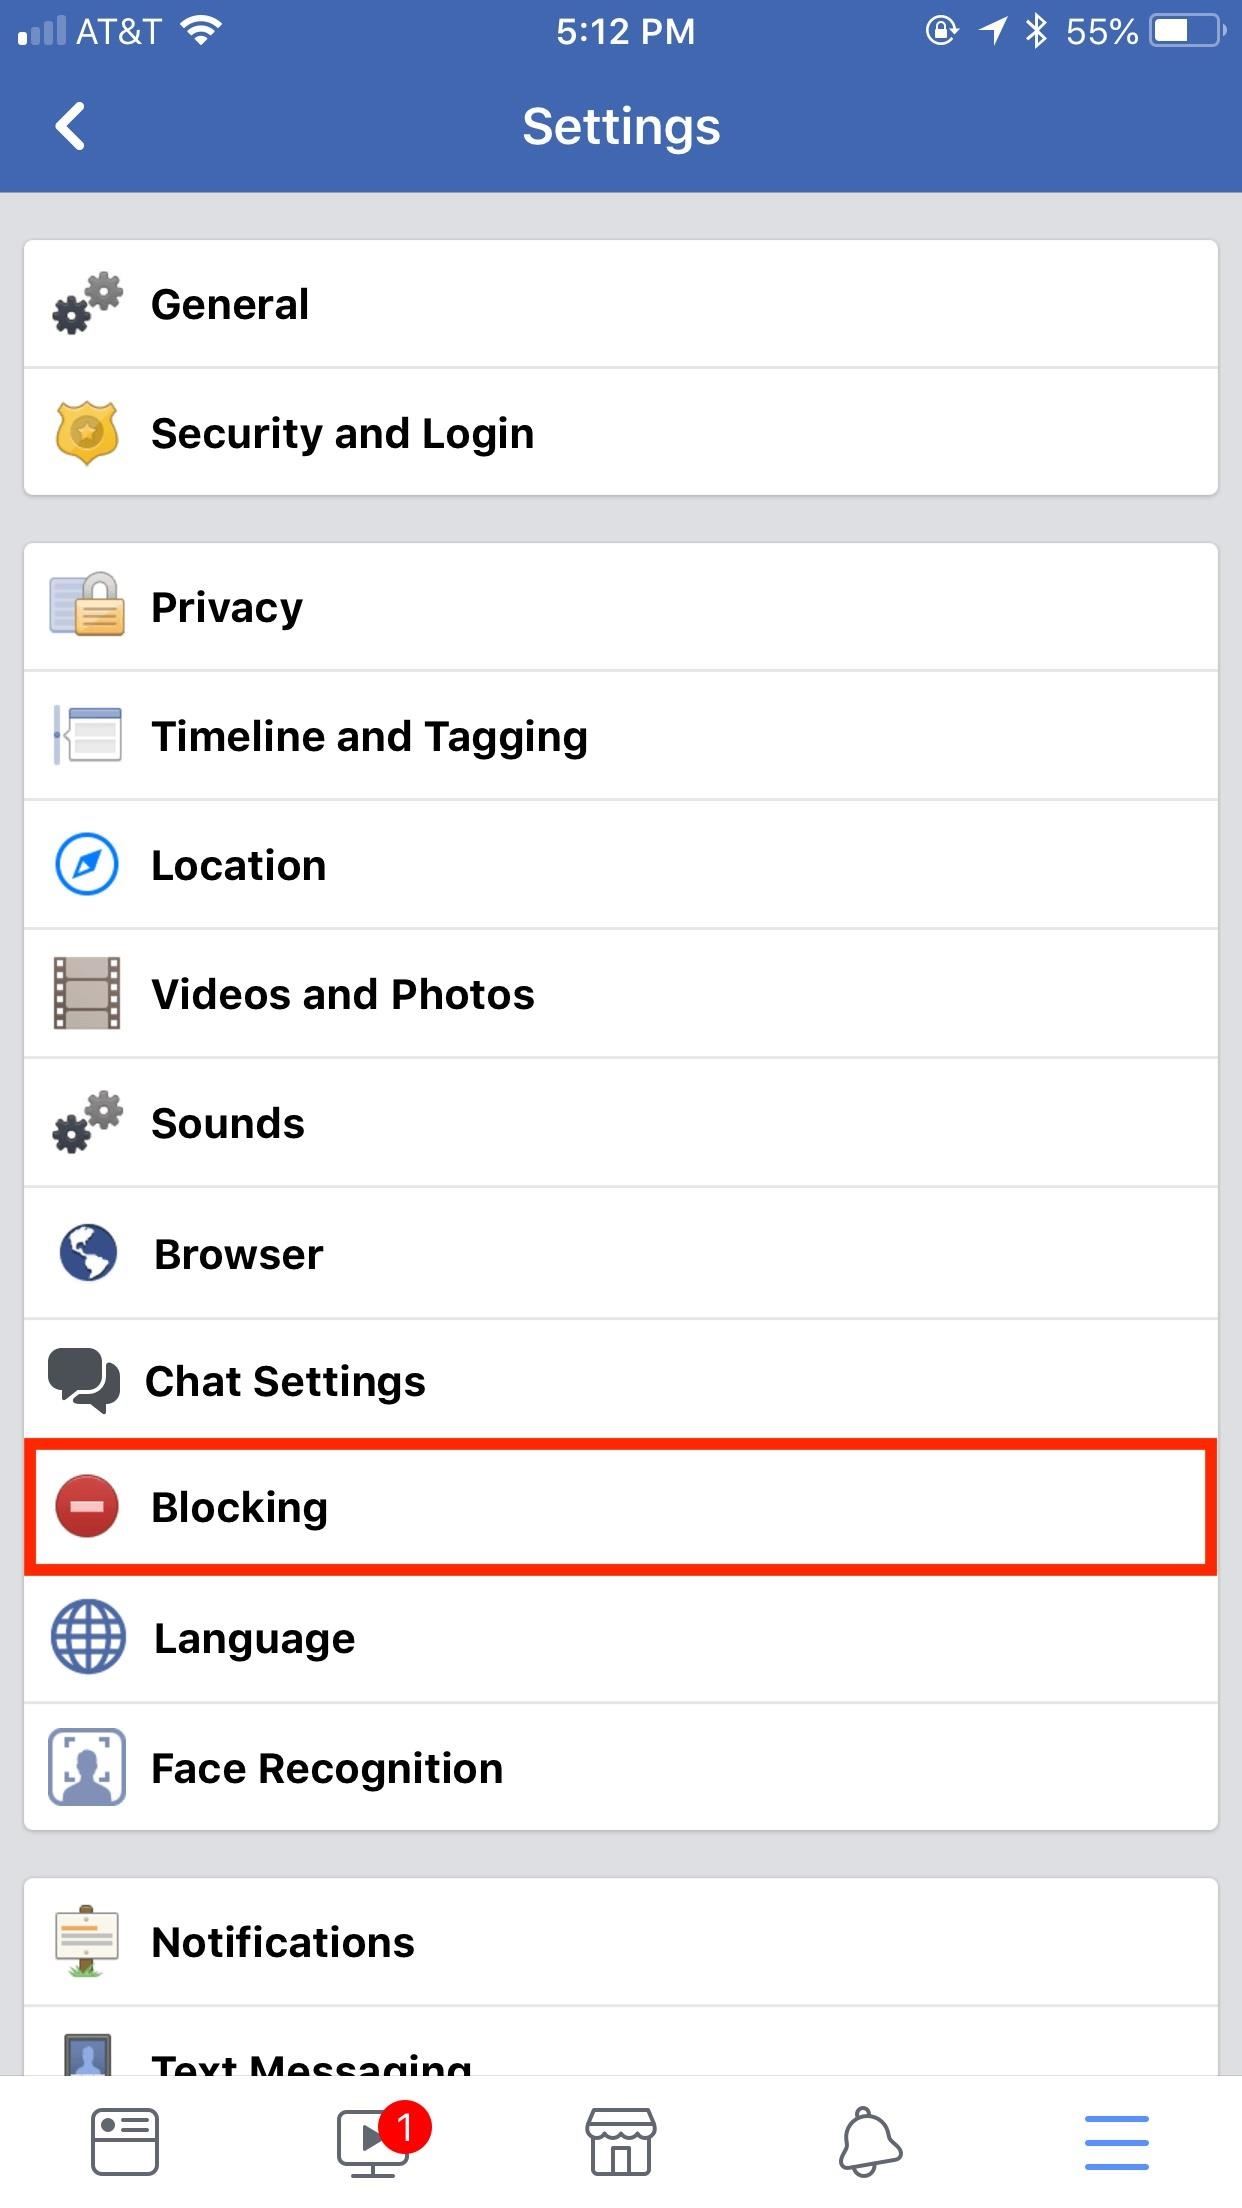
How To: Everything You Need to Disable on Your iPhone for Maximum Security
Privacy and security go hand in hand, especially for smartphones. When it comes to privacy, you decide what personal information about yourself is out there to discover. Security, on the other hand, is all about enforcing those privacy decisions.Sometimes privacy and security will conflict with one another. Sometimes you won't even know your privacy is being invaded. But, for the most part, you can have total control over privacy/security on your iPhone, whether you're worried about third-party apps, the FBI, thieves, or even Apple having access to your data.Not sure where to begin? There are a lot of tricky settings hiding within your iPhone, and we'll do our best to cover them all below, along with any drawbacks there may be. Location data, your lock screen, Siri, widgets, saved passwords and credit cards ... these are just a few of the things you'll have to make decisions on. Sometimes a compromise will be needed, where absolute privacy is not the best option, but at least you'll be aware of how your personal information is being used.Don't Miss: How to Create a Strong (Or Stronger) Passcode for Your iPhoneIn this guide, we'll focus mainly on settings you need to disable or "limit" in iOS 10 or iOS 11 for better privacy and security. If we added things to "enable," we'd be here all day, so we'll leave that for another guide. Some of these settings will conflict with one another, and we'll do our best to let you know when that happens. Ultimately, it's up to you to decide on what to disable or limit, so don't feel any pressure.
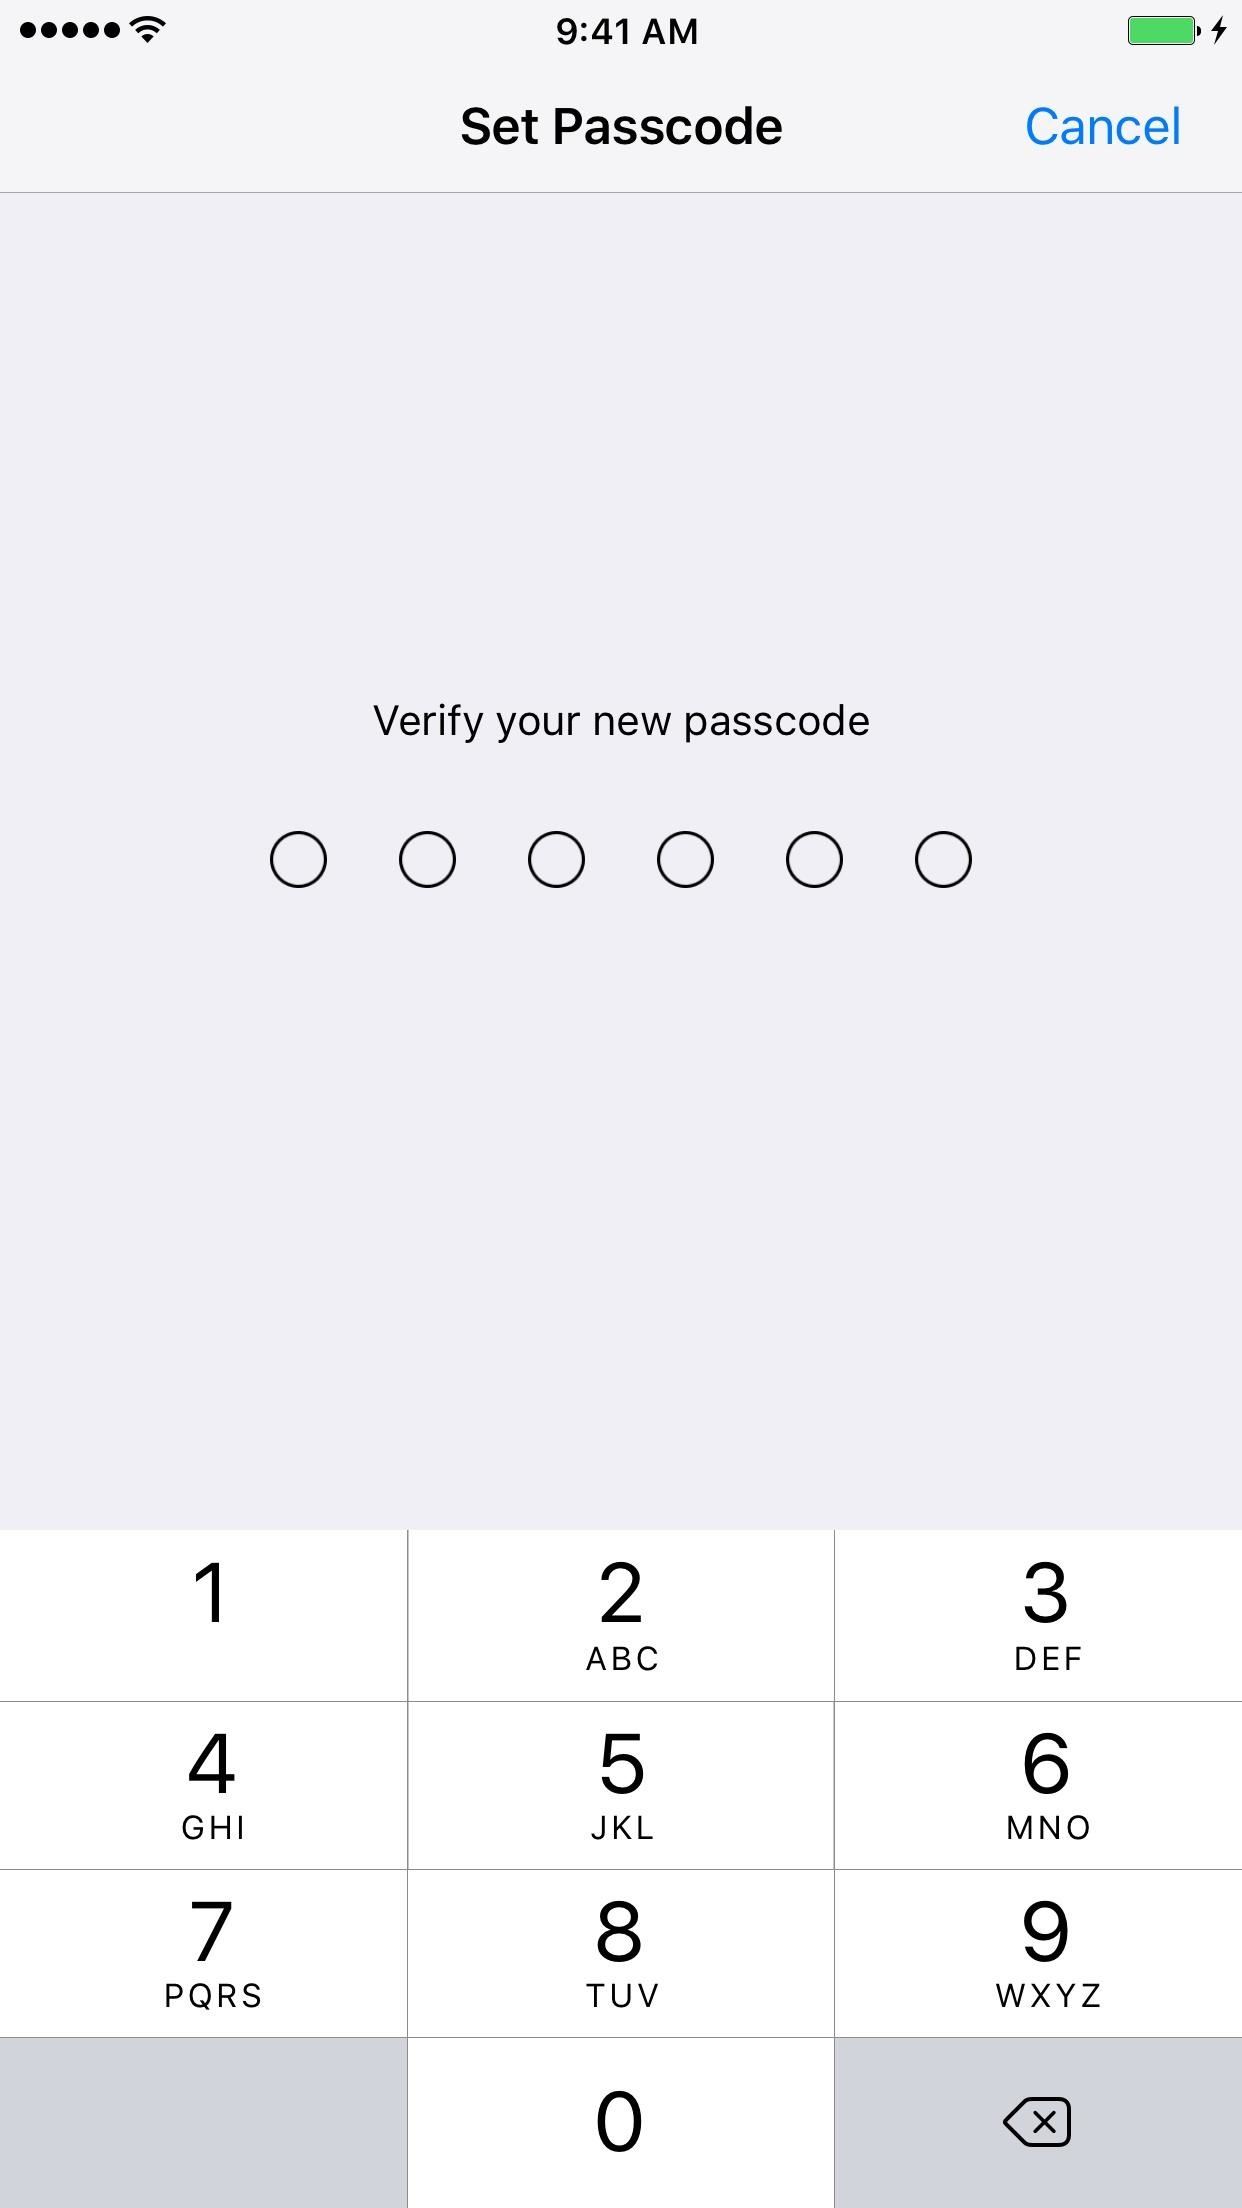
Step 1: Disable Use Passcode to Change Apple ID Password (High)If you've set up a passcode on your iPhone, which you most certainly should have, chances are that you got suckered into a seemingly harmless setting that allows you to change the password of your Apple ID using your iPhone's passcode, as long as you're signed into iCloud at the moment.While this sounds like a great thing to do if you're constantly forgetting your iCloud password, if someone gains access to your iPhone using your passcode somehow, there's a good chance they'll also be able to change your iCloud password and take over your entire Apple account.To prevent this from happening, go to Settings, then select "Touch ID & Passcode" (or just "Passcode" if you have an older device). Enter your current passcode, then select "Turn Passcode Off." Simply changing your passcode will not fix this issue. Enter your current passcode once again, then create a strong passcode and verify it. Afterward, you'll be prompted with the following message:You can use your new passcode to change your Apple ID password from this iPhone. Enter the Apple ID password for "[iPhone Name]" to continue. Do NOT complete this step. Instead, tap "Cancel," and make sure you're connected to Wi-Fi or data and signed into iCloud at the moment, or else you'll run into issues with this again later. Canceling this prompt means that, depending on your settings, you'll either have to answer security questions or use two-factor authentication to change your Apple ID password, should you lose it.
Step 2: Disable Siri on Your Lock Screen (High)There's no arguing that Siri can be super helpful when you've got a quick question or need to send a quick message hands-free. However, if you have a passcode set up, eventually you're screen is going to turn off and get locked. And, by default, Siri is accessible from the lock screen on your iPhone by anyone with a finger.They may not be able to use "Hey Siri," since that's tied to your unique voice, but they can still press and hold the home button to access Siri. From there, they can either speak to Siri or Type to Siri (iOS 11 only) and gain valuable data on your close friends and personal information.Apple does its best to lock private data behind your passcode or Touch ID, but some info will still slip out. Plus, almost every lock screen exploit that happened was a flaw in Siri's capabilities, so she's eventually going to make your iPhone accessible to a clever hacker out there. If you're feeling extra cautious, check out the full instructions below to disable Siri's lock screen access.Instructions: How to Disable Siri on Your iPhone's Lock ScreenYou can also disable Siri completely on your iPhone if you want. We don't think that's necessary, but if you don't use Siri, why have it enabled?
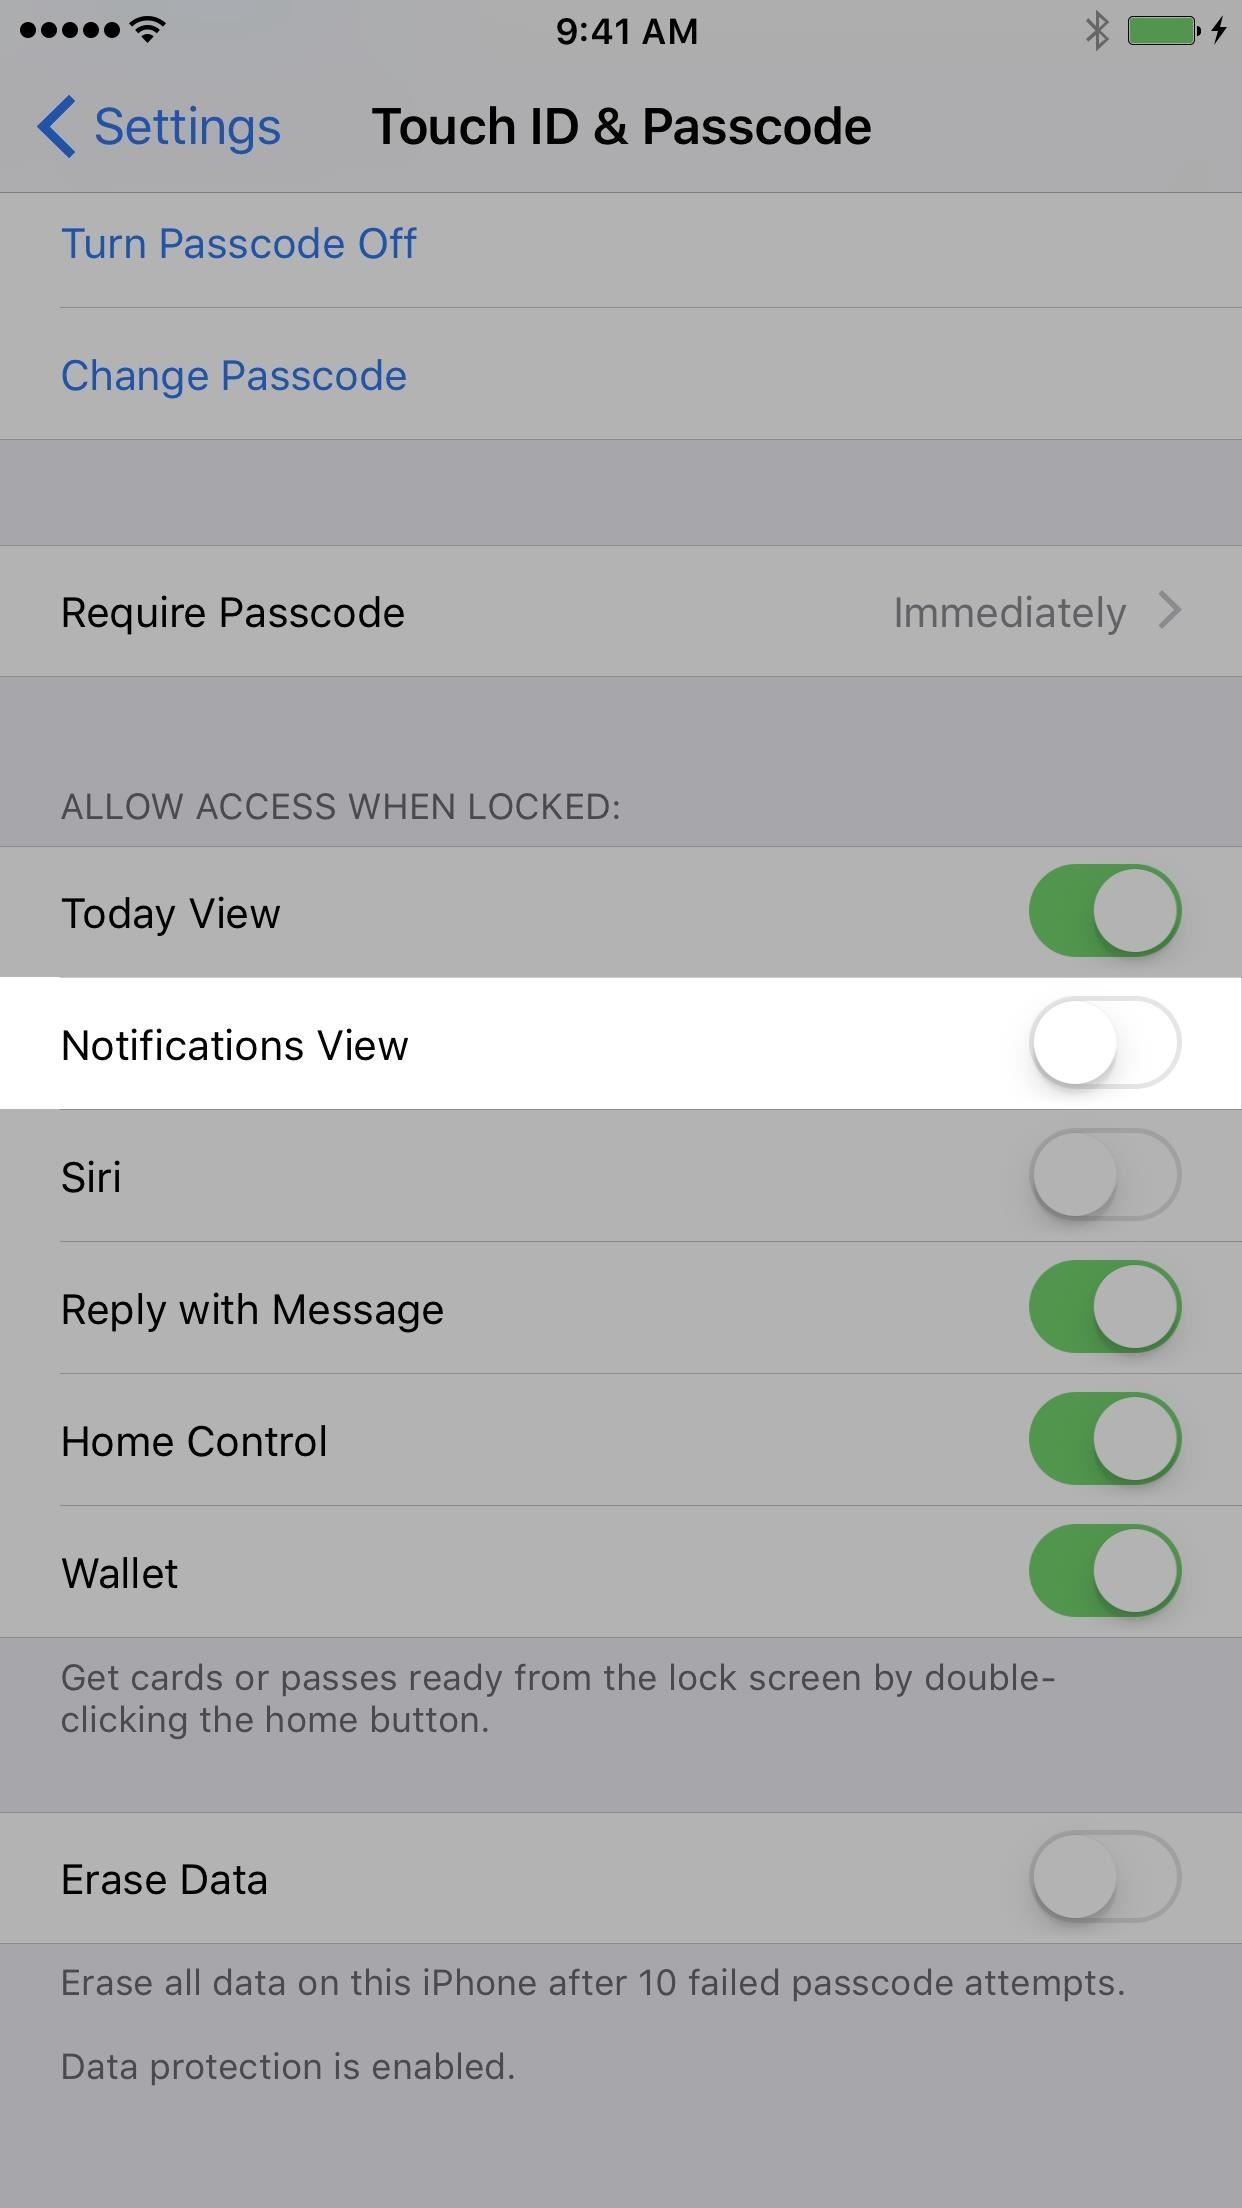
Step 3: Disable Recent Notifications on Your Lock Screen (High)While we're on the topic of the lock screen, let's talk about notifications. By default, whenever your screen is locked, anyone with a finger can swipe down from the top to open up your recent notifications. This can tell somebody with your iPhone what types of apps you use and how frequently, who your contacts are and what they're saying to you in texts and emails, what events are coming up for you, and so on.If this worries you a little, you can disable it. Open up Settings, then select "Touch ID & Passcode" (or just "Passcode"), then toggle off either "Notifications View" (iOS 10) or "Recent Notifications" (iOS 11). iOS 10 (left) vs. iOS 11 (right). Now, whenever your screen is locked, no one — not even you — can swipe down from the top to view notifications. However, keep in mind that this won't do anything for new notifications on your lock screen. Those will still show up as usual, until you unlock your device or clear them individually on the lock screen.
Quick Tip for iOS 11 Users OnlyIf you're running iOS 11 and can't stand the idea of losing access to your entire Recent Notifications pull-down, you can go to "Notifications" in Settings, pick an app, then toggle off "Show in History," which will remove it from the list. However, this will also remove it from the list when unlocked, so keep that in mind.

Step 4: Disable Reply with Message on Your Lock Screen (High)iOS 10 added a new feature that lets users with 3D Touch reply immediately to a new message on the lock screen. The problem here is that anyone with hands on your iPhone can see incoming message notifications and will be able to reply to them using 3D Touch. To prevent this from happening, you can go back to your "Touch ID & Passcode" (or just "Passcode") settings, then toggle off "Reply with Message."Don't Miss: How to Keep Others from Replying to Messages on Your iPhone's Lock Screen

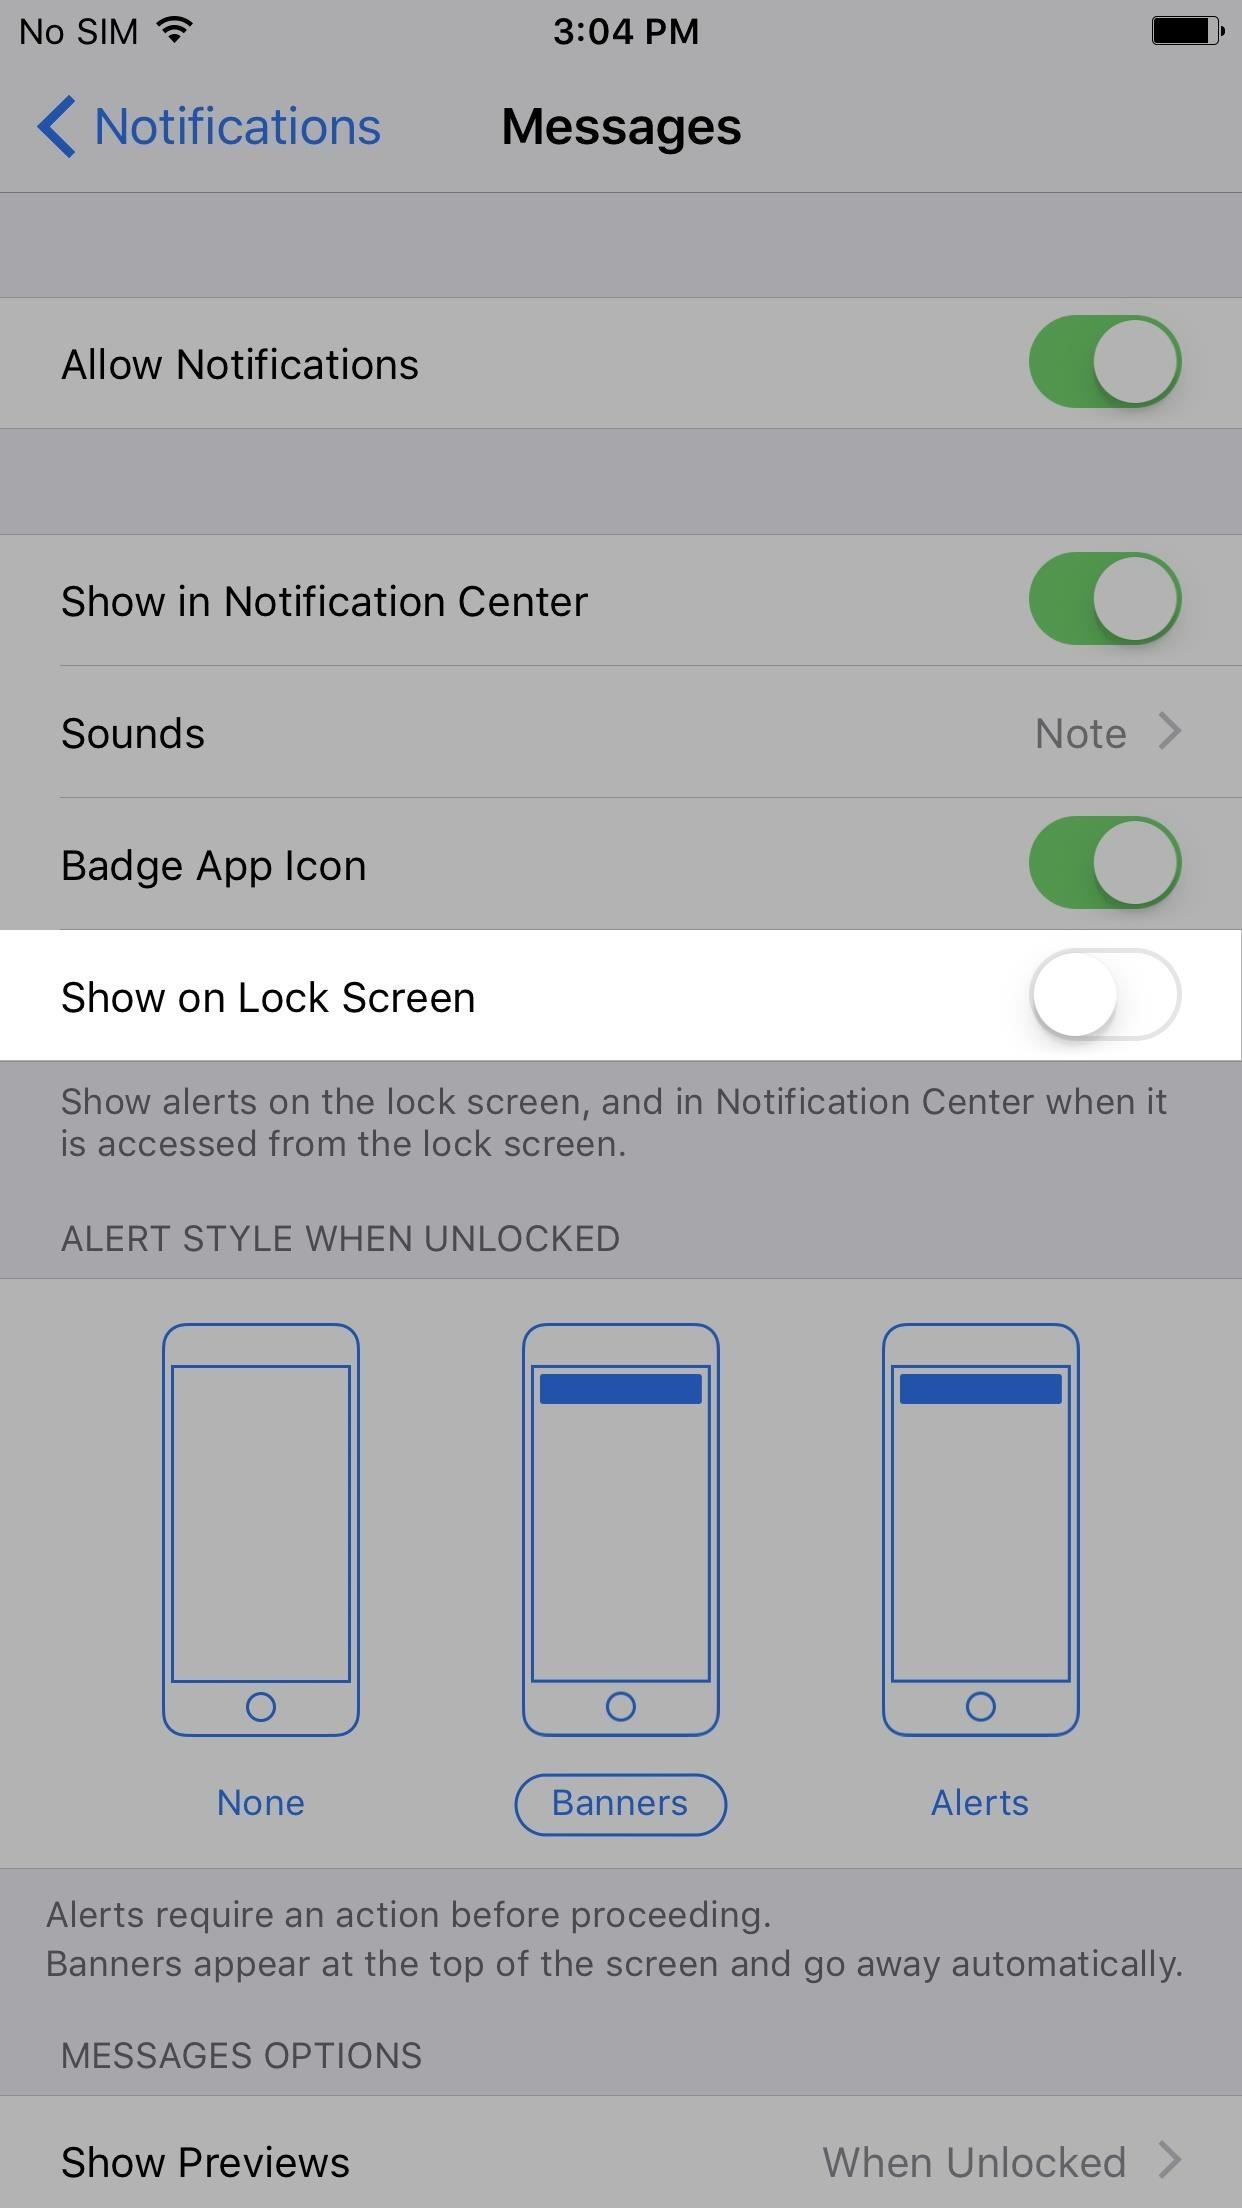
Step 5: Disable Notification Previews on Your Lock Screen (High)While Step 3 above got rid of the pull-down Notifications View on the lock screen, whenever you get a new notification for an app, it will still appear on your lock screen. Some of these notifications are harmless, but some apps can reveal quite a bit of information. Also, anyone can use 3D Touch on a notification to expand it and interact with it, such as replying directly to a message for you (if you didn't disable "Reply with Message" from the previous step).If you still want to know when you get a notification but want to limit the details of it to your eyes only, then you can disable "Previews" on the lock screen. Enabled, notifications can be read and interacted with (left, middle). Disabled, the contents of the notification are hidden, and need to be be unlocked to access or interact with (right). For those of you on iOS 10, go to "Notifications" in Settings, then choose the app you'd like to disable Previews for. Then, at the bottom of each's page, tap on "Show Previews," and set it to either "When Unlocked" or "Off." Right now, this can only be done in select Apple apps such as Messages, Mail, Photos, and Wallet. For those of you running iOS 11, go to "Notifications" in Settings, then at the top of the screen, there will be a master "Show Previews" option that applies to all apps on your iPhone, not just select Apple ones. Tap on it and choose either "When Unlocked" or "Off." This will become your default for all apps. After, you can go back to the main Notifications settings and select apps on an individual basis to change them from your new default setting, if you want. All apps have the option in iOS 11.Don't Miss: How to Disable Notification Previews for All Apps in iOS 11
Step 6: Disable Notifications Entirely on Your Lock Screen (Medium)If there are some apps you'd like to never see notifications for on the lock screen, like dating apps, because you don't want anybody knowing that you use those apps, you can disable those notifications from appearing on the lock screen entirely.Just go to "Notifications" in Settings, then pick an app. There is no way to apply this across the board on your iPhone, so you have to do it on an app-by-app basis. Next, toggle off either "Show on Lock Screen" (iOS 10) or "Show on Cover Sheet" (iOS 11), and you'll never see a notification from the app again on your lock screen. iOS 10 (left) vs. iOS 11 (right).

Step 7: Disable the Control Center on Your Lock Screen (Low)There's not a whole lot someone can do on your lock screen Control Center except toggle a few settings or take some photos. However, if your iPhone gets stolen, the thief can turn on Airplane Mode very easily which will prevent you from locating the device using Find My iPhone, and they'll be able to test their "hacking" skills by trying to unlock your iPhone without worrying about being tracked.Without access to the Control Center, thieves are more likely to just turn the iPhone off instead of trying to gain access to your account right away. And if you set Find My iPhone to wipe your iPhone when it connects to the internet, your data is that much safer.If you're running iOS 10, open up Settings, then select "Control Center" and toggle off "Access on Lock Screen." If you're on iOS 11, go to "Touch ID & Passcode" (or just "Passcode") in Settings, then toggle off "Control Center" under Allow Access When Locked. iOS 10 (left) vs. iOS 11 (right).
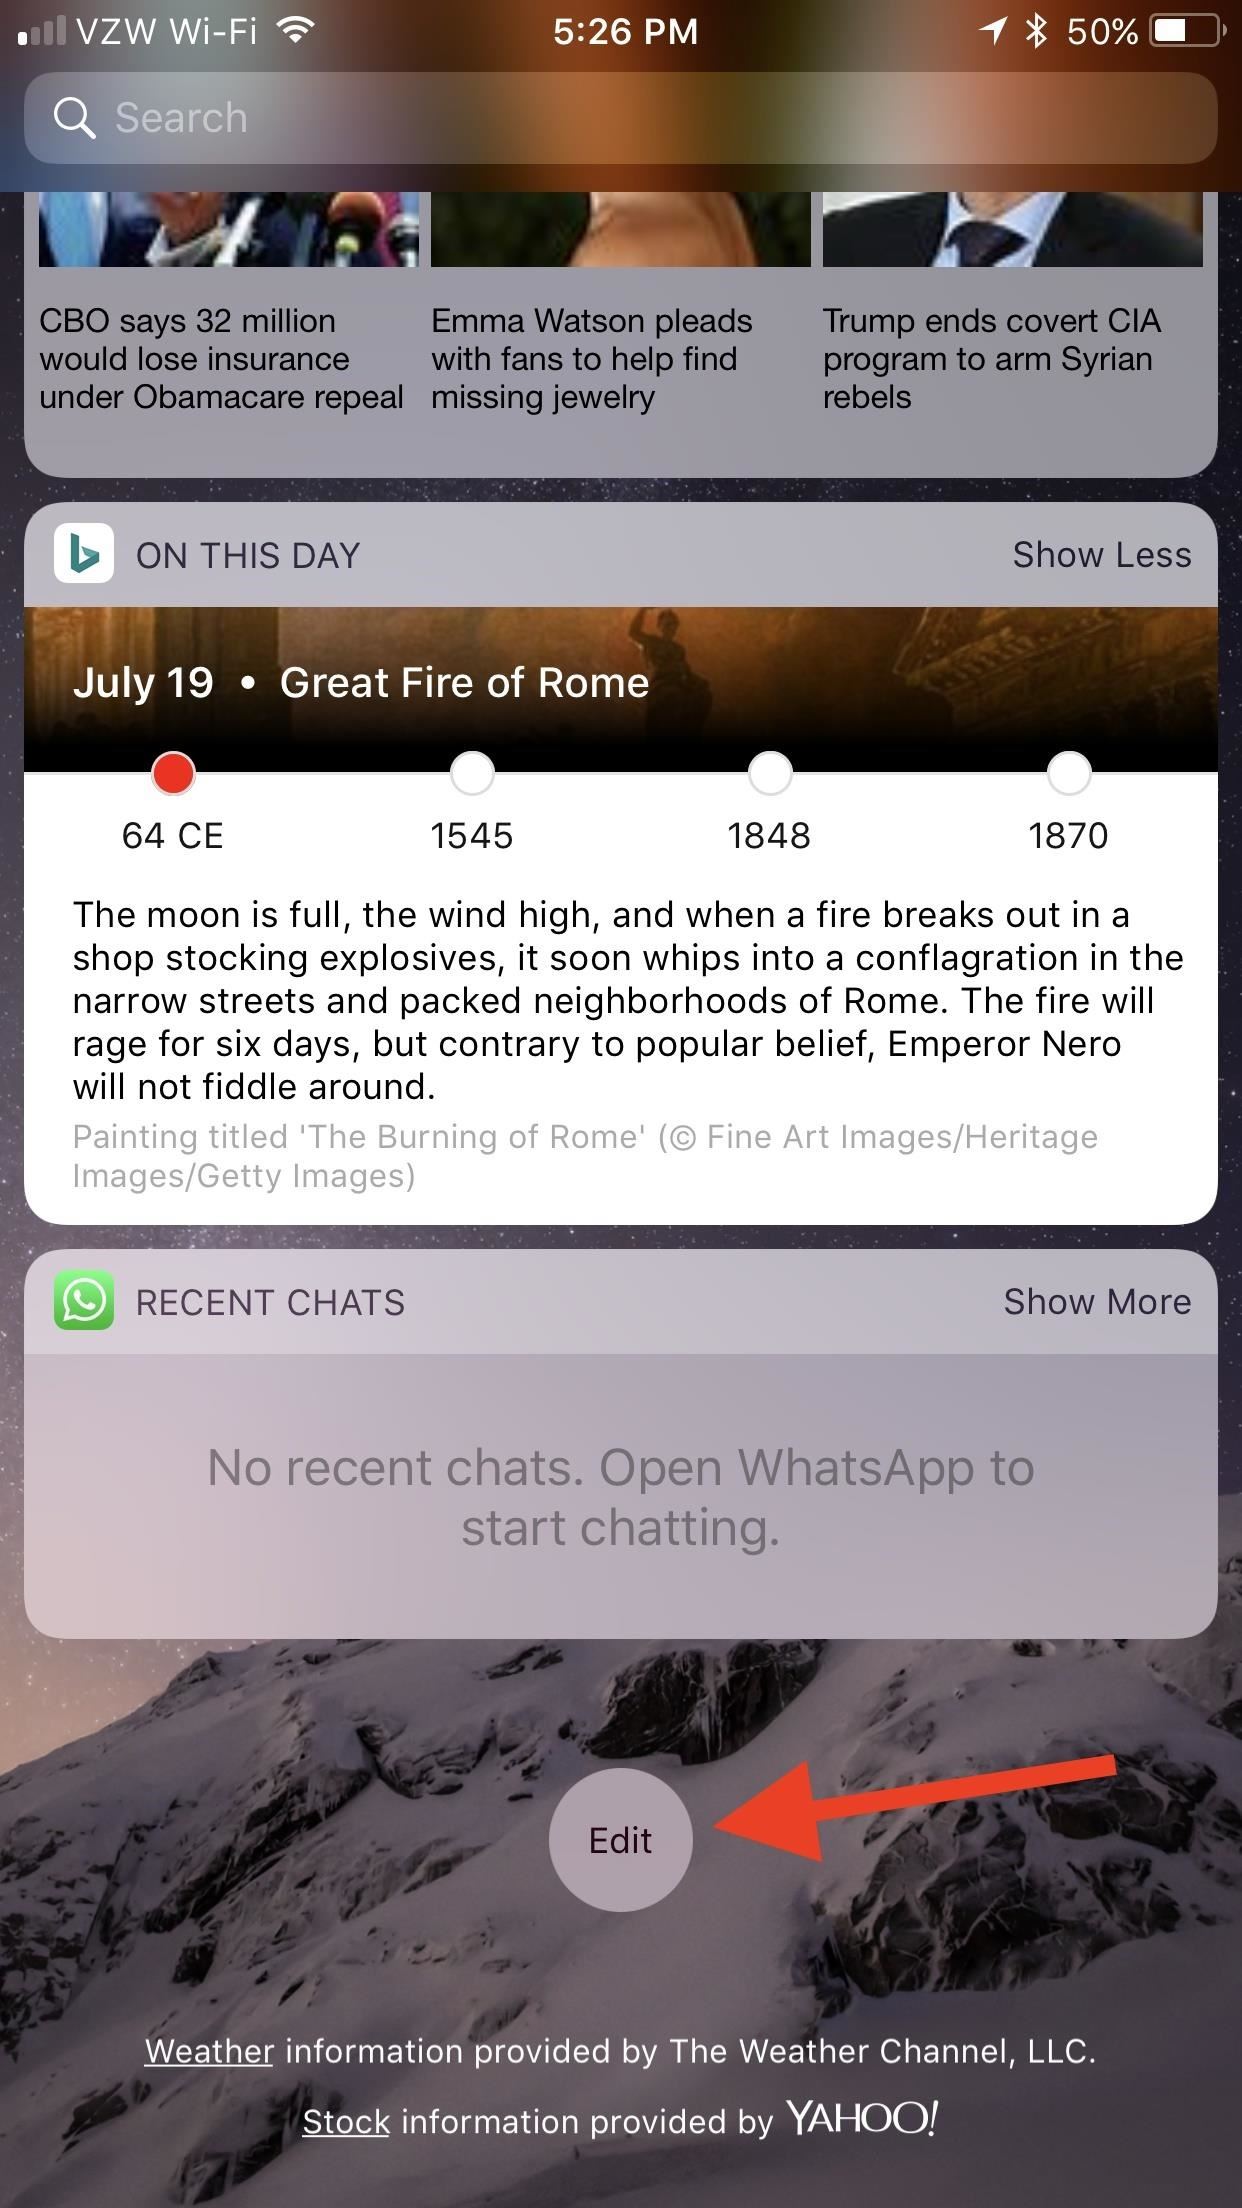
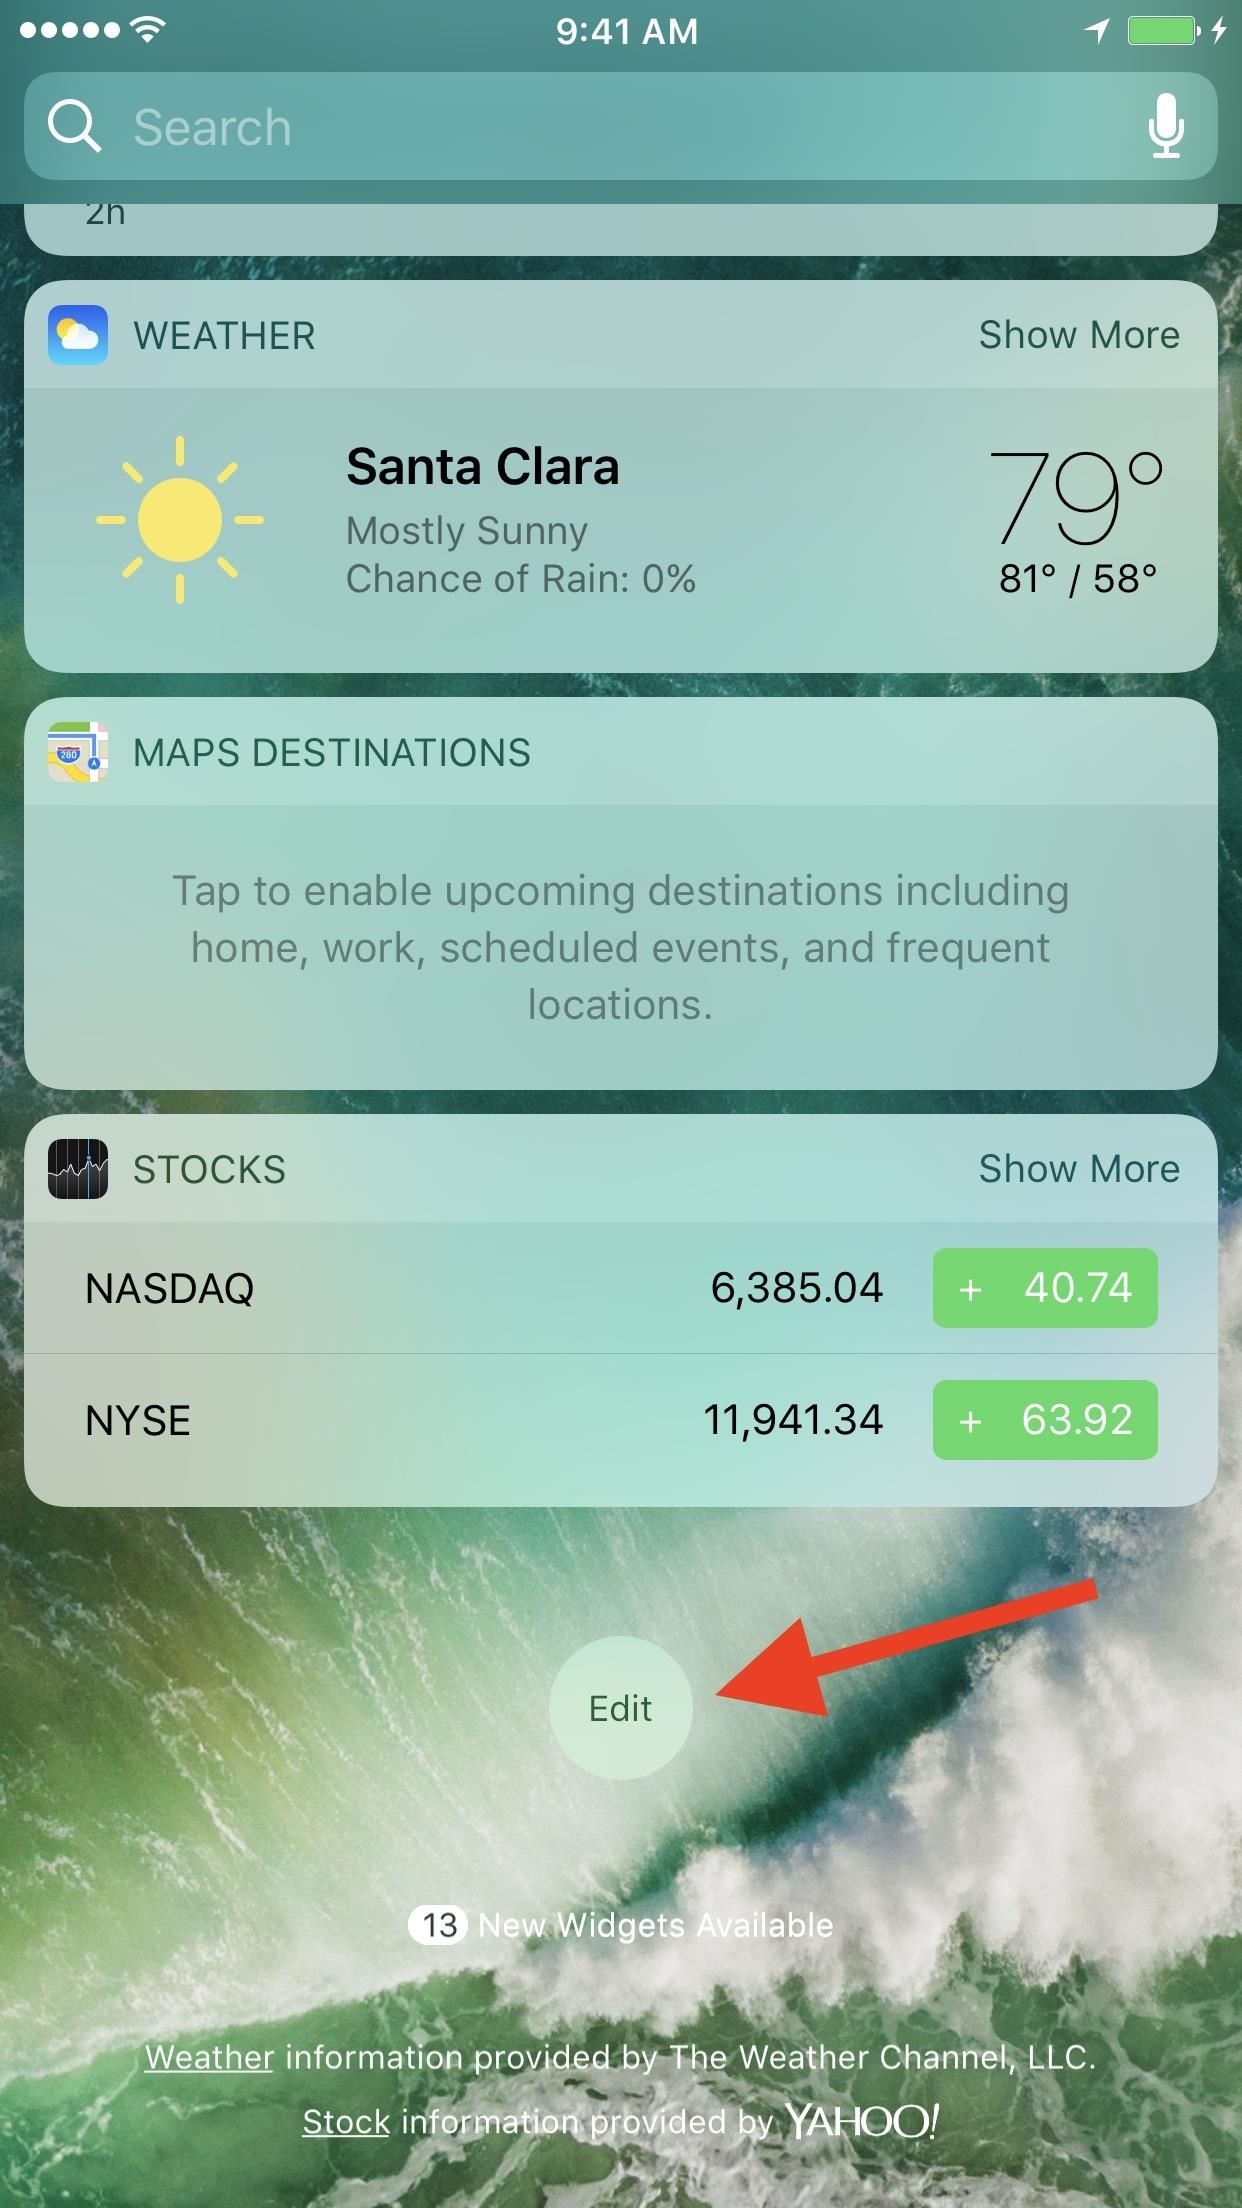
Step 8: Disable Widgets on Your Lock Screen (Medium)Staying on topic with the lock screen, you'll also want to consider disabling certain widgets from appearing in the Today View, or disabling the Today View entirely. Some information you may not want others looking at are favorite contacts, your upcoming calendar events, and recent chats, among other things.To disable individual apps, which will disable them from the Today View entirely, not just on the lock screen, slide over to your Today View, then tap "Edit" at the bottom of the page. If your screen is locked, you'll need to use Touch ID or your passcode to continue. Then, just remove widgets with personal information in them. If you just want to disable the whole Today View page on the lock screen instead of removing widgets entirely from both the locked and unlocked views, head to "Touch ID & Passcode" (or just "Passcode") in Settings, then toggle off "Today View" under Allow Access When Locked.Don't Miss: How to Remove Widgets from Your iPhone's Lock Screen
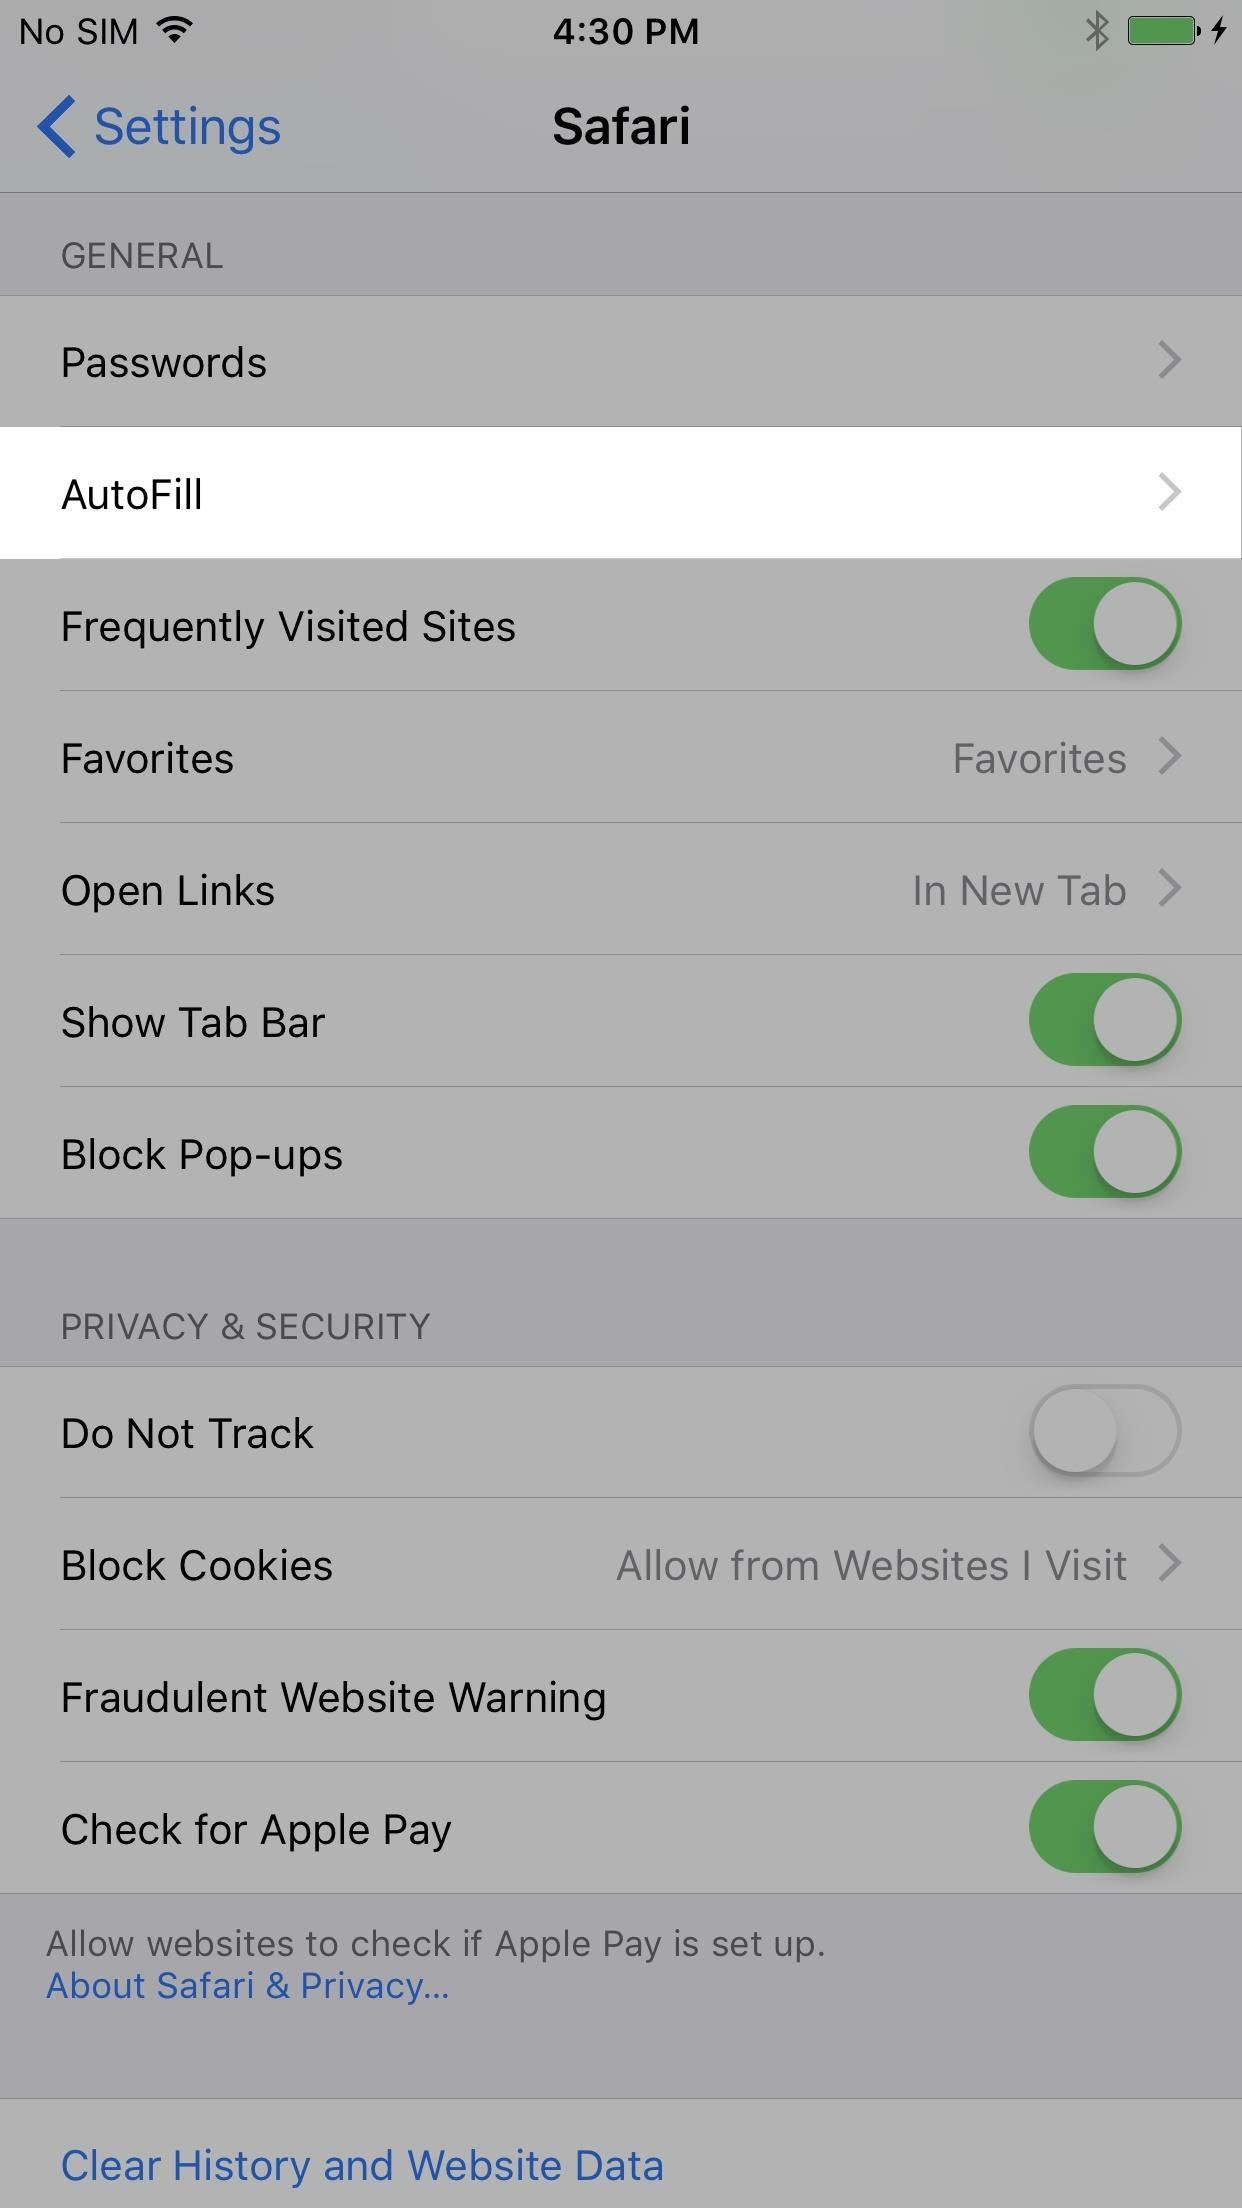
Step 9: Disable AutoFill in Safari (Medium)Safari will save usernames and passwords, as well as debit and credit card information, if you let it. This makes it fairly easy to input these things into websites when you need to, but it also makes it easy for someone who just happened to gain access to your iPhone to do the same, whether they hacked your passcode or otherwise.Go to "Safari" in Settings, then tap on "AutoFill." Toggle off "Names and Passwords" as well as "Credit Cards" from this screen. You can even toggle off "Use Contact Info" if you're worried about that. You can also tap on "Saved Credit Cards" to delete any that you don't want listed in there anymore.
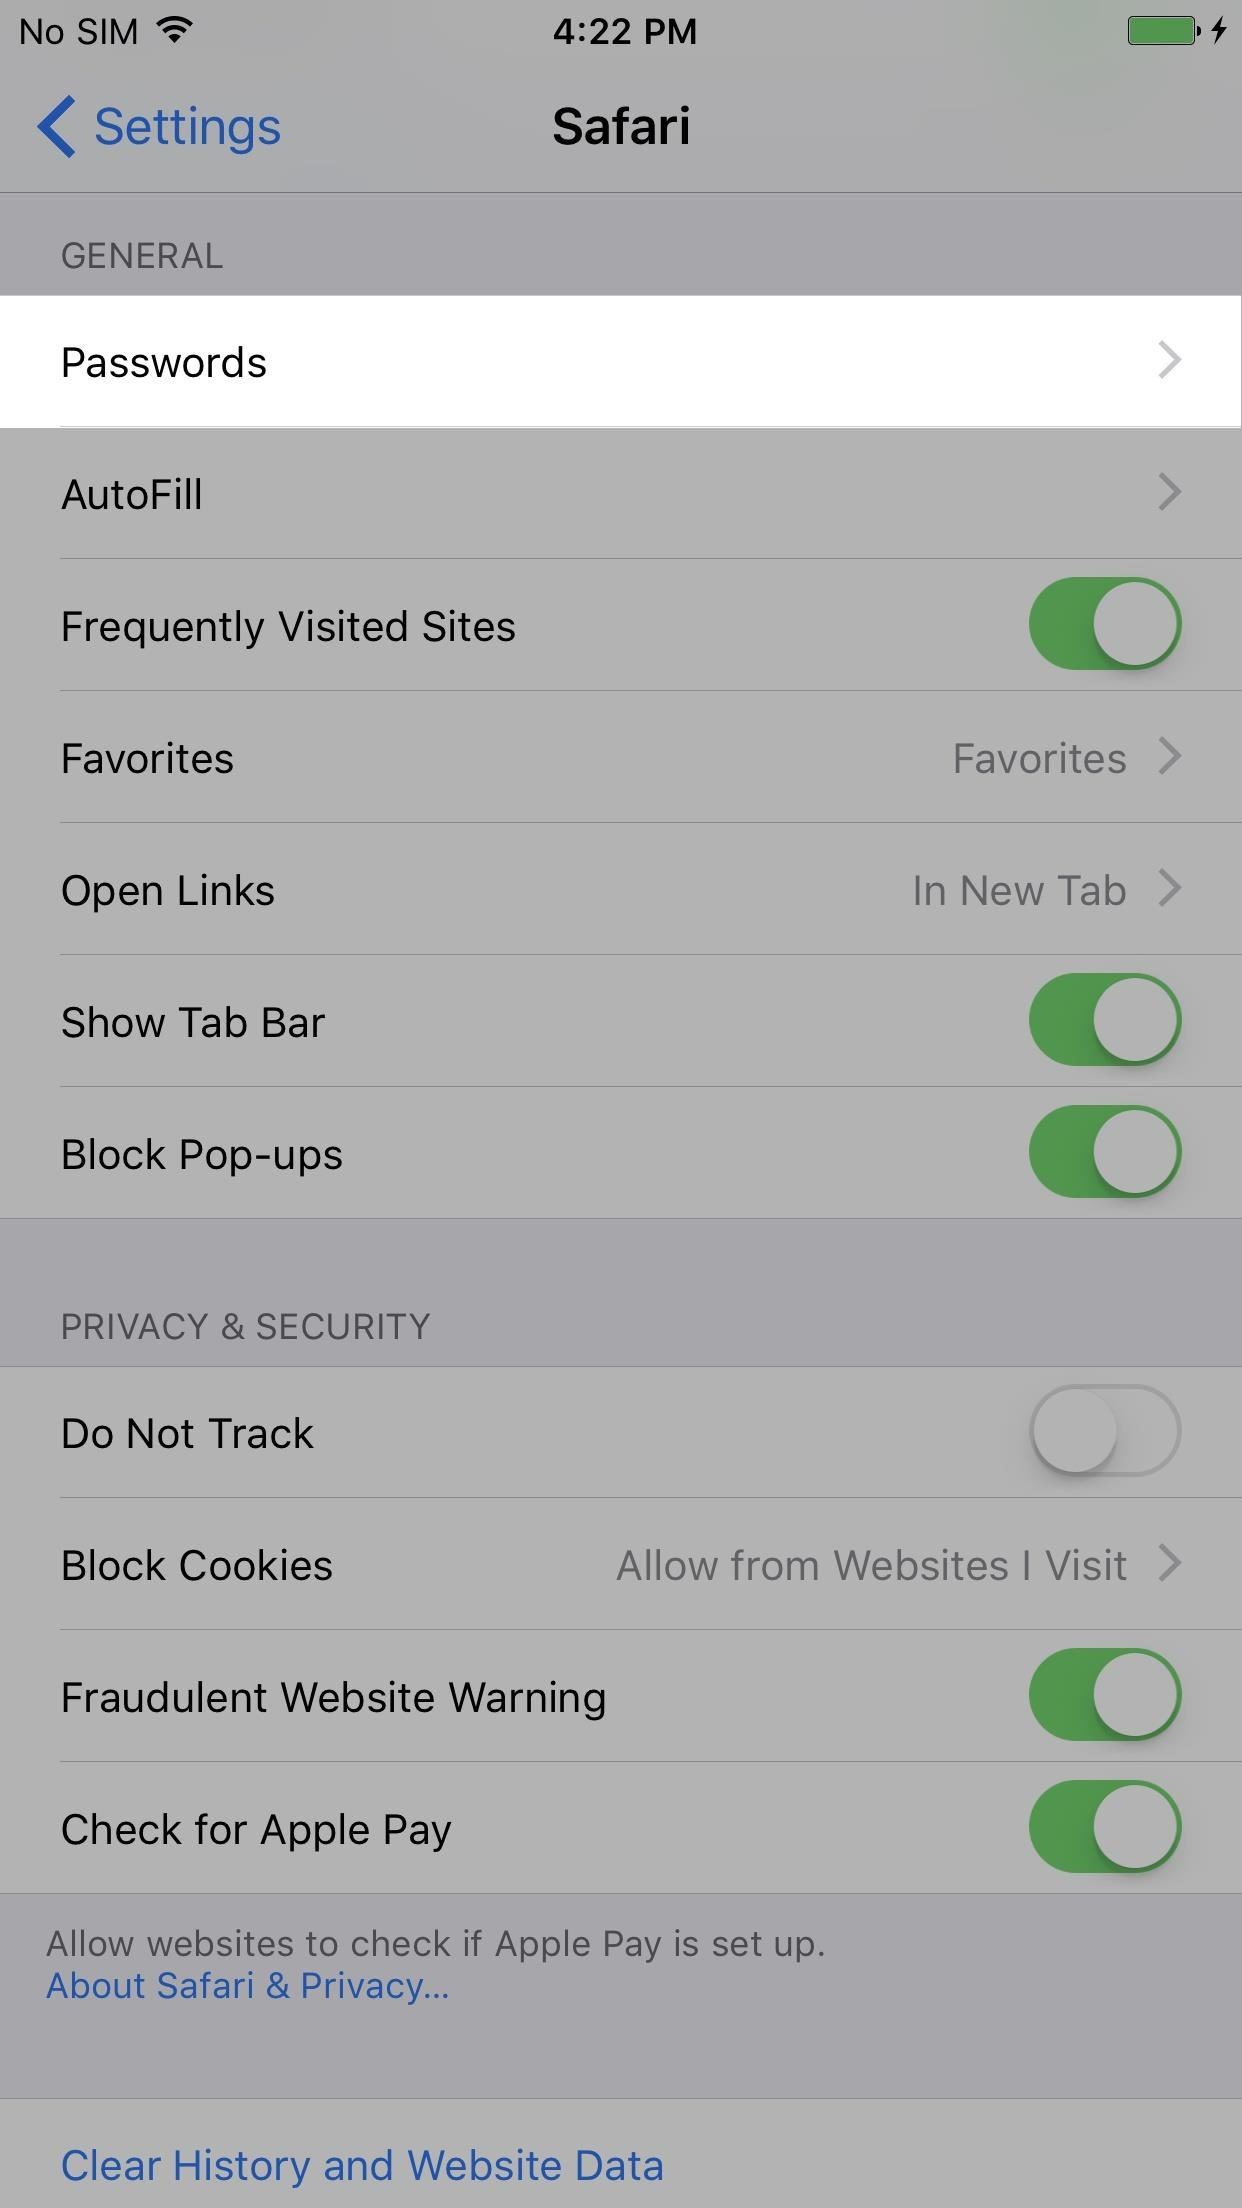
Bonus: Delete Saved Safari PasswordsWhile you could delete saved credits cards in this step, for passwords saved in Safari, you'll have to go somewhere else, and this differs from iOS 10 to iOS 11. If you toggled off AutoFill above, there's really no reason to keep them stored on your iPhone, especially if you already use another password manager such as LastPass. Also, if you have Safari synced with your Mac and your Mac gets stolen, the thief can use AutoFill without even having your iPhone.In iOS 10, go to "Safari" in Settings, select "Passwords," then enter your passcode or use Touch ID. In iOS 11, go to "Accounts & Passwords" in Settings, tap on "App & Website Passwords," then enter your passcode or use Touch ID. On the next screen, in iOS 10 or iOS 11, you can begin deleting passwords as you see fit. iOS 10 (left) vs. iOS 11 (right).
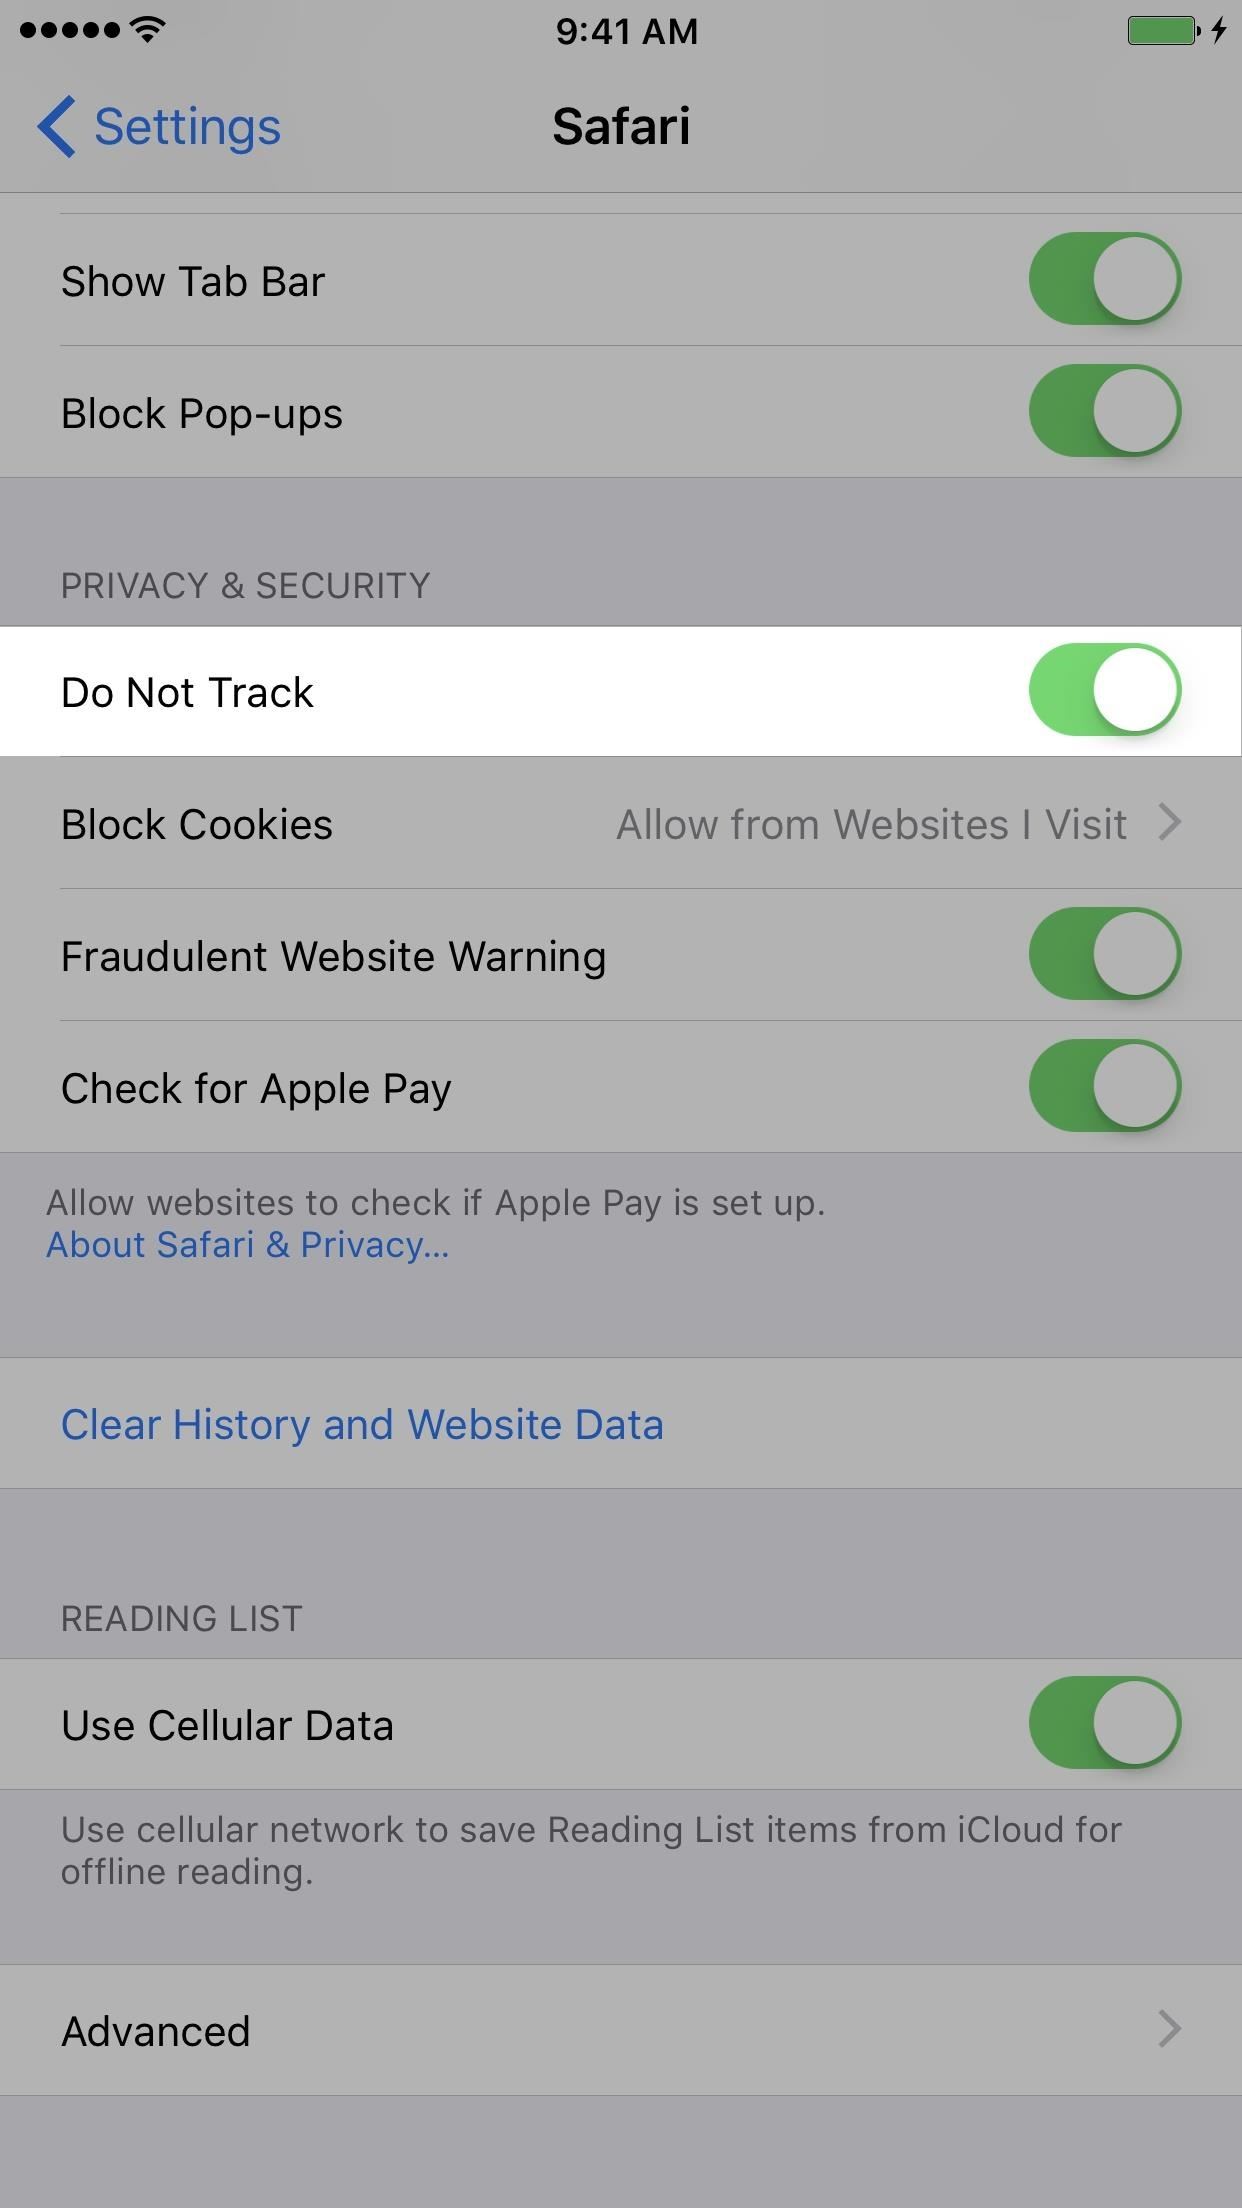
Step 10: Disable Ad Tracking in Safari (Medium)When you're using Safari to browse the web, third-party advertisers can easily track what you're looking at and what you're doing to display advertisements to you better. Some people may like more targeted ads during their web-browsing experience, but some of you may not want to give unknown third-parties personal data. For those who want to keep your data private, you can change this in your Safari settings.Go to "Safari" in Settings, then either toggle on "Do Not Track" (in iOS 10) or "Ask Websites Not To Track Me" (in iOS 11). You can see that in the newest iOS version, they changed the wording, which is a more accurate description of this setting. Apple simply adds a DNT tag to the header request sent to websites, which just asks third-party advertisers not to track you. They are under no obligation to do so, though. iOS 10 (left) vs. iOS 11 (right). If you want a better option for keeping your browsing from being tracked, you can use Private Mode when you need to. Better yet, look into some content blockers in the iOS App Store that you can add to Safari; They not only block ads from showing in Safari but can prevent advertisers from following you around from site to site.
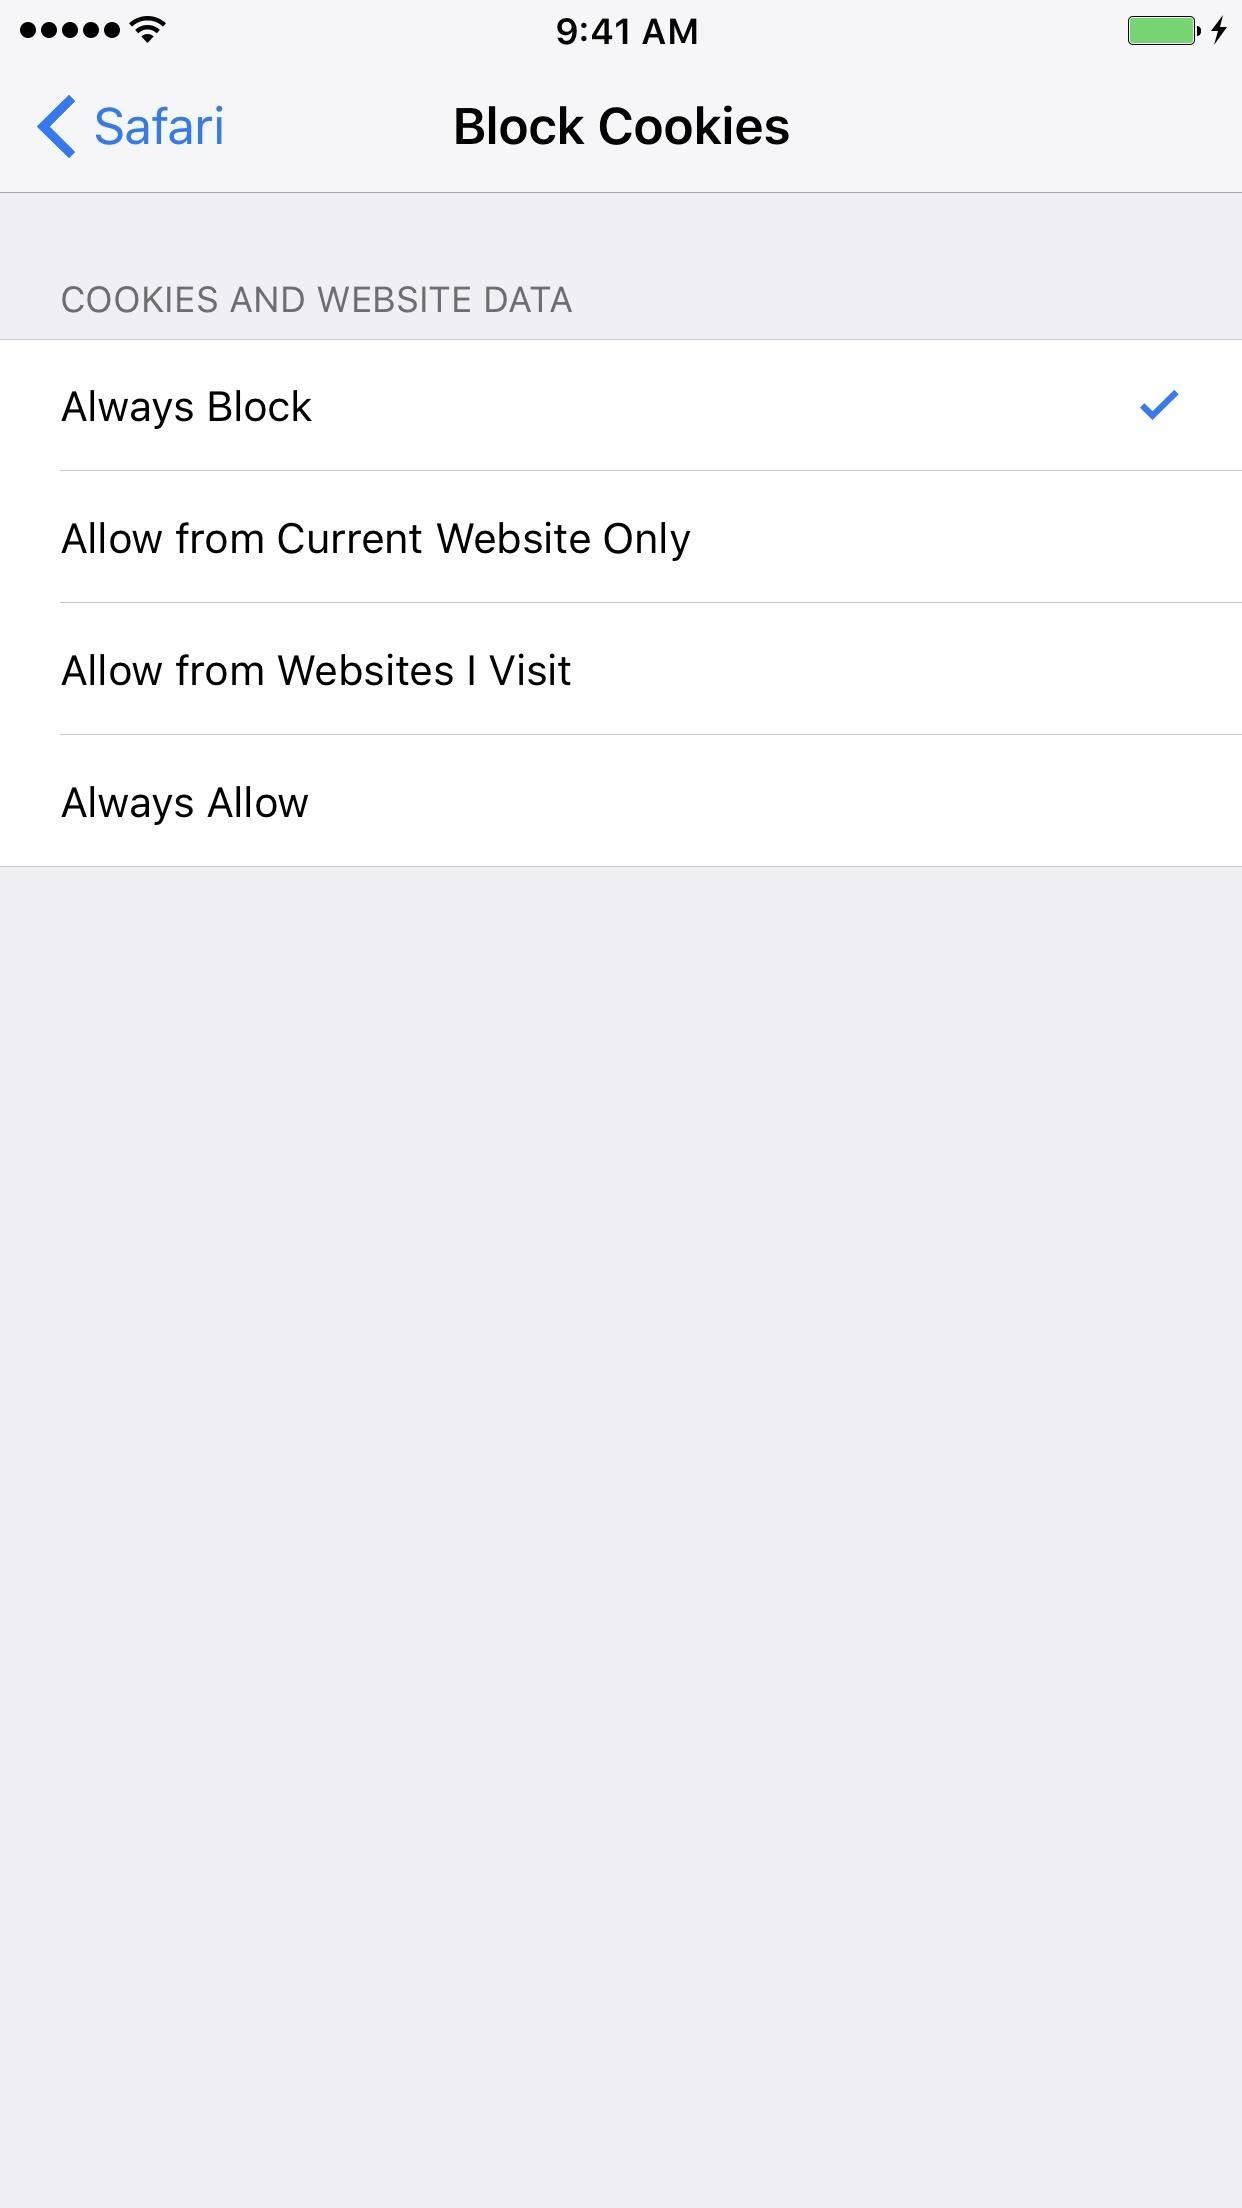
Step 11: Disable Cookies in Safari (Low)Cookies are used by websites to store data to recall the next time you visit the site, making it easier to log in, see things in your shopping cart, and remember your preferences, among other things. However, third-parties attached to webpages you visit, such as advertisers, can also store trackable cookies in your browser.In iOS 10, go to "Safari" in Settings, then tap on "Block Cookies." This will give you some options, such as blocking them entirely or allowing cookies from websites you visit only. In iOS 11, you'll notice that on the main Safari settings page, there's a toggle instead. This is because the removed the fine-tuned options, and you can only turn cookies off for everything, which you may not want to do. iOS 10 (left) vs. iOS 11 (right).
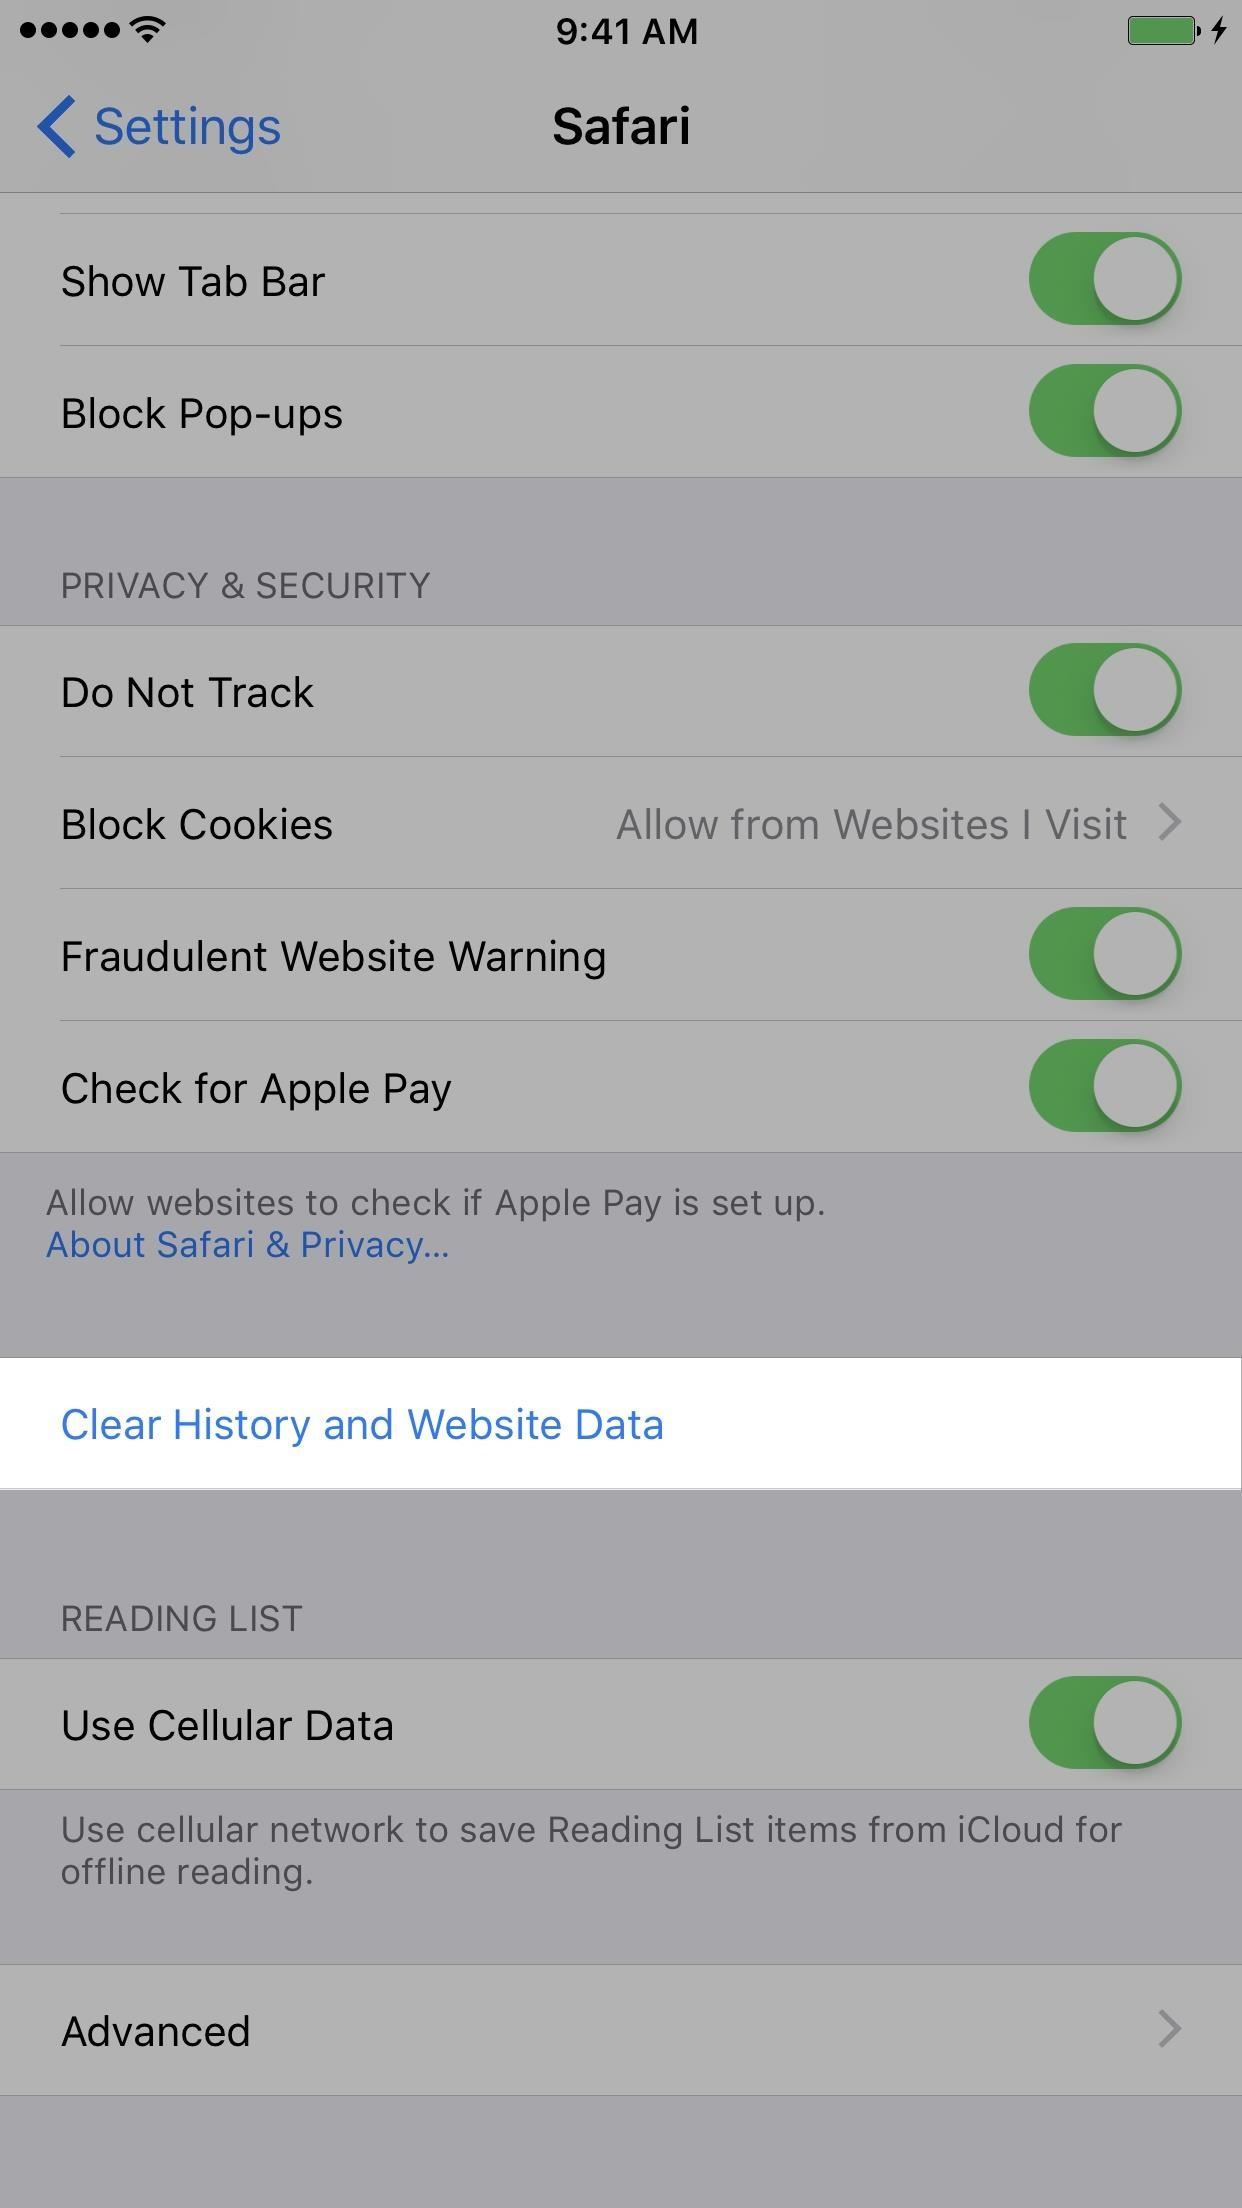
Bonus: Clear Your Safari History & Website DataAfter you've disabled cookies, you might also want to clear your history and website data (including saved cookies) in Safari. To do so, in your Safari settings, tap on "Clear History and Website Data." On the confirmation prompt, tap on "Clear History and Data." If you just want to clear your old cookies and not your history, you can instead go to "Advanced," then scroll down and hit "Remove All Website Data" followed by "Remove Now" on the prompt. Alternatively, you could swipe left on individual cookies do delete them one by one.
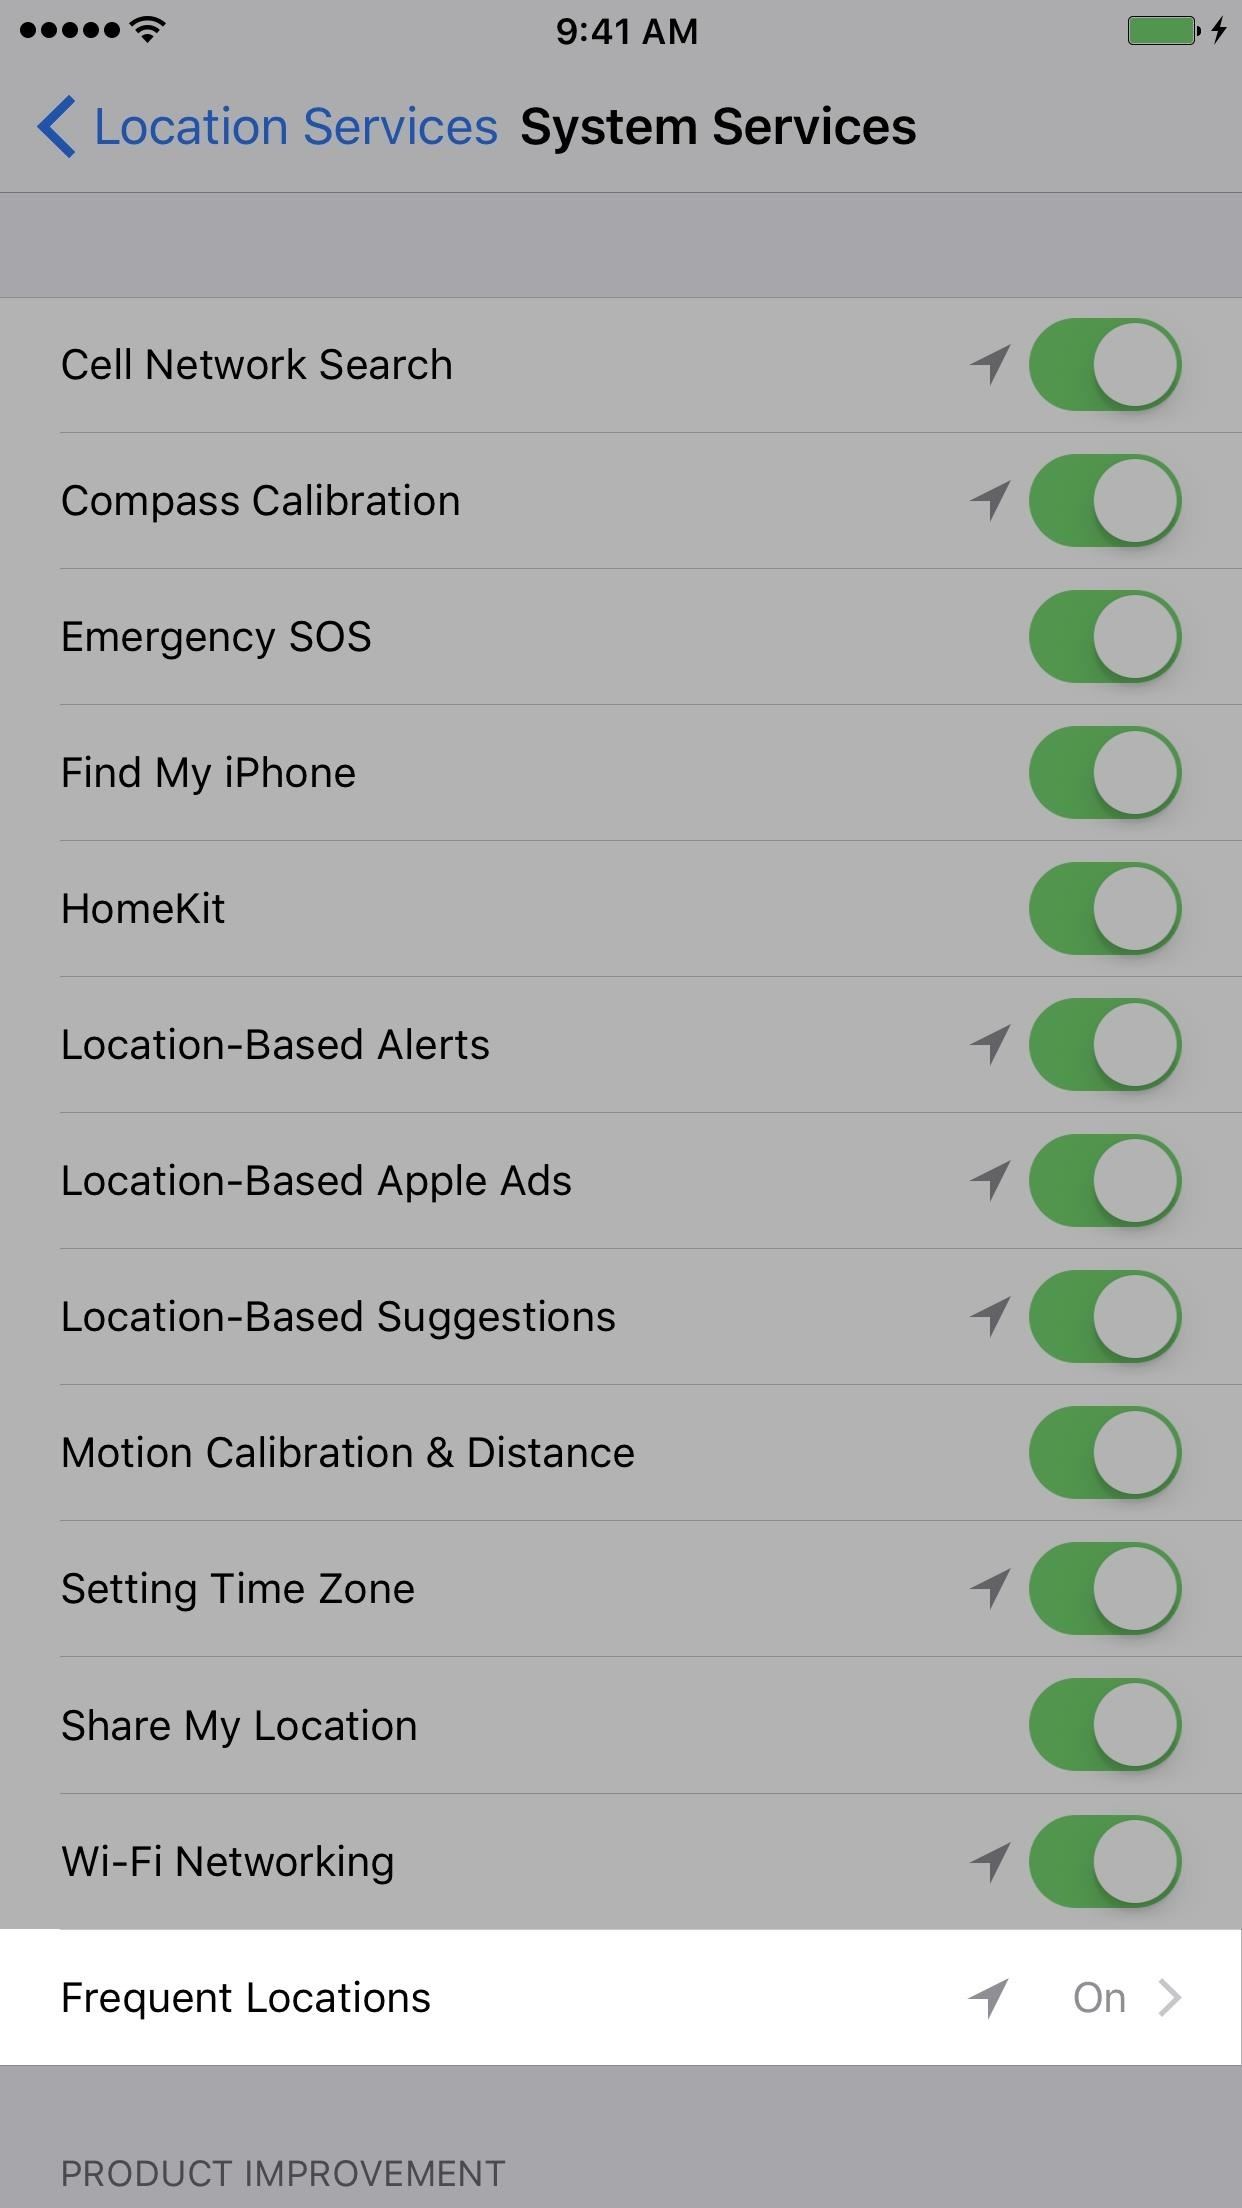
Step 12: Disable Frequent Locations in Settings (Medium)Apple is tracking your every move. That sounds scary, but it's not all that bad. To help you with predictive traffic routing, for example, telling you when the best time to leave work to get home for dinner, Apple collects your most frequented locations (how many times you've been there and for how long) and stores them on your iPhone. This data is not sent to Apple's servers unless you allow it, like if you consented to "Share iPhone Analytics."However, if someone gets a hold of your device and knows your passcode, they can find out exactly where you have been and where you will likely be again in the future. Now that's scary.In iOS 10, go to "Privacy" in Settings, then tap on "Location Services" at the top. On the next page, scroll down and tap on "System Services," then tap on "Frequent Locations" from the list. To disable this feature, just toggle it off. Turning it off won't remove your history, however, so you can select "Clear History" to do so if you'd like, then confirm your choice on the prompt. In iOS 11, it's only slightly different. Again, go to "Privacy" in Settings, then tap on "Location Services." On the next page, scroll down and select "System Services," then tap on "Significant Locations." Unlike in iOS 10, you'll have to use Touch ID or enter your passcode to access this setting. Next, tap on "Clear History" if you want to, then toggle off the main setting (you can't clear your history after turning Significant Locations off first).
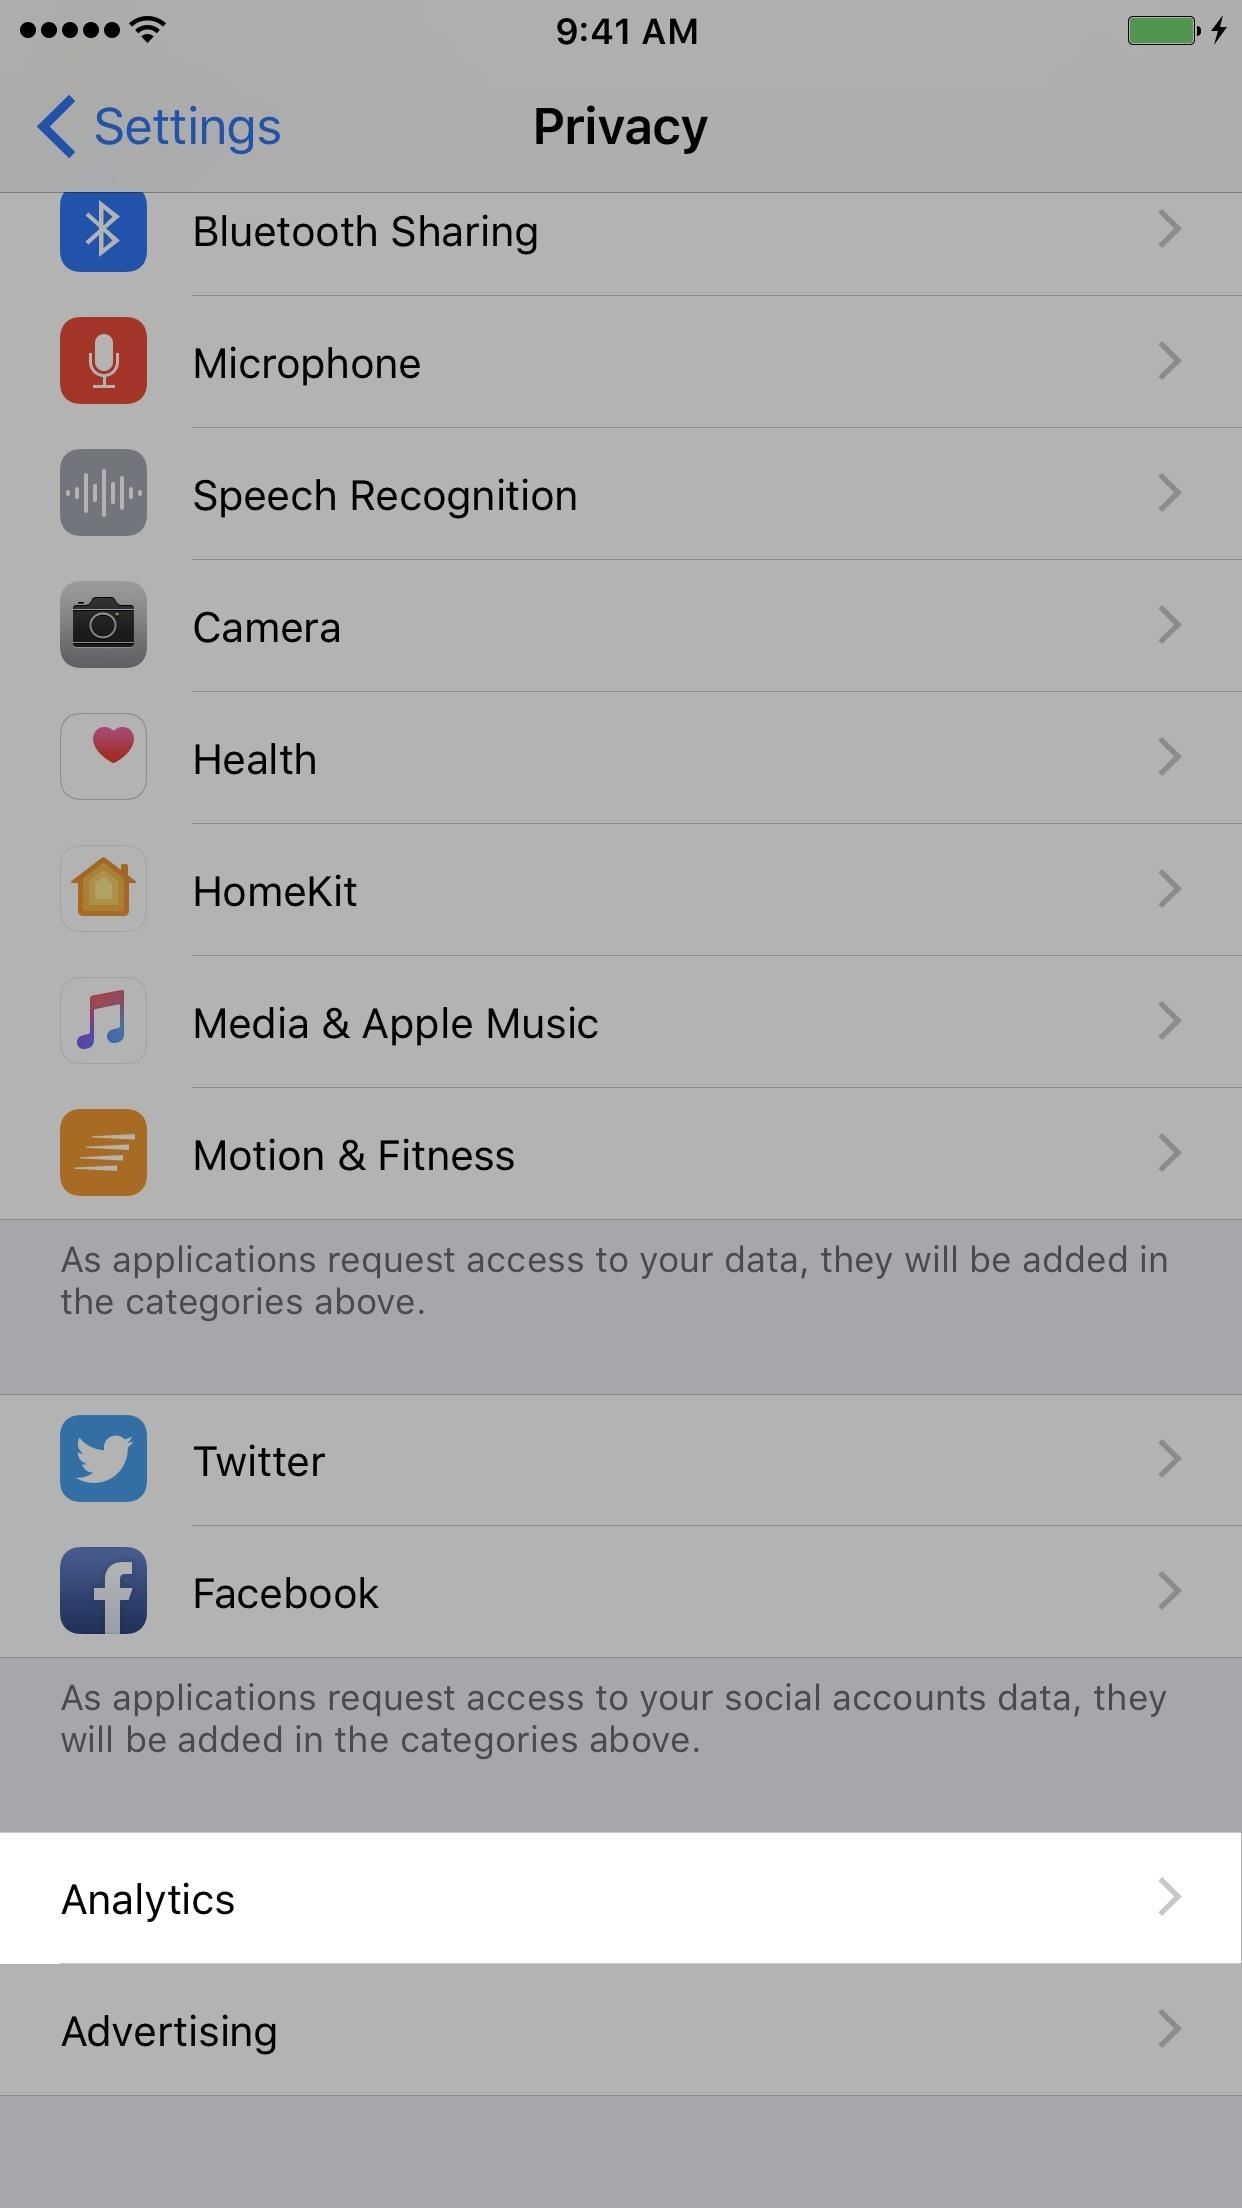
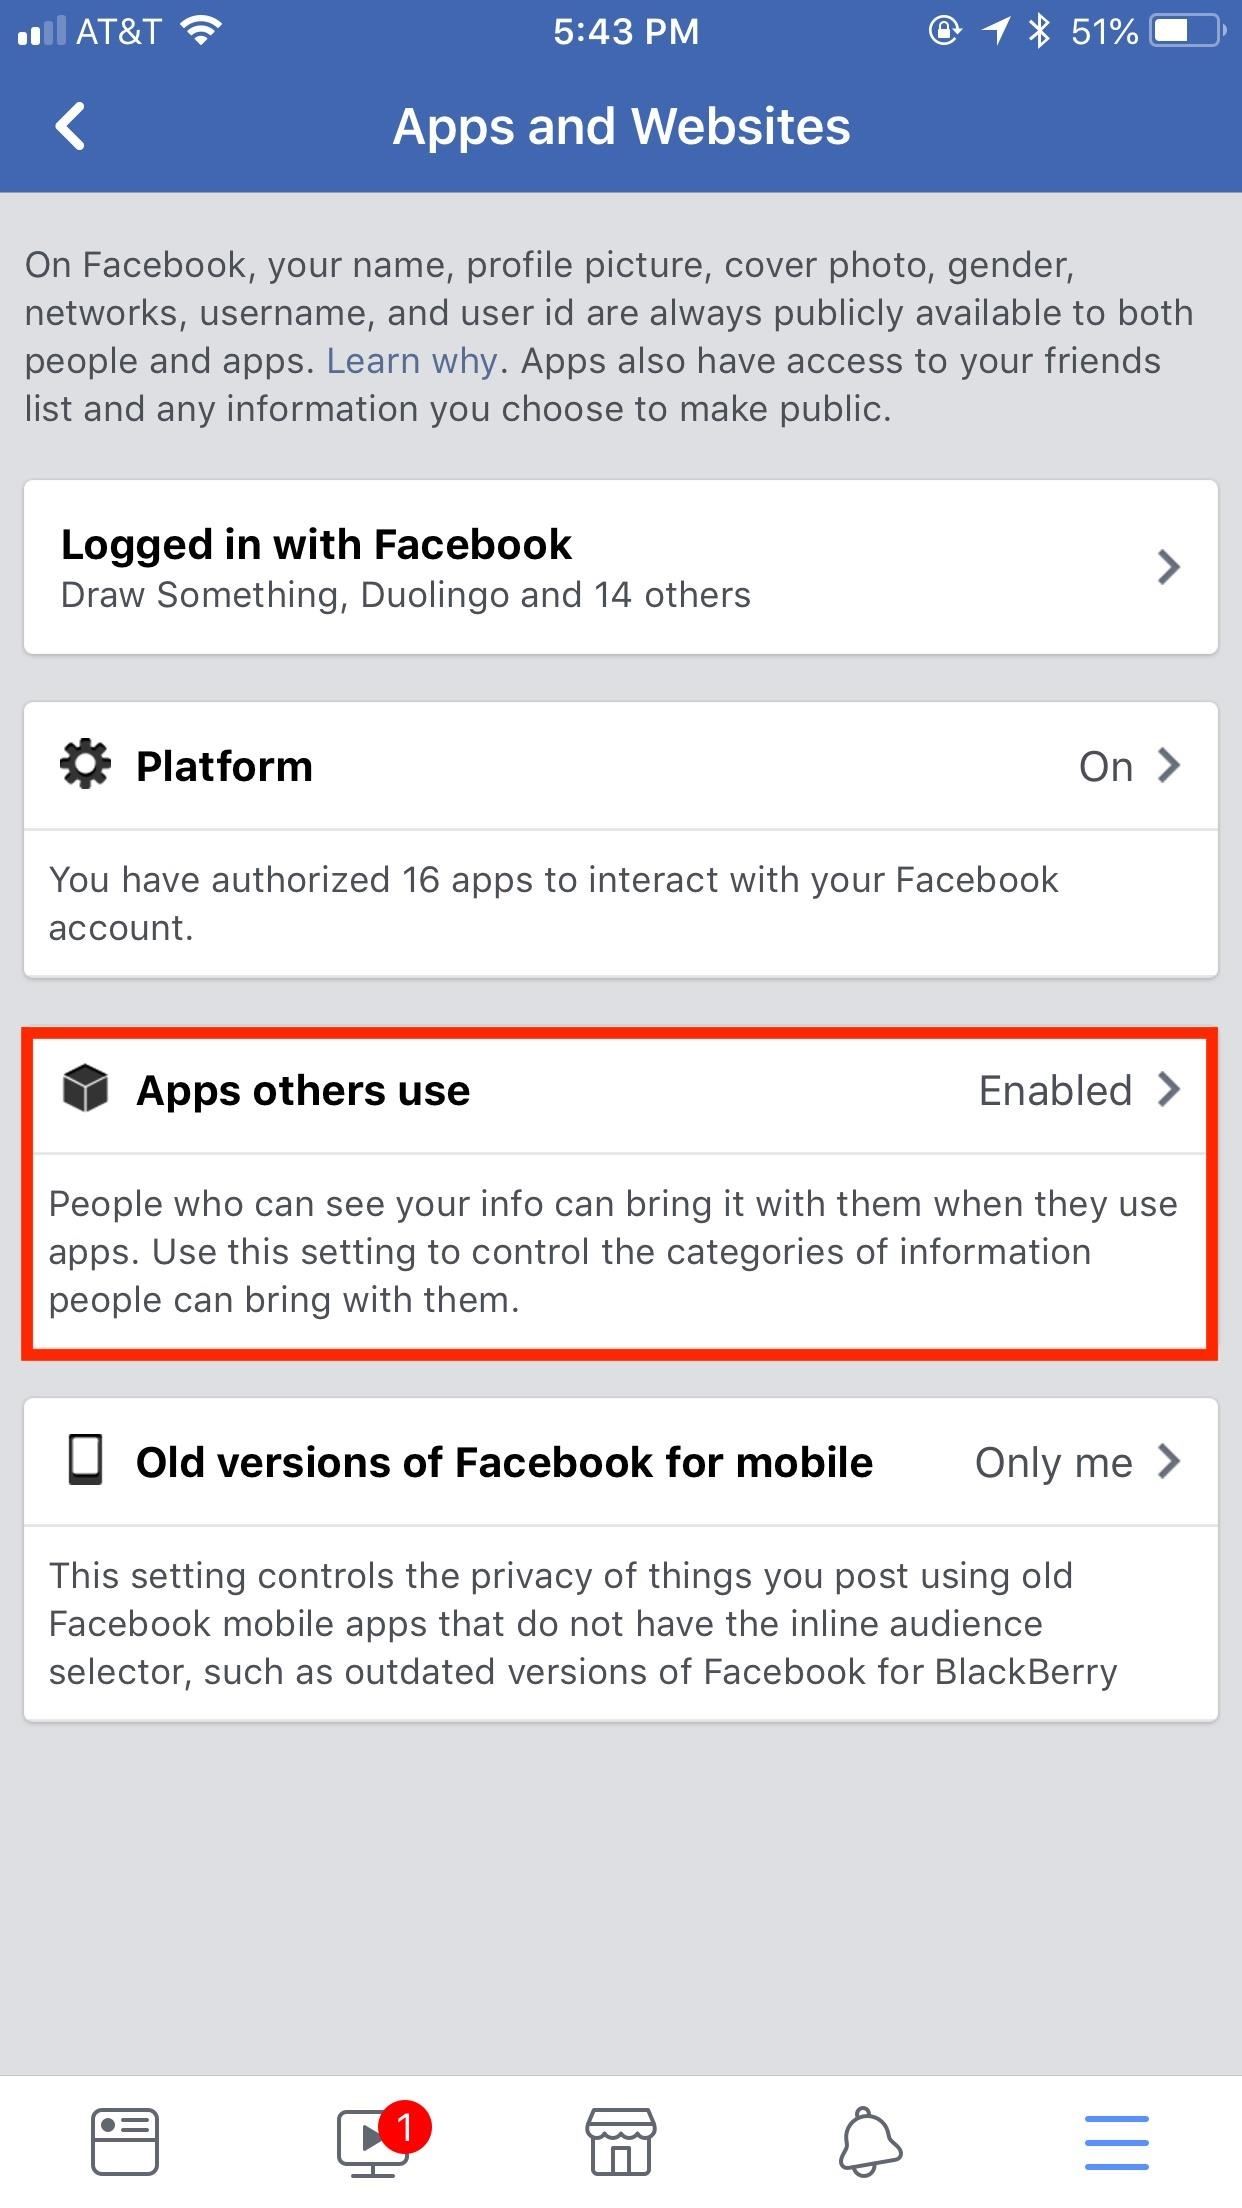
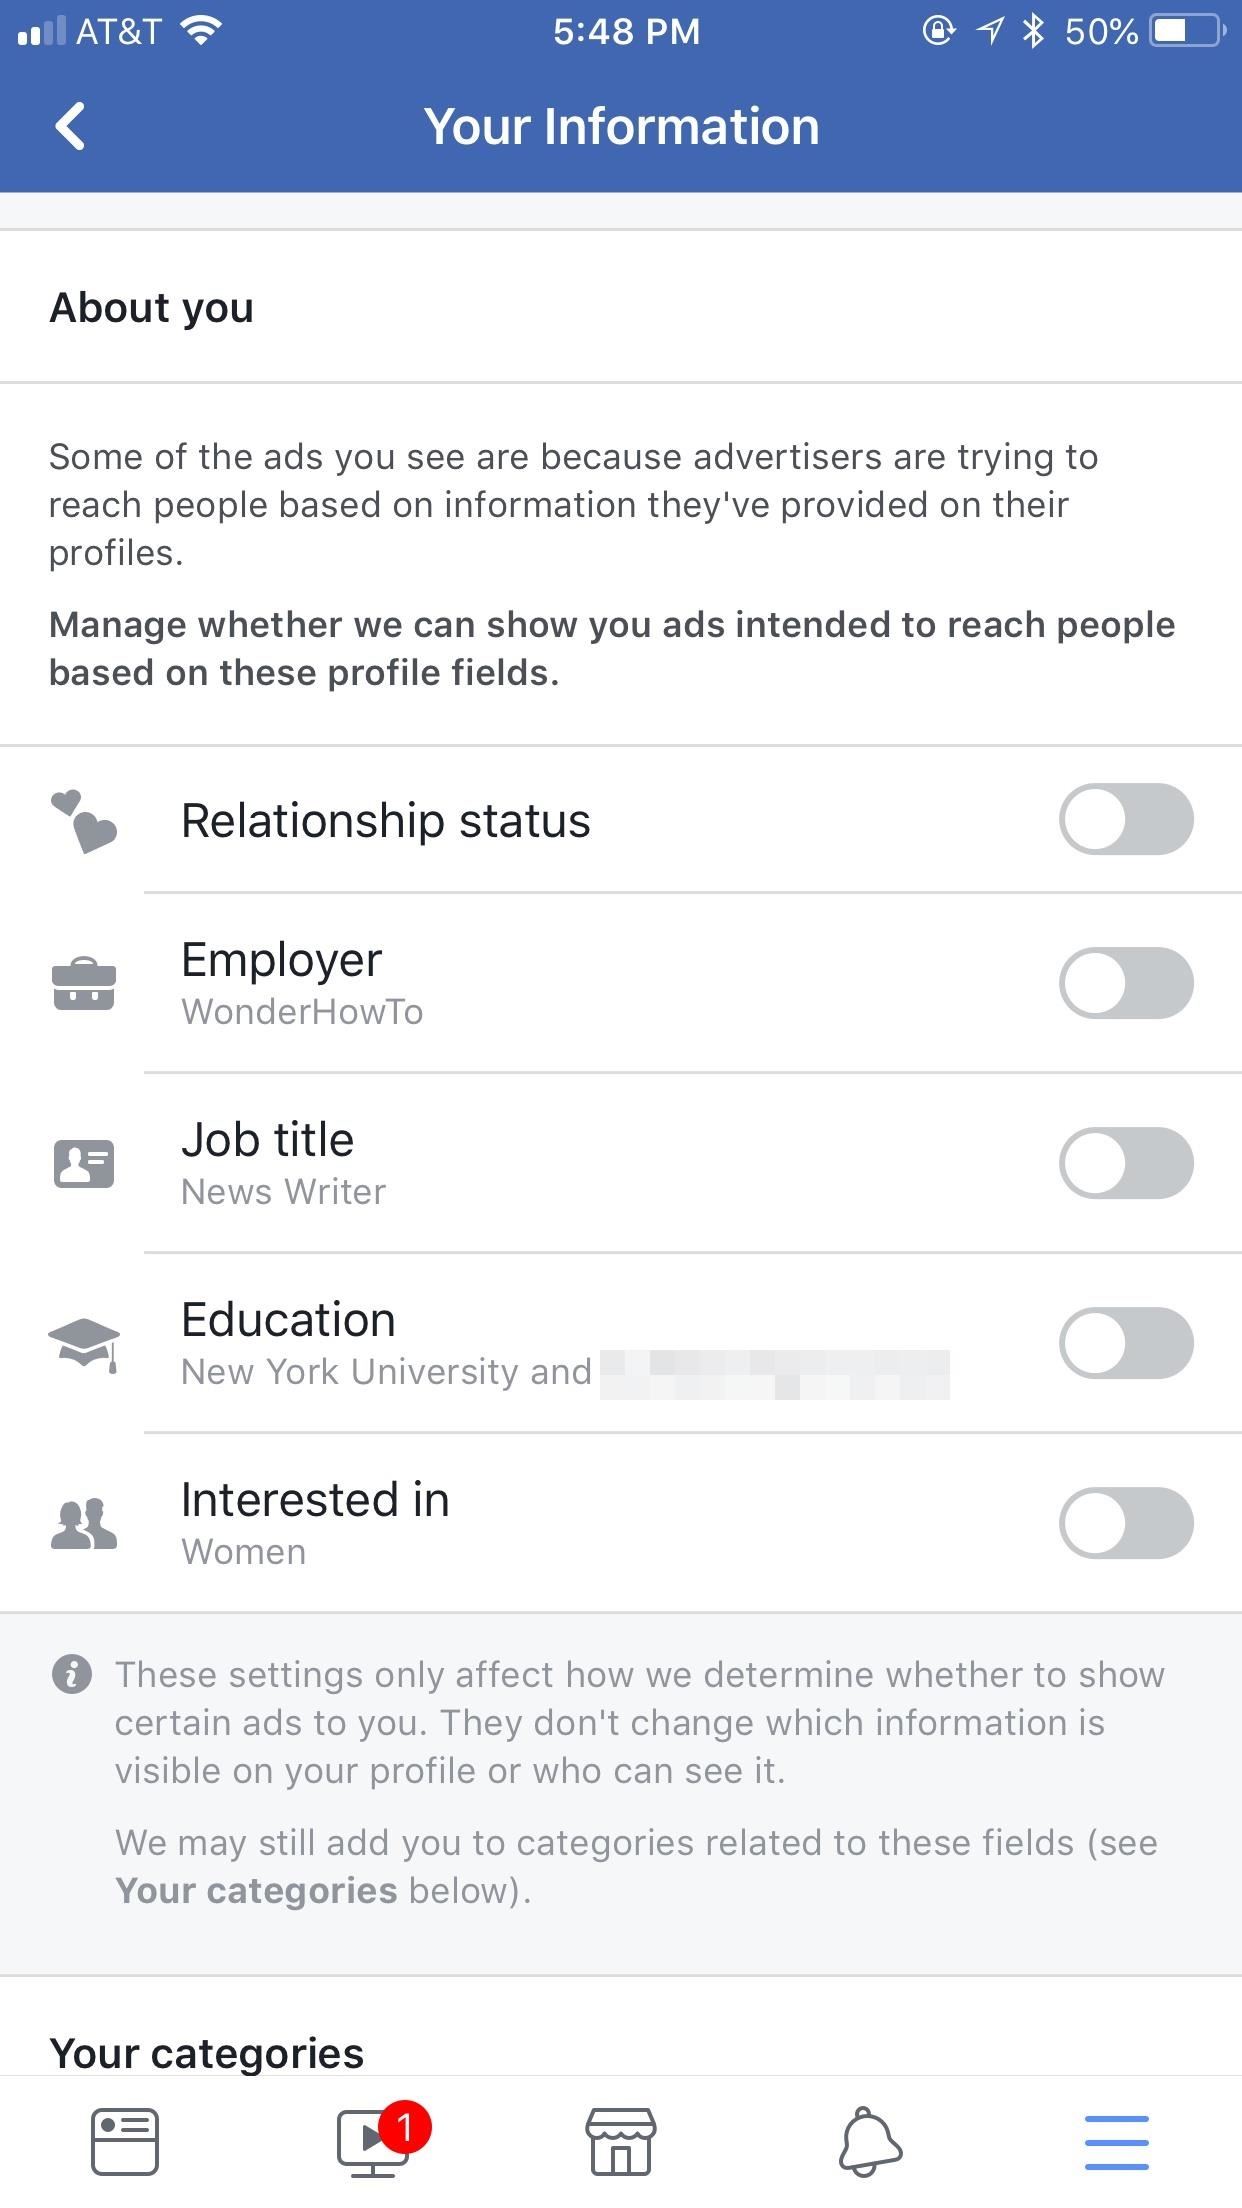
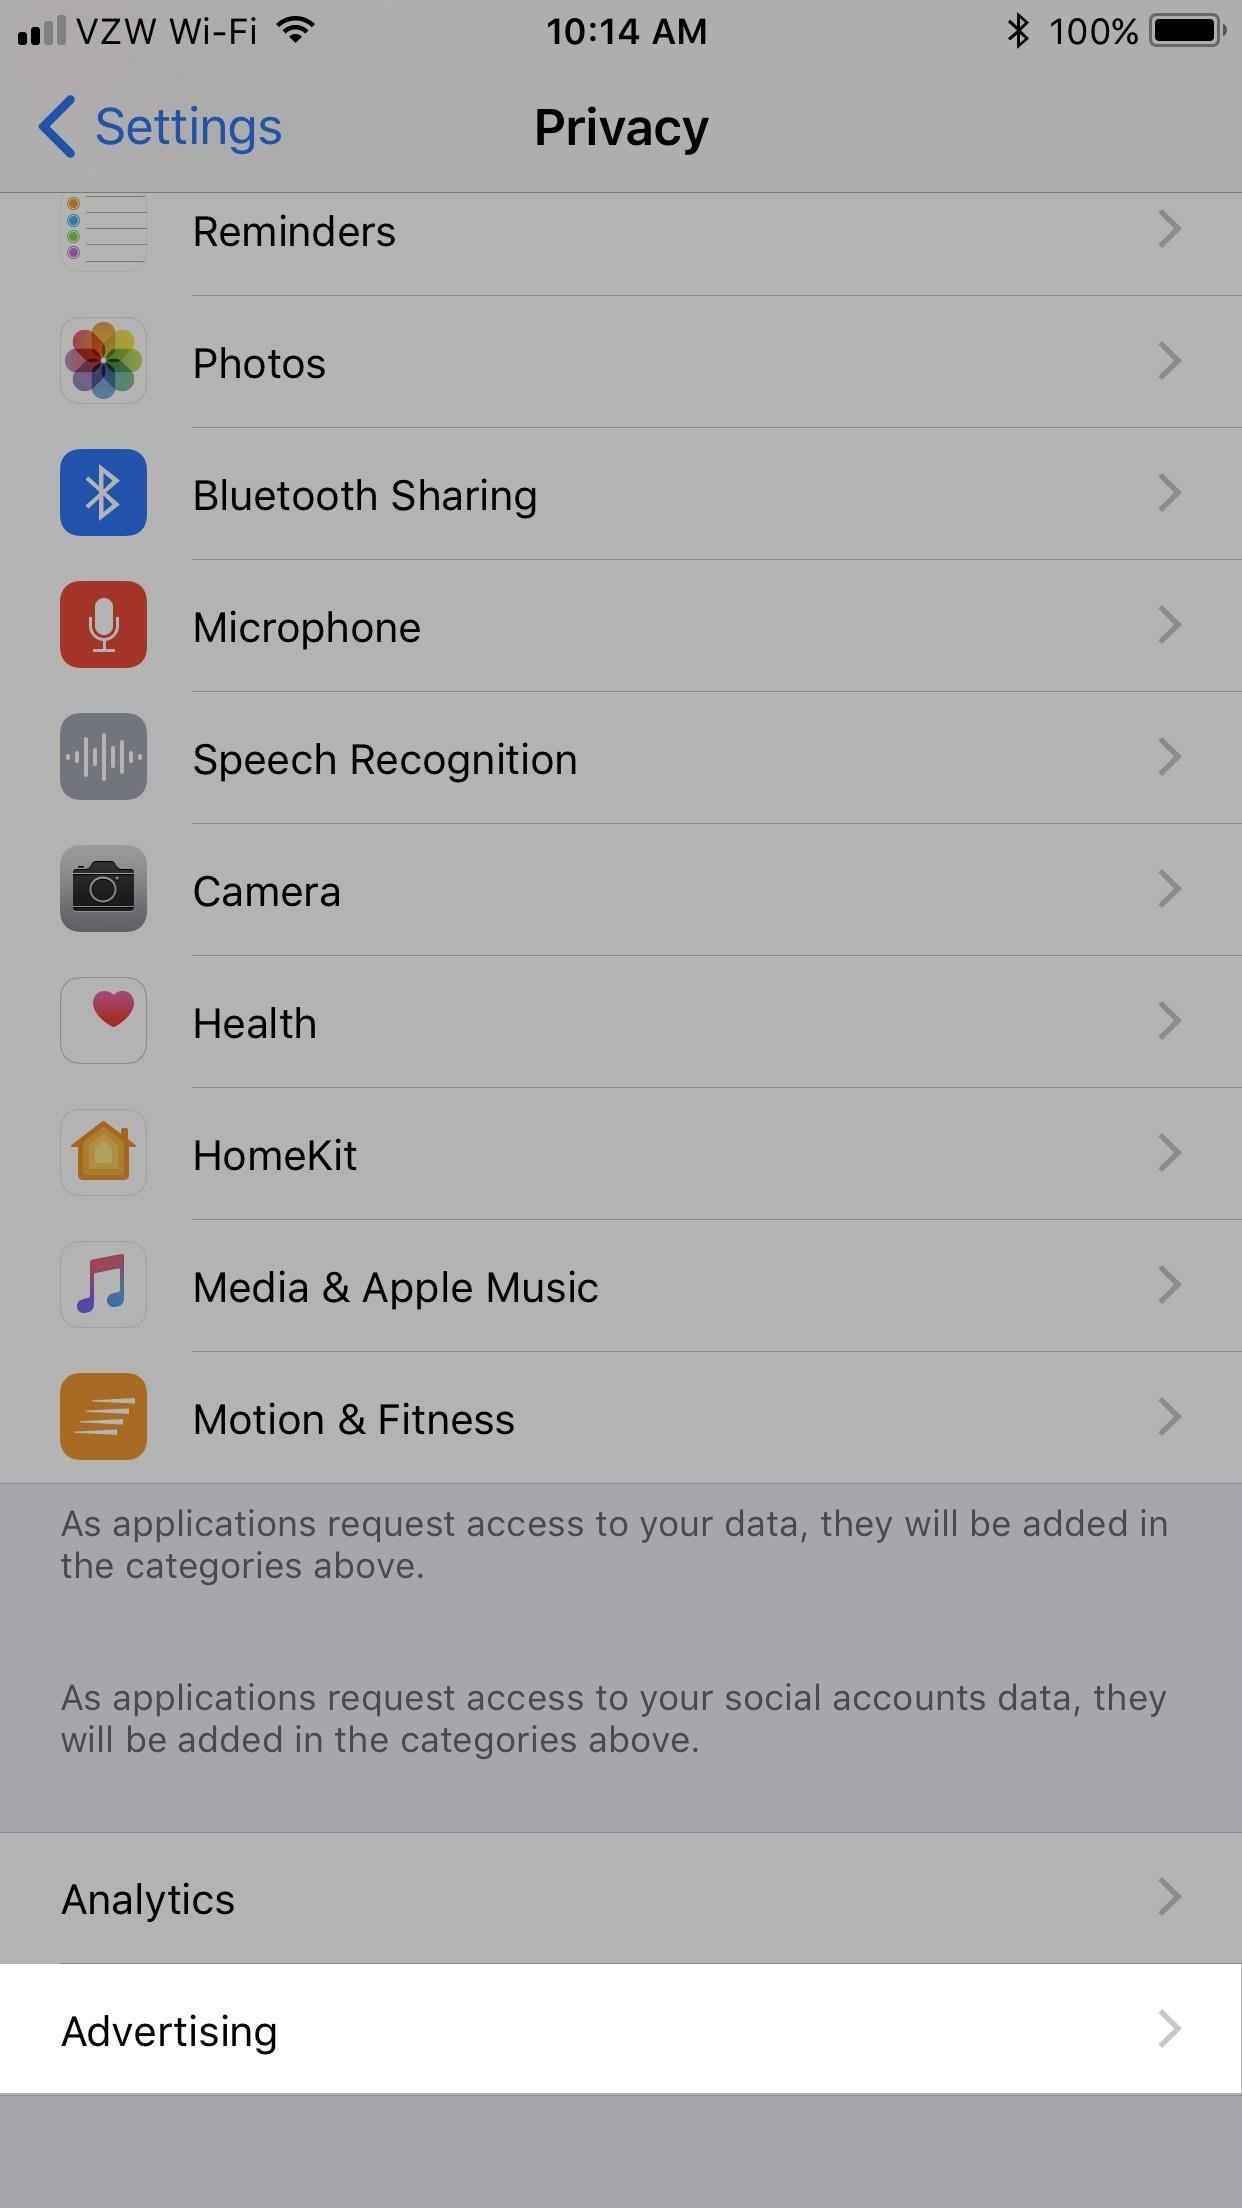
Step 13: Disable Analytics Sharing (Low)When you first set up your iPhone for the first time or after a major update, Apple will ask you if you want to share analytics with them about your usage. According to Apple, none of the data they collect will identify you personally. And personally identifiable information that they do get uses differential privacy to maintain your anonymity. Still, there's something creepy about sharing too much information with anyone.If you enabled this without thinking about it twice, you can see the type of data Apple is collecting in Settings. Go to "Privacy," then select "Analytics" at the very bottom. Next, tap on "Analytics Data" to review what they have collected.If you're okay with Apple using this information, but would rather not share have them sharing this with app developers, just toggle off "Share With App Developers" from the main "Analytics" page. If you'd like to disable it for Apple and everyone else, just toggle off "Share iPhone Analytics" instead. Alternatively, if you don't mind sharing data but want to keep your location locked down, you can go to "Privacy" in Settings, then tap on "Location Services." Next, tap on "System Servies," then disable "iPhone Analytics" here.
Step 14: Disable App Suggestions on the Lock Screen (Low)Have you ever noticed a suggestion to install an app from the bottom of your lock screen? This is based on your current location, so if you're in a Vons grocery store, it may suggest you install the Vons app to locate deals when shopping. This is a relatively harmless iOS feature, but it may creep you out regardless.Also, these are not the only app suggestions that will show up on your lock screen and elsewhere on iOS. Some of them will be for apps you use on a regular basis or at a set time or place, and iOS will try to predict those scenarios and suggest you open those apps to save you time from having to hunt for them manually.To disable all app suggestions on the lock screen and in your "Today View" widget screen, either on your lock screen or home screen, swipe right to open the Today View, then tap on "Edit" at the bottom. On the Add Widgets screen, tap the minus sign next to "Siri App Suggestions" and tap "Remove." Note that this will not disable app suggestions in Spotlight. If you just want to disable location-based app installation suggestions, you can do that in Settings instead. Go to "Privacy," then "Location Services," then "System Services" at the bottom of the page. Here, toggle off "Location-Based Suggestions." (See the next step for screenshots.)However, note that location-based app suggestions are not the only suggestions you will be disabling using this option. Whenever you open Spotlight, use Look Up, or submit a search to Spotlight or Safari, your location will no longer be sent to Apple so they can provide you with better real-time answers. So you may realize you don't want to disable this at all if you find this useful.
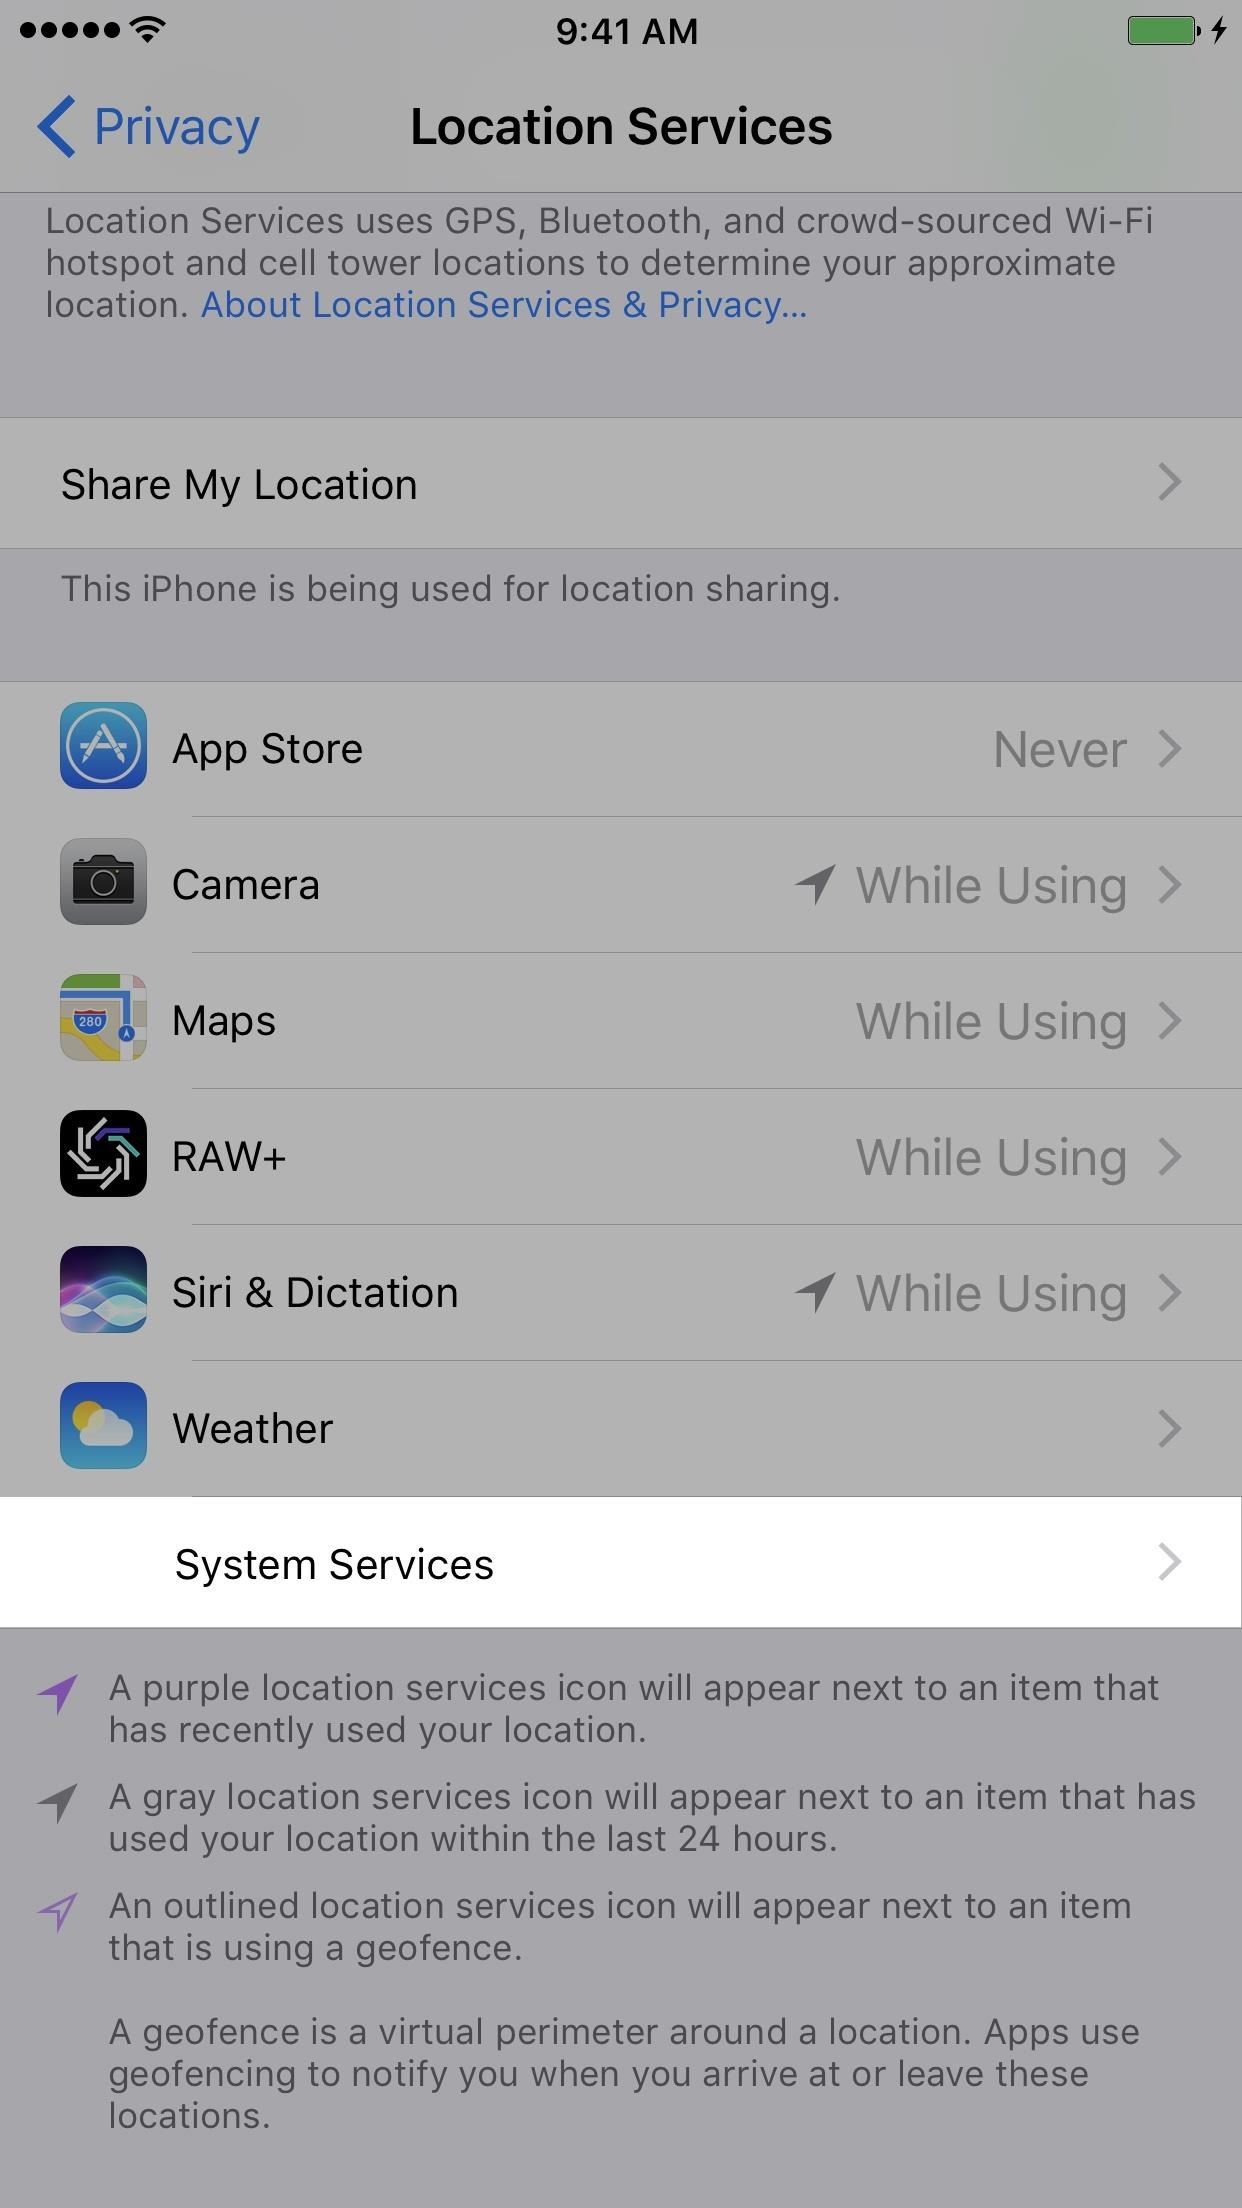
Step 15: Disable Location-Based Alerts & Ads in Settings (Low)You may be served "geographically-relevant alerts" on your iPhone that, for example, will remind you to call someone when you reach a certain location or to leave for an upcoming appointment. This is a relatively harmless setting. Actually, it's quite useful, so I wouldn't recommend turning this off.The one that most of you will want to disable is the feature that gives Apple your current location, including travel speed and direction, to provide you with geographically-relevant advertisements.Open up Settings, then select "Privacy" followed by "Location Services." Next, tap on "System Services" at the bottom of the page, then toggle off "Location-Based Apple Ads." Here, you can also choose to turn off "Location-Based Alerts" and "Location-Based Suggestions," the latter of which was covered in the previous step.
Step 16: Limit Ad Tracking in Settings (Medium)We've already covered this from a third-party perspective in Step 10 when you're using Safari, but Apple also serves up its own personalized advertisements in the iOS App Store and Apple News. Contextual information such as your device info, location, searches, articles read, name, address, age, download history, and other data is used to make these ads more relevant to you. If you don't like the sound of that, you can limit this.On your iPhone, go to Settings and choose "Privacy." Next, select "Advertising" at the bottom, then toggle on "Limit Ad Tracking." This will essentially make your unique identifier null and will opt your Apple ID out across all of your devices, making it impossible for anyone to associate any data with you. This also applies to third-parties who don't use Apple's advertising platform, as they are required to abide by the setting via Apple's guidelines. If you don't mind an occasional personalized ad, you can leave it toggled off, and can instead choose "Reset Advertising Identifier" to get a clean start with advertisers tracking your data online. You can also "View Ad Information" to see the type of information they have been collecting on you.
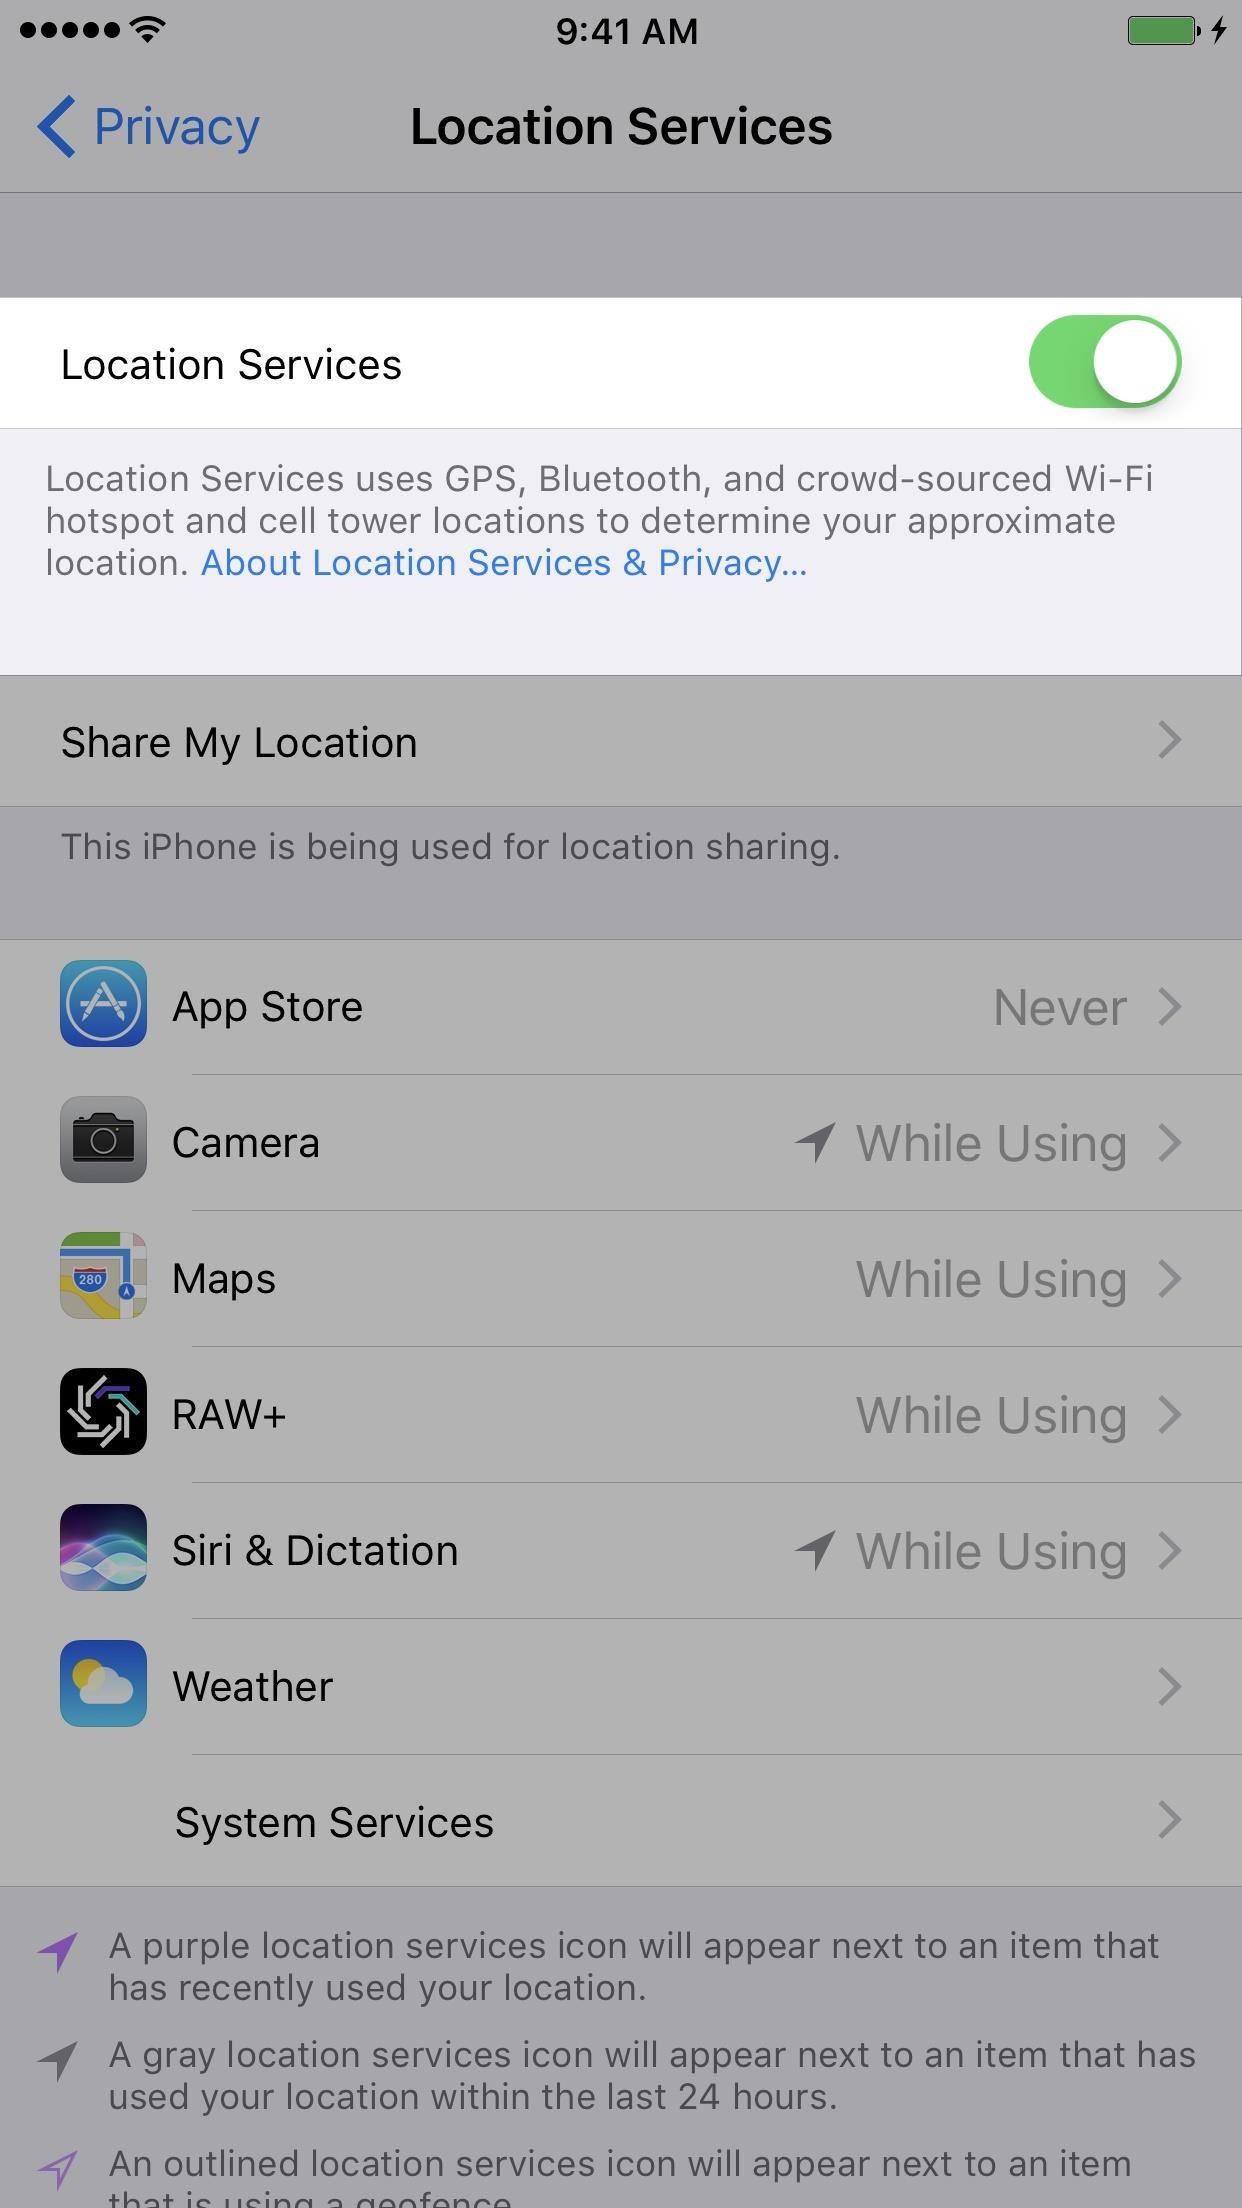
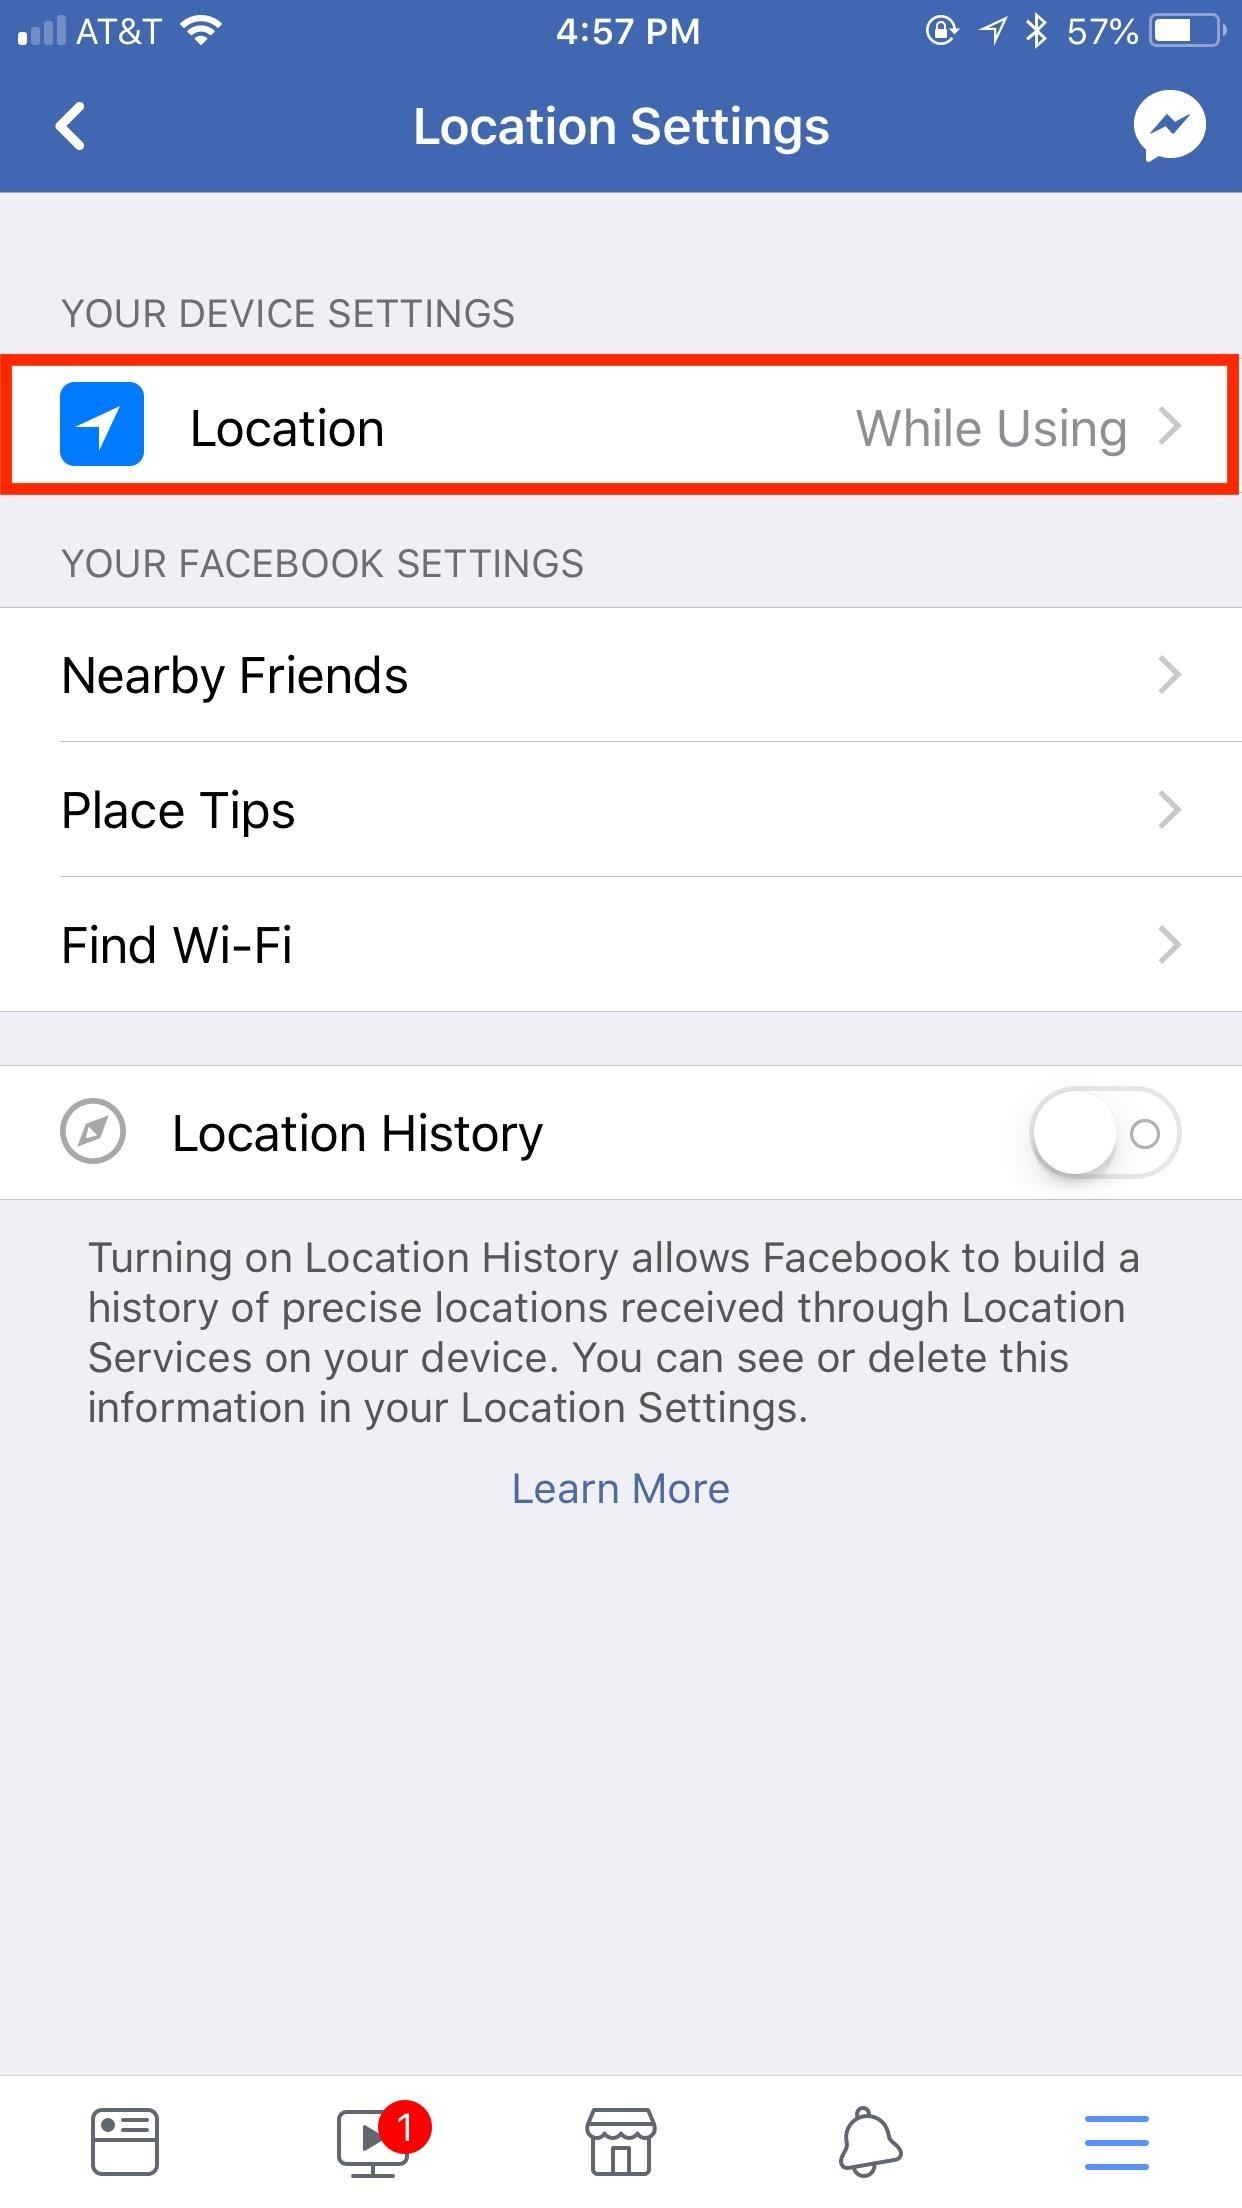
Step 17: Disable or Limit Location Services for Apps (Medium)When you install apps, a lot of them will prompt you to let them use your location when using the app. Some apps, such as map and navigation services, won't work properly without being able to see your location. However, they don't need to see your location when you're not actually using the app. Plus, not every single app on your iPhone needs to actually know your location period. It's an unnecessary battery drain, and who knows what else these apps are doing with your location data.When you want to kill access to your location for every app on your device on a temporary basis, you can toggle on Airplane Mode from your Control Center, or you can go to "Privacy" in Settings, tap on "Location Services," then turn it off device-wide. Like I said before, some apps actually need your location data to function properly, so this is not an ideal option unless you just want to temporarily disable all location data from being collected. Thankfully, you can change location settings for individual apps.From the "Location Services" settings, select each app individually, then switch it based on your usage. For instance, for me, a dictionary app has no excuse to use my location, and a theme park app does not need always-on access. The app maker will provide a description stating how they use your location data, which can help influence your decision.

Step 18: Disable Sharing Your Location (Medium)Apple's Find My Friends has been a stock app on iPhones ever since iOS 9, and you may be sharing your location with friends and family without necessarily knowing it. Worse, it's fairly simple for someone who has access to your iPhone to share your location indefinitely in Find My Friends, making it easy for your people to track you.You can disable this option directly in that app or device-wide in Settings. The latter also will disable location sharing for the Messages app, which lets you share your location in conversation threads.In your "Location Services" settings, tap on "Share My Location," then toggle if off on the next page. Here, you can also select "From" to see other devices connected to your iCloud account. If there are any old devices here, you can swipe left on them to delete them from the list.
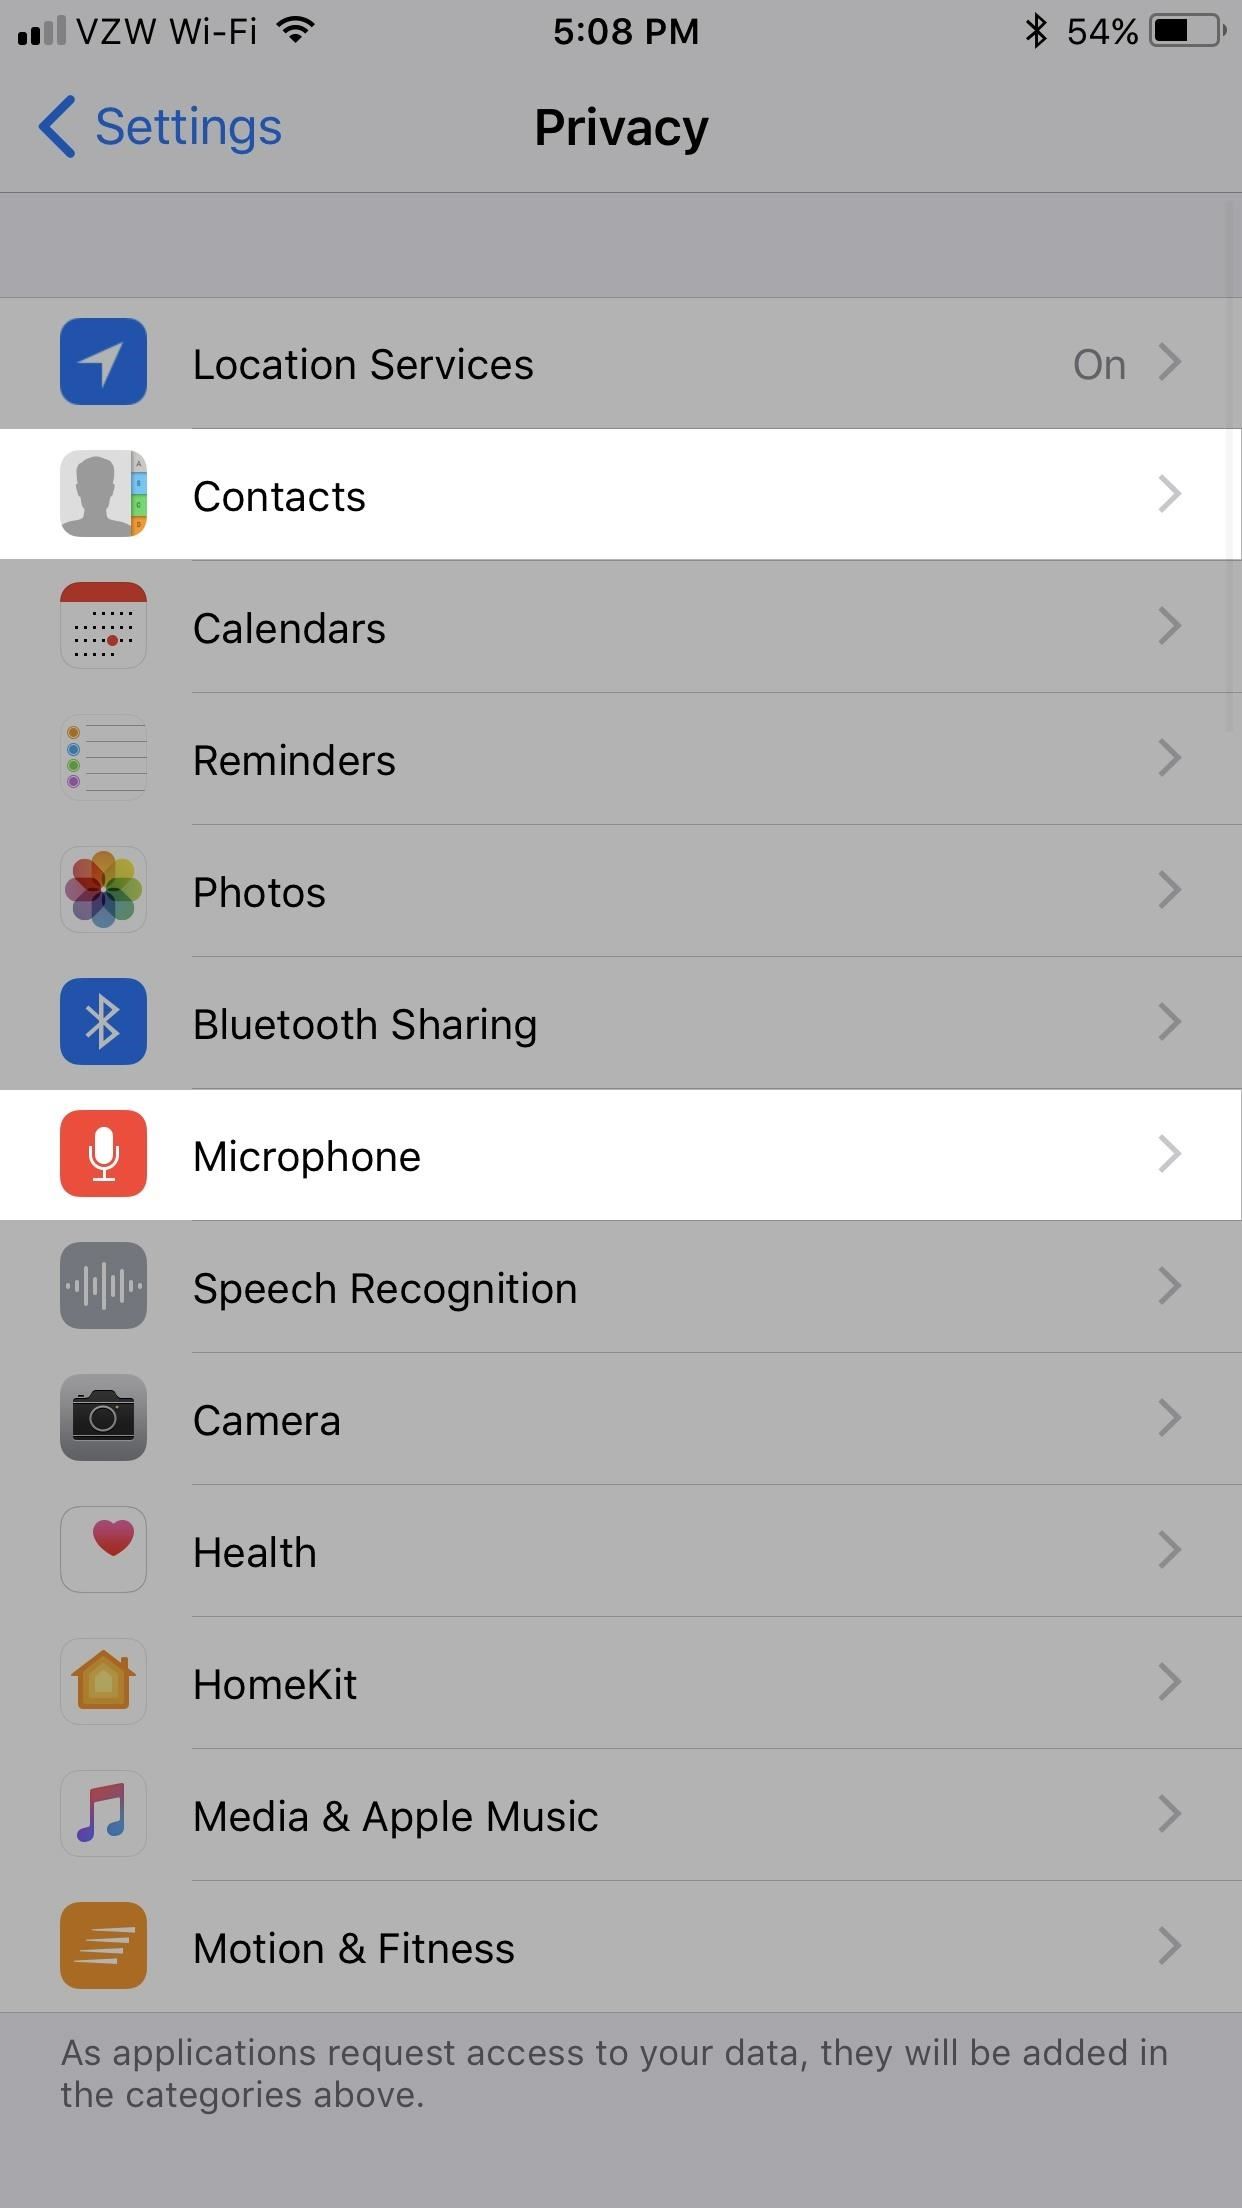
Step 19: Disable Microphone & Contacts Access in Apps (Low)A lot of apps will want access to your microphone in order to function properly, and they will ask for permission when they first need it. For instance, any app where you can shoot video will want mic access, such as Instagram, Facebook, and Snapchat; and voice-activated assistants like Alexa and Google Assistant will obviously need your mic.However, occasionally, an app that has no reason accessing your mic will ask for access and you might grant it without really paying attention. Apple is pretty good at keeping malicious apps out of the iOS App Store, but some apps that have asked for microphone access in the past that don't really need it include Google Maps, USA Today, and Waze, among others.You can check and disable microphone apps for all of your apps by going to "Privacy" in Settings, and then selecting "Microphone." Here, you can toggle off any that you think don't need it anymore. Likewise, you can go back into "Contacts" on the Privacy settings and prevent certain apps from looking at your list of contacts, if they don't need to.
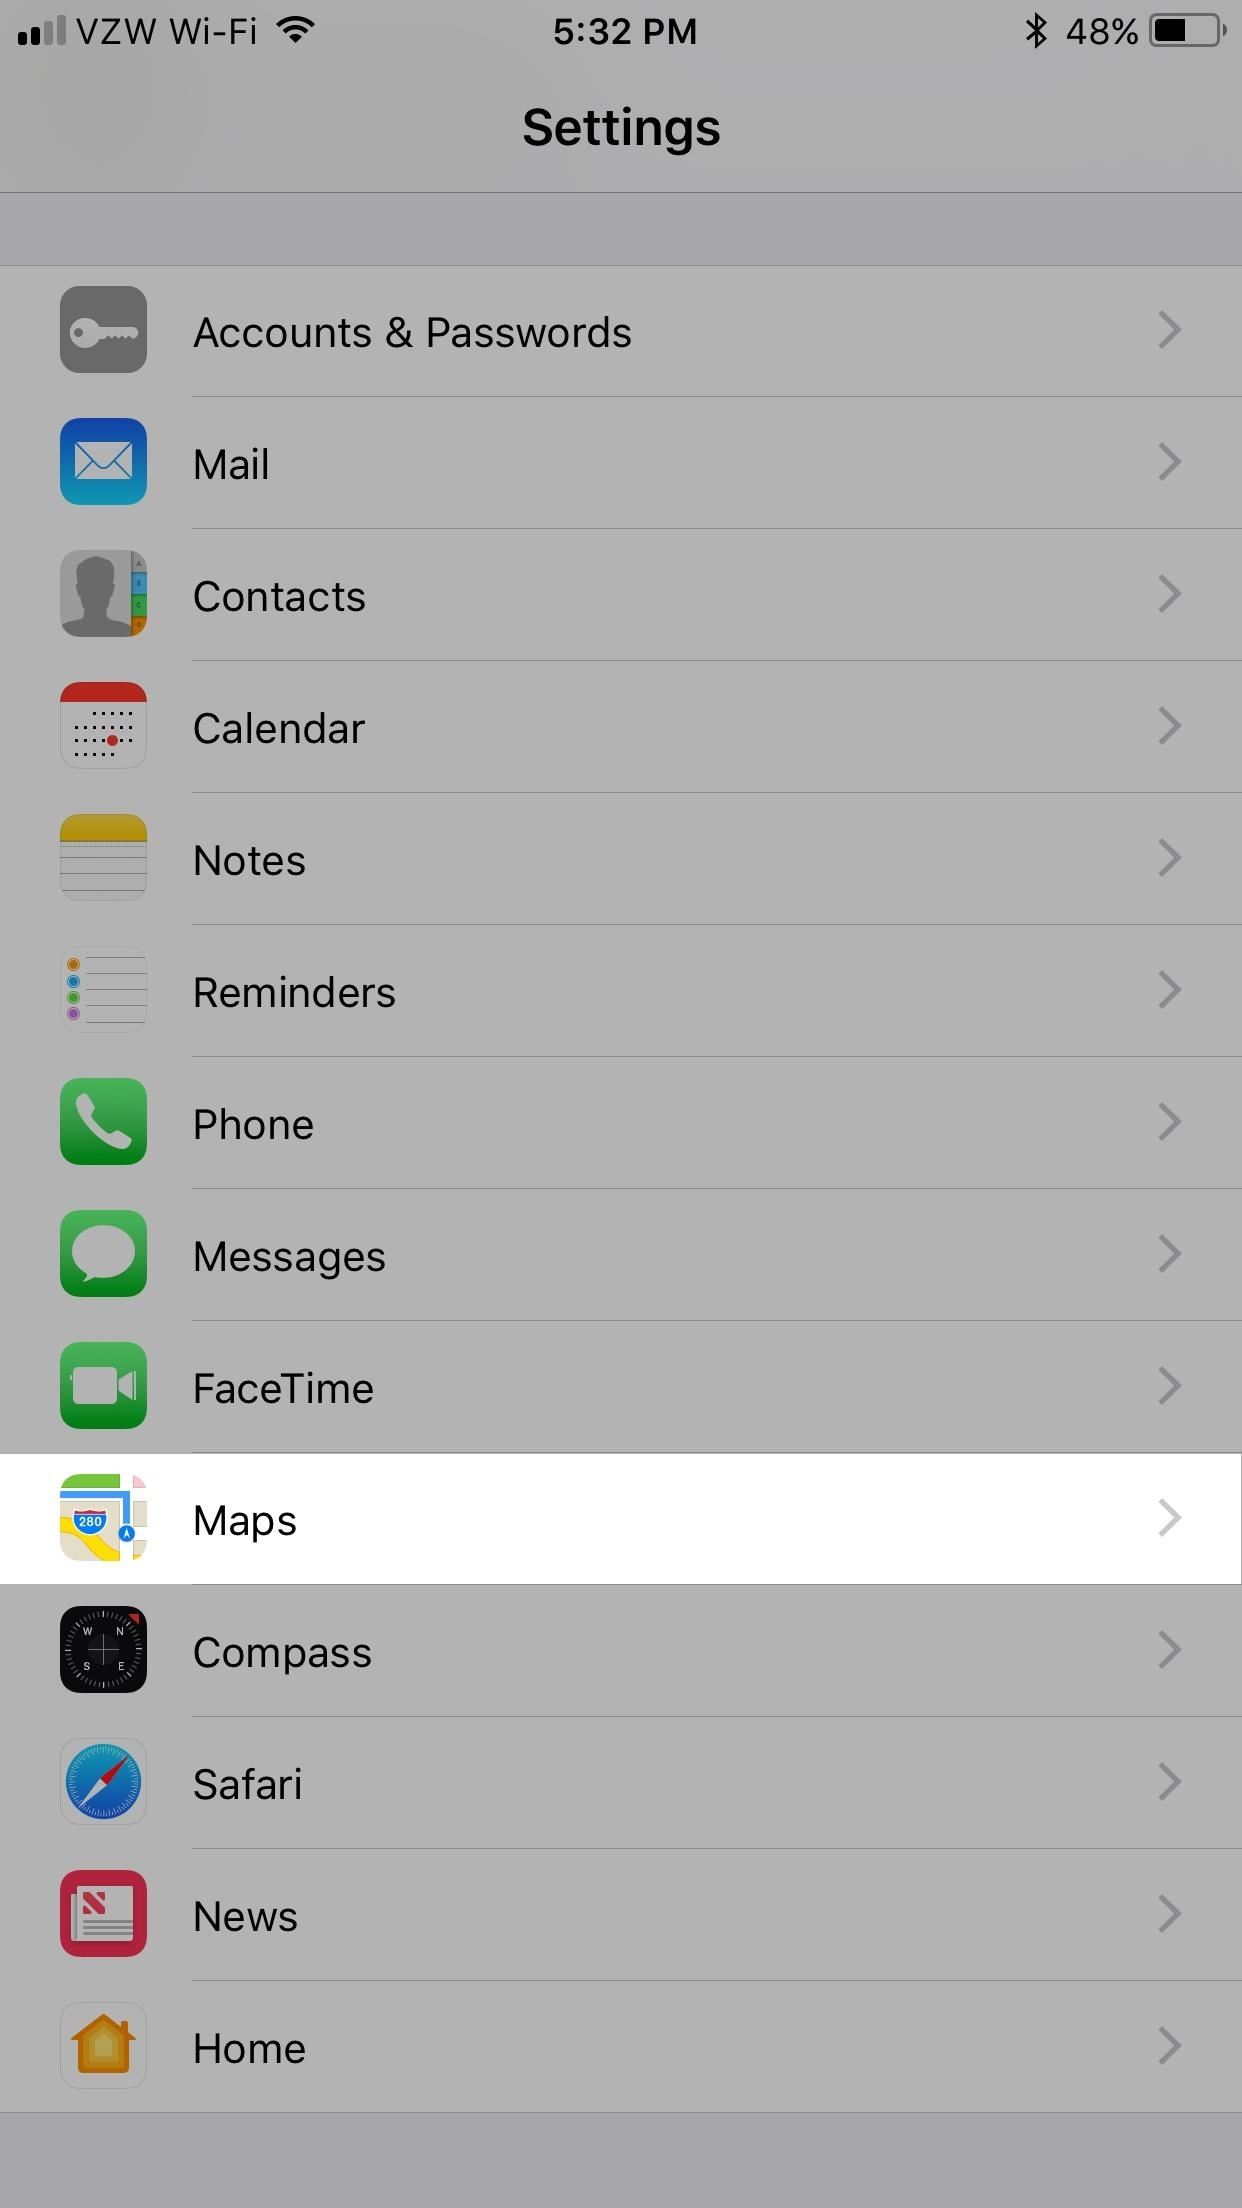
Step 20: Disable Show Parked Location in Maps (Low)Now, this is a really handy feature if you can never find your car in a parking lot, but it's also a great feature for thieves. Say you keep your iPhone in your purse without a passcode and the bag gets stolen. The thief not only gets your purse and iPhone, but they can ultimately find your car too and take off with it if your keys are also in the bag. Yes, it's a stretch, but worse things have happened.Even if your iPhone is locked, your car's location may appear in the Maps widget on your lock screen, unless you disabled that. So, to disable this, head to "Maps" in Settings, then toggle off "Showed Parked Location." That's all there is to this one.
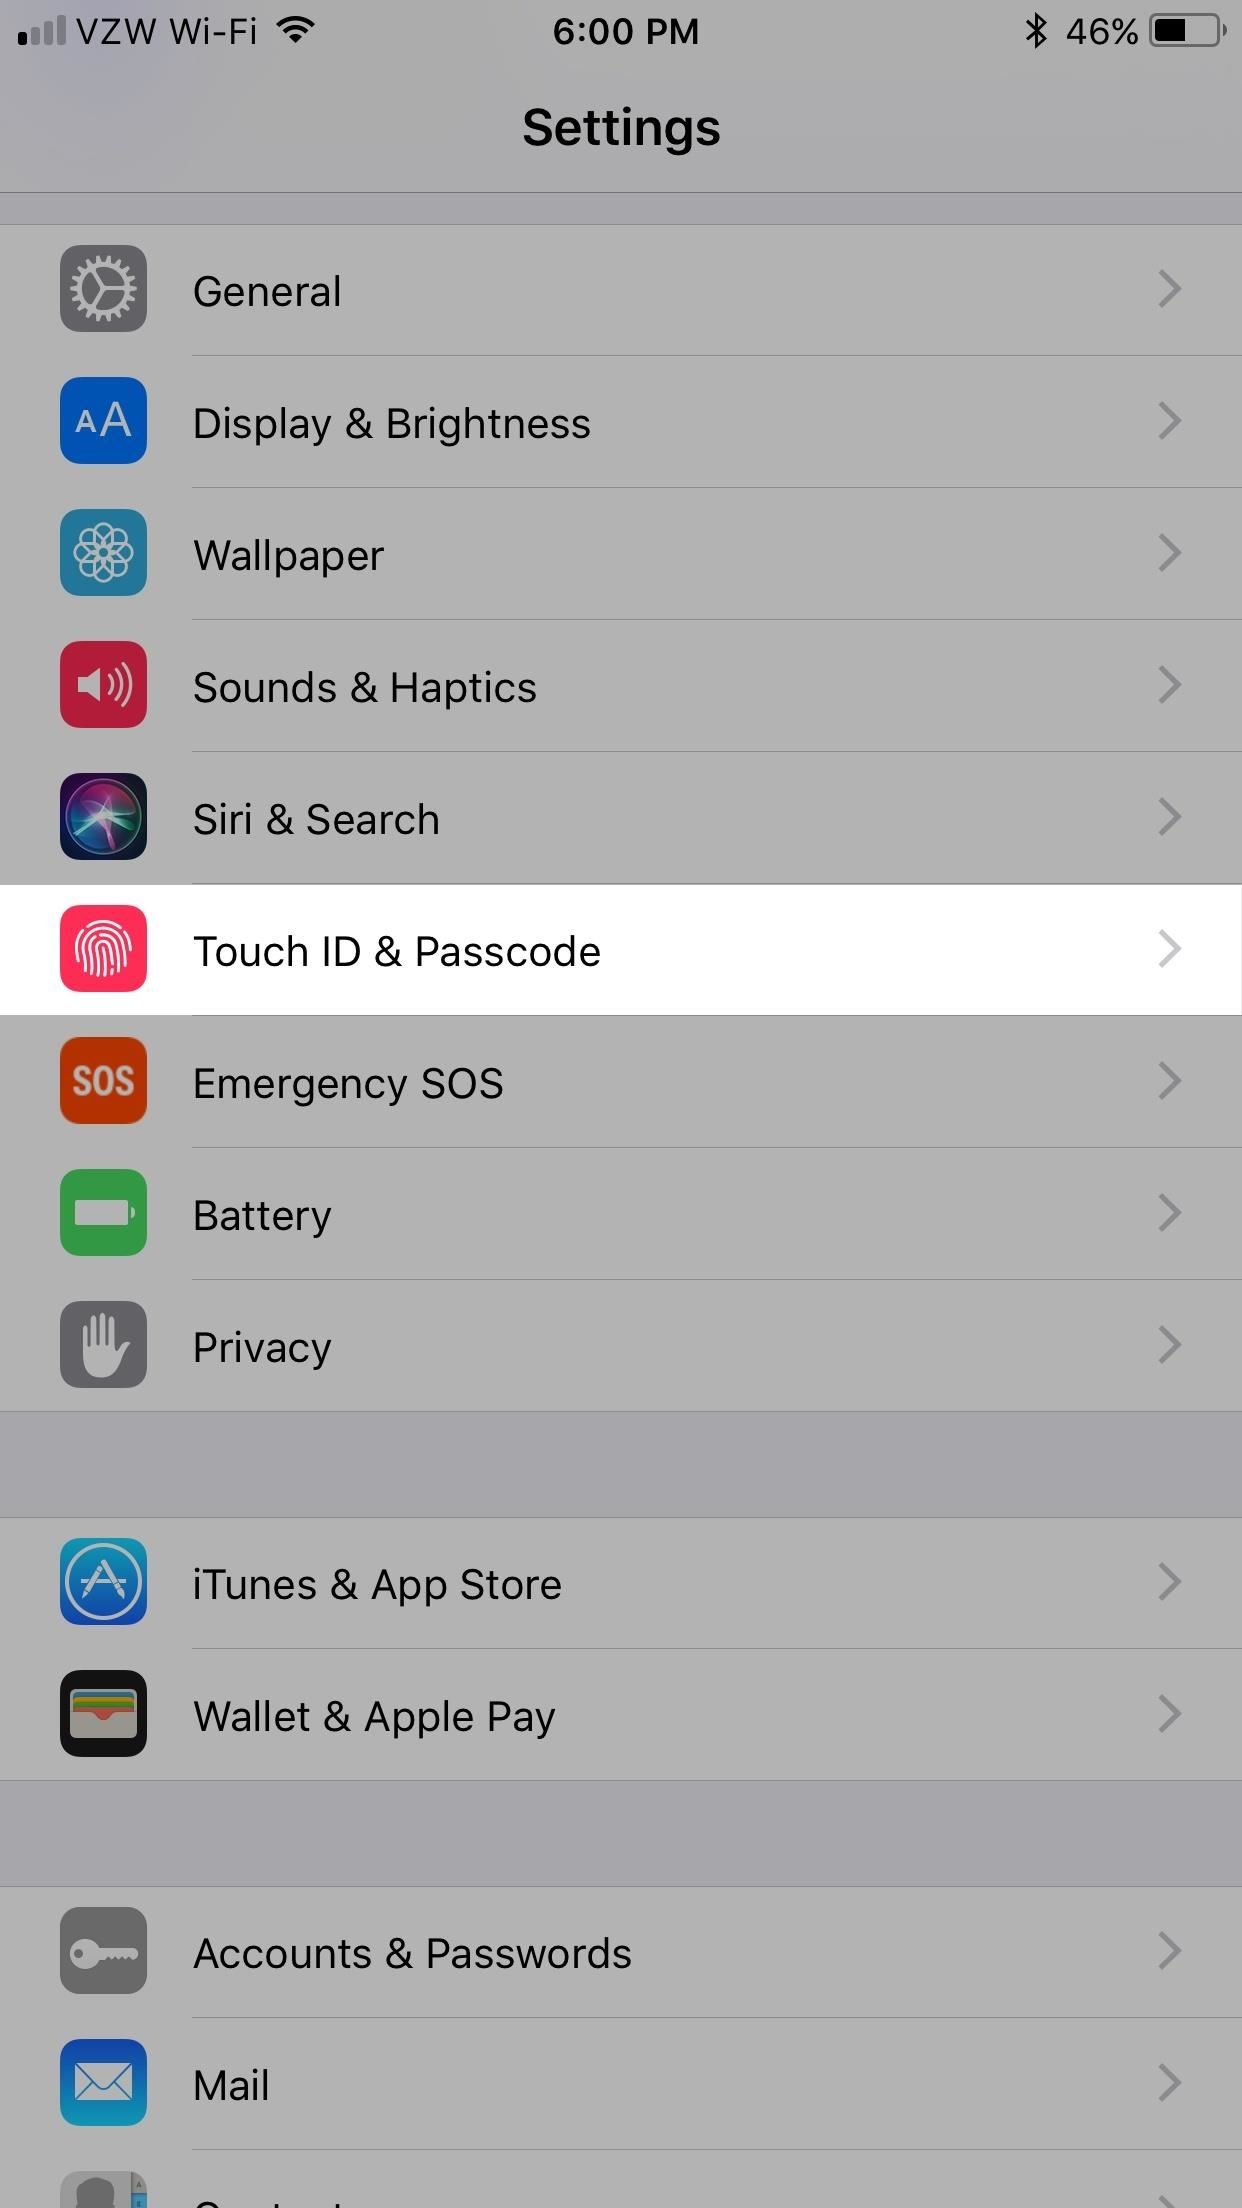
Step 21: Disable Touch ID (High)Yes, you heard that right. While I don't think I could ever live without the convenience of using my fingerprint to unlock my iPhone or access certain settings and app features, there is always a risk that someone could hack the fingerprint file stored on the device. A passcode you can change, but a fingerprint you can't replace.Don't Miss: Why Fingerprints & Other Biometric Security Measures Aren't as Secure as You'd ThinkPlus, people (including law enforcement) can physically force you to put your finger on the Touch ID sensor to unlock the device, and it's even possible that someone could use your severed fingertip. A gory idea, but not impossible.There are, of course, security benefits for using Touch ID, such as bystanders not being able to peer over your shoulder to see the digits you're inputting for your passcode. So you just have to decide which is the better risk — using a replaceable passcode or a fingerprint you're stuck with for life.You can disable your Touch ID in "Touch ID & Passcode" in Settings. Here, swipe right to left on each fingerprint listed and tap "Delete." Do this for each one. After you've got them all, all of the items under Use Touch ID For will be deactivated. Then just make sure to set a really strong passcode.
How Secure Is Your iPhone?While this list has covered everything you might want to disable or limit on your iPhone, this is not the definitive guide to securing your iPhone and increasing privacy. Some options, like location-based services for "Routing & Traffic" and "Popular Near Me," are relatively harmless and useful as crowd-sourced anonymous information that benefits everyone.There are more proactive steps you can take, such as browsing in Private Mode, enabling the "Fake Website Warning" and "Prevent Cross-Site Tracking" (iOS 11 only) Safari settings, making sure to clear your "Recently Deleted" photos album, clearing trusted computers, enabling "Find My iPhone," preventing Calendar from adding events automatically, and much, much more.Don't Miss: All of the Coolest New iOS 11 Features You Didn't Know AboutFollow Gadget Hacks on Facebook, Twitter, Google+, YouTube, and Instagram Follow WonderHowTo on Facebook, Twitter, Pinterest, and Google+
Cover photo and screenshots by Justin Meyers/Gadget Hacks
Thanks to Android Pie's gesture controls, features like split screen mode now take several additional steps to activate. This change is due to the revamped navigation bar which removed the recents apps button. Luckily, we can still change it back. With some tinkering in Settings and the help of an
On 's To Pie Screen Back Split How Oreo Android Simpler Mode
comohacercrecerminegocio.com/16/On-'s-To-Pie-Screen-Back-Split-How-Oreo-Android-Simpler-Mode-Get-BHw1Atz/hj/
Screen Pie Get How To Android On Simpler 's Mode Oreo Split Back Well, not quite secret, said Pierre Carpenter, chief of licensing for Minnesota. He said he has no doubt Gallian was told the information was secret, but after Department of Public Safety officials discussed the matter this week, they decided that the codes behind the license
's Mode Oreo How Pie On Screen Back Simpler Android Get To
Due to its constant delays and lack of public invites, the OnePlus One is the equivalent of a unicorn in the Android community. I was lucky enough to win an invite in the OnePlus Storm of Invites promotion and have loved every minute with my new Nexus Killer since receiving it.
Instal Custom Recovery & ROM Baru di Samsung Galaxy S4
Phones iOS 13: Every new feature iPhone you need to know about now. Learn about the new software Apple will deliver to your iPhone this fall.
Mindfulness App Aura for Sale on Android « Gadget Hacks
Do you ever want to take a trip down memory lane and view the Instagram posts you've liked in the past? Did you know the Instagram application allows you to do just that? Our guide will show you
How to See Photos You've Liked on Instagram - OS X Daily
osxdaily.com/2017/04/08/see-photos-liked-instagram/
We're focusing on the Instagram app for iPhone here, but this likely works the same on Instagram for Android too, and if you have Instagram on your iPad it will be the same. How to See All Pictures You Have Liked on Instagram. This works to see all images and posts you have liked on Instagram
How to See Posts You've Liked on Instagram: 5 Steps
How to Beat Cut the Rope : Ultimate Stars Guide for iPad, iPhone & iPod Touch If you've played the addicting game Angry Birds on your iPhone, chances are you've heard of a newer game called Cut the Rope.
How to Measure and cut a rope « Climbing :: WonderHowTo
If there is no audio or sound when playing YouTube videos online, refer Google YouTube support No sound on videos to have your problem solved. If you have no audio in YouTube video playback on iPad/iPhone/iPod touch, try to mute and unmute with the button on the side of iPad/iPhone/iPod touch.
How to download audio from any streaming video | PCWorld
How To: Make a remote control work with just one battery How To: Program a Comcast remote How To: Disassemble your iPhone 4 and remove the internal components How To: Make an IR detection device and measure temperature w/ quenched phosphors
How to Convert temperature measured in Celsius to Fahrenheit
How to Send email attachments above the size limit - Internet
How to Clear Cookies and Cache in Firefox. Web browsers have a cache to store information such as images from the sites you visit. By caching content on your browser, web pages load faster.
How to Delete browser cookies In Mozilla Firefox « Internet
So really, backing up the EFS partition is probably one of the first things you should do immediately after rooting your Galaxy S6. But existing EFS backup solutions aren't necessarily compatible with the Galaxy S6, so the trouble becomes where to find an app that will do the trick.
Unknown Baseband, No IMEI, No EFS Backup « Samsung Galaxy S3
You can locate your device if: Find My iPhone is set up on the iOS device or Mac you want to locate. Apple Watch is paired with an iPhone. The iOS device, Apple Watch, or Mac is online. AirPods are out of their case and near one of your iOS devices. Any of your iOS devices can find the AirPods, but they must be paired with at least one of your
Cell Phone Location Track Sold Direct - eBay | Fantastic prices on Cell Phone Location Track
AD
Well, if you own an Android device, all you need is SwatchMatic to be installed on it. This free app has the capacity to instantly identify virtually any color that comes within the sights of the viewfinder of your device's camera.
Paint Color Matching App: ColorSnap - Your Sherwin-Williams
Users feel good while setting up a new Android device. But we also know that your data is sensitive so there would be one thing that would bother you is how to transfer data from Android to Android with using Bluetooth. Don't worry here's an easy way which would help you out to transfer all the data safely by simply using Bluetooth.
How to Move Files From One Cloud Storage Service to Another
How To: Automatically Mute Media Playback When You Put Your Android in Priority Mode News: The OnePlus 6T — a Few Additions and 1 Major Subtraction News: People Are Pissed About the Lava Red OnePlus 5T October 30: The OnePlus 6T — What's Rumored & What We're Hoping For
How to Mute or Pause Music on Your HTC One by Just Waving